Registering a Node in the Management System#
In this version, it is required to register the node through a Python command line tool before you can use it in the Management System. The command line tool will be executed locally on the Nerve Device.
During the registration process there are two key parts happening: First, the node is configured. This means that the serial number is assigned and its secure ID is generated according to its serial number. The login credentials for local UI, host and RT VM access are also set. Second, the node is registered in the Management System with its serial number and secure ID so that the node can log in when communication is needed. For that, an existing admin user in the Management System is required. The admin user admin@nerve.cloud is defined by default.
Note
The files have been sent as part of the delivery. If you have not received the required files for the registration of a node, please contact your sales representative or TTTech Industrial customer support at support@tttech-industrial.com.
Hardware Setup#
In order to connect the node to the Management System, you will need to set up the Nerve Device and connect your local workstation to the Nerve Device:
- Please set up your Nerve Device as described in the device guide.
- Connect your workstation to the physical port associated with host access.
Note
Please refer to the device guide for details on host access with your Nerve Device.
With this, the hardware is ready for the node registration process.
Note
Port 443 (HTTPS) and port 8883 (MQTTS) of the corporate firewall have to be open for communication between nodes and the Management System.
Copying the Tool to the Nerve Device#
As the dependencies for the command line tool are already installed on the Nerve Devices, you only need to copy it to the Nerve Device and execute it from there. To do so, you will need an SSH client and a file transfer client. PuTTY and WinSCP are used as examples.
Note
The screenshots below use the MFN 100 as an example. Please refer to the device guide for the appropriate information on your Nerve Device.
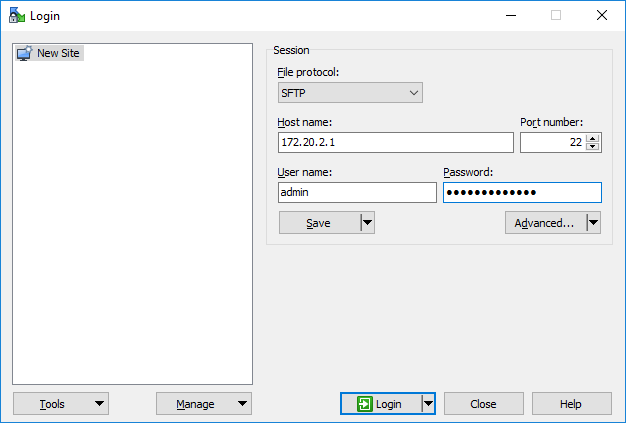
- Open a file transfer client like WinSCP.
- Enter the host IP address of your Nerve Device under Host Name.
-
Enter the credentials for host access to the Nerve Device below under User name and Password.
-
Copy the
nerve-onboard.pyto the Nerve Device. The default path is/home/admin/on the Nerve Device.
With the command line tool now copied to the Nerve Device, you can execute the command line tool locally on the Nerve Device. We will use an SSH connection to do so.
Using the Tool#
Now that all preparations are complete, you can execute the command line tool and start the registration of the node in the Management System.
Note
In the instructions below it is assumed that the default admin user is available in the Management System.
If you have already created new users and the default admin user is not available anymore, please add the cloud user parameter to the command and specify the user that will be used instead to log in to the Management System: python3 nerve-onboard.py --cloud-user <username> <domain> <serial>
- Open an SSH client like PuTTY.
-
Enter the host IP address of your Nerve Device under Host Name (or IP address).

-
Click Open.
- Log in with the credentials for host access of the Nerve Device.
-
Enter
python3 nerve-onboard.py <domain> <serial>and replace the placeholders with this information:Item Description <domain> This is the URL of your cloud. Please enter the URL without the protocol in the beginning. You can find it in the customer profile.
Example:example.nerve.cloud<serial> Enter the serial number of your Nerve Device here. You can find it on the label of the Nerve Device. Note
Depending on your Nerve Device, the command line tool might extend the serial number to 12 characters. Please make sure to take note of that after registering a Nerve Device.
-
Enter the following information in the table. The command line tool will prompt you one by one:
Item Description New LocalUI password Define the new password for the local UI of your Nerve Device. New RT VM password Define the new password for the CODESYS runtime. New system password Define the new password for SSH host access. Cloud password Enter the password of your cloud access. 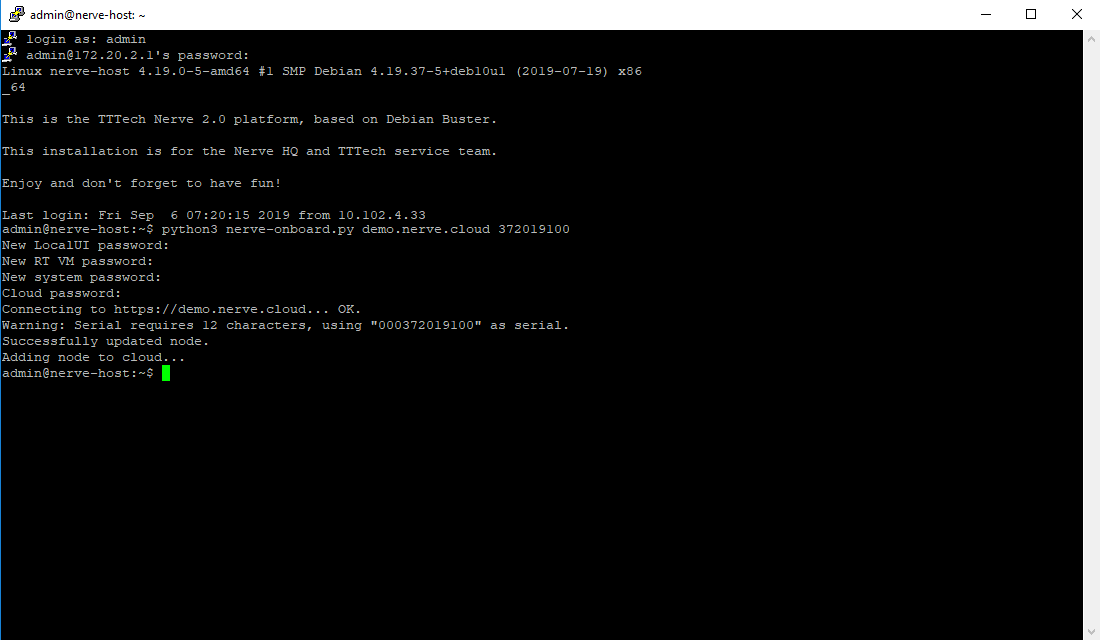
Note
The passwords above must be at least 8 characters long.
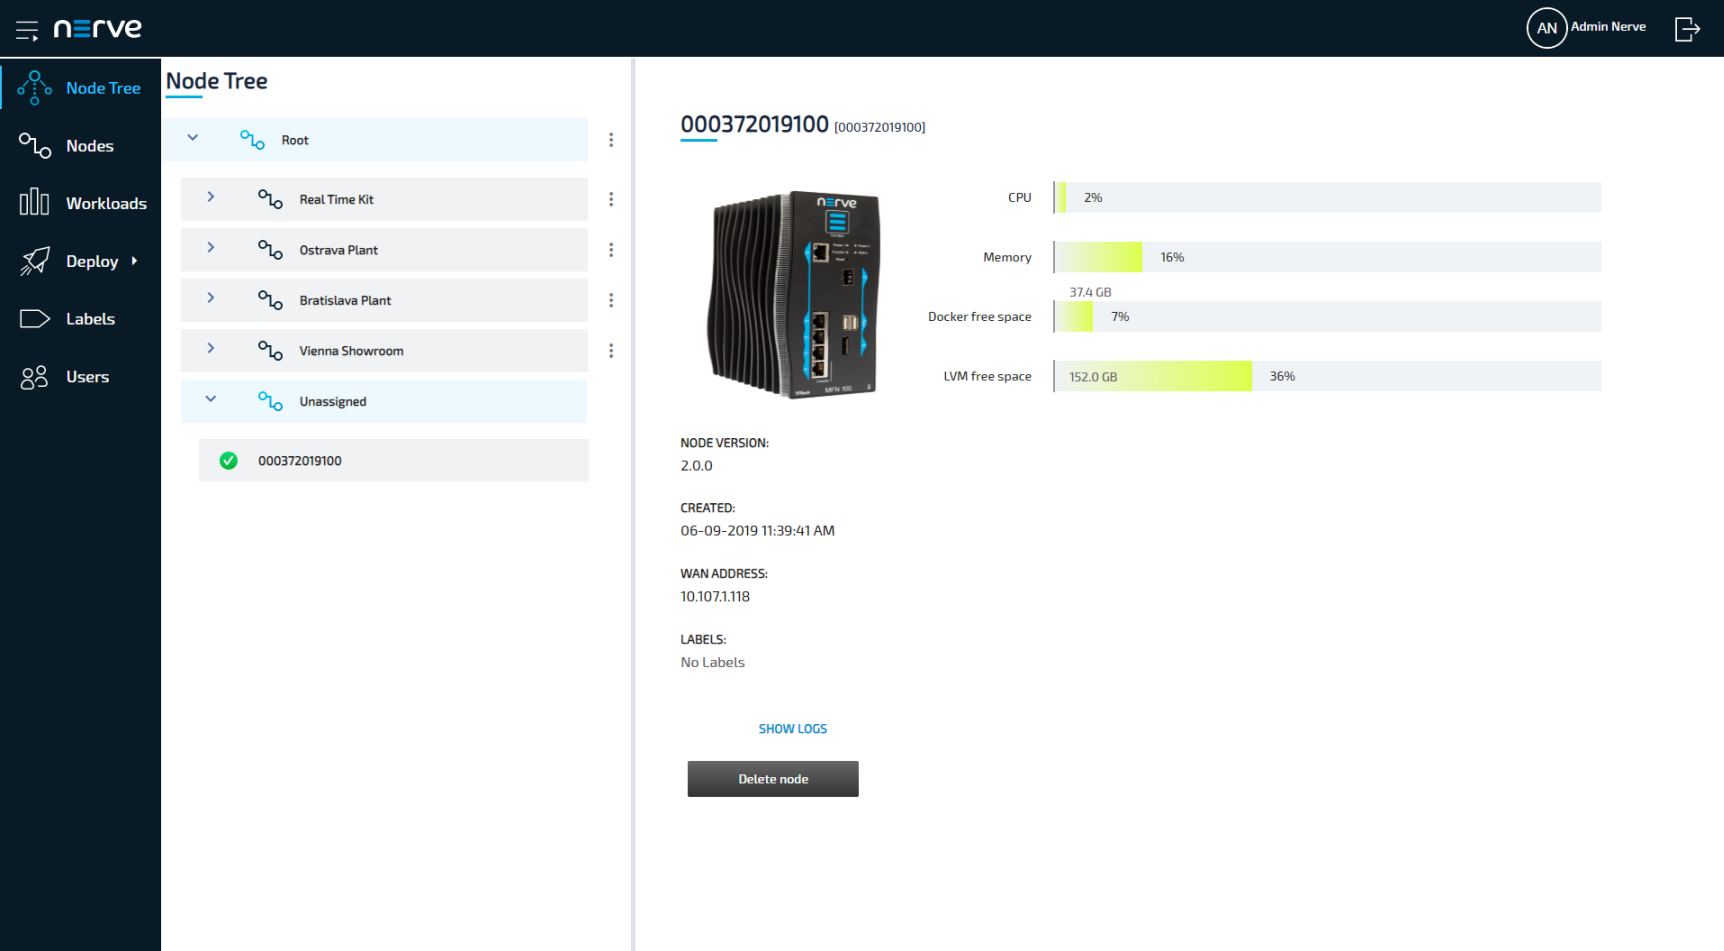
The node is now online and registered in the Management System. You can find it under Root > Unassigned in the Node Tree.
Note
Please make sure to note down the new passwords you have defined as you will need them later.
Using the Tool Locally#
Since the dependencies for this tool are installed on the Nerve Device, the preferred method is to use the command line tool on the Nerve Device. However, the tool can still be executed locally if you prefer.
The tool needs Python 3 and Requests. Please download and install Python 3 on your workstation and follow the instructions on the Requests homepage to install Requests. On Debian and Ubuntu, enter apt-get install python3 python3-requests to install all dependencies.
Navigate to the folder where nerve-onboard.py is located on your workstation and open a command line. After that, the steps for using the tool are identical to the steps above. Follow the steps above starting from step 5 to register a node successfully.
Command Line Interface Parameters#
The command line tool offers many optional command line interface parameters. To see the list of parameters, enter python nerve-onboard.py -h. As described above, the command line tool will prompt you to define new passwords for the local UI, the CODESYS runtime and host access if no parameters are given. It will also ask for the password for Management System access. For the other parameters, the default values are used if they are not defined. The default parameters are given in the table below where applicable.
| Item | Description |
|---|---|
| Usage | nerve-onboard.py [-h] [-v] [--mfn-ip IP] [--mfn-port <port>] [--user <username>] [--password <password>] [--current-rtvm-pwd <password>] [--new-rtvm-pwd <password>] [--new-system-pwd <password>] [--new-log-dest URL] [--new-localui-pwd <password>] [--cloud-user <username>] [--cloud-pwd <password>] [--name <nodename>] [--version <nodeversion>] [--label <labelkey>] <domain> <serial> |
| Positional arguments | <domain>This is the URL of your cloud. Please enter the URL without the protocol in the beginning. You can find it in the customer profile. Example: example.nerve.cloud<serial>Enter the serial number of your Nerve Device here. You can find it on the label of the Nerve Device. |
| Optional arguments | -h or --helpUse this argument to show the help message in the command line. -v or --verboseAdd this argument to show verbose output, giving detailed information during the registration process. |
| Node connection arguments | The following arguments are defined for connection to the node.--mfn-ip <ipaddress>This argument defines the IP address of the MFN 100. The default IP address is 172.20.2.1. --mfn-port <port>Define the port through which the local UI of the Nerve Device can be reached. The default port is 3000. --user <username>Enter the user for local UI login here. The default user is local@nerve.cloud.--password <password>Enter the current password for local UI login. The default is Passw0rd.--current-rtvm-pwd <password>Enter the current password to the CODESYS runtime here. The default password is lab123. |
| New configuration | The arguments here are used to define new passwords and paths.--new-rtvm-pwd <password>Define the new password for the CODESYS runtime. If this information is not given, you will be prompted by the command line tool. --new-system-pwd <password>Define the new password for SSH login to the host. If this information is not given, you will be prompted by the command line tool. --new-log-dest <url>Define the path for the elasticsearch log destination. The default path is <domain>:443/filebeat_app/.Please note that logging should be available in the Management System by default. --new-localui-pwd <password>Define the new password for local UI login. If this information is not given, you will be prompted by the command line tool. |
| Cloud connection | The following arguments are used for connecting to the cloud. The username and password here are also used for the web interface.--cloud-user <username>Enter the username to connect to the cloud. The default user is admin@nerve.cloud.--cloud-pwd <password>Enter the password to connect to the cloud. If this information is not given, you will be prompted by the command line tool. |
| Node details | You can configure the details for how this node will appear in the cloud. The information defined here can be configured in the Management System as well after node registration was successful.--name <nodename>This is the name of the node that will be displayed in the Management System. The default name is the serial number of the node. --version <nodeversion>Define a node version. The default node version is 2.0.0. --label <key> <value>Add a label to the node. Define a key for the label which function as the "category" of the label (e.g. MachineNumber) and a corresponding value (e.g. 1). This can be given multiple times to add multiple labels. However, please note that a node can only be assigned one label per label key. Label keys must consist of one word only. |