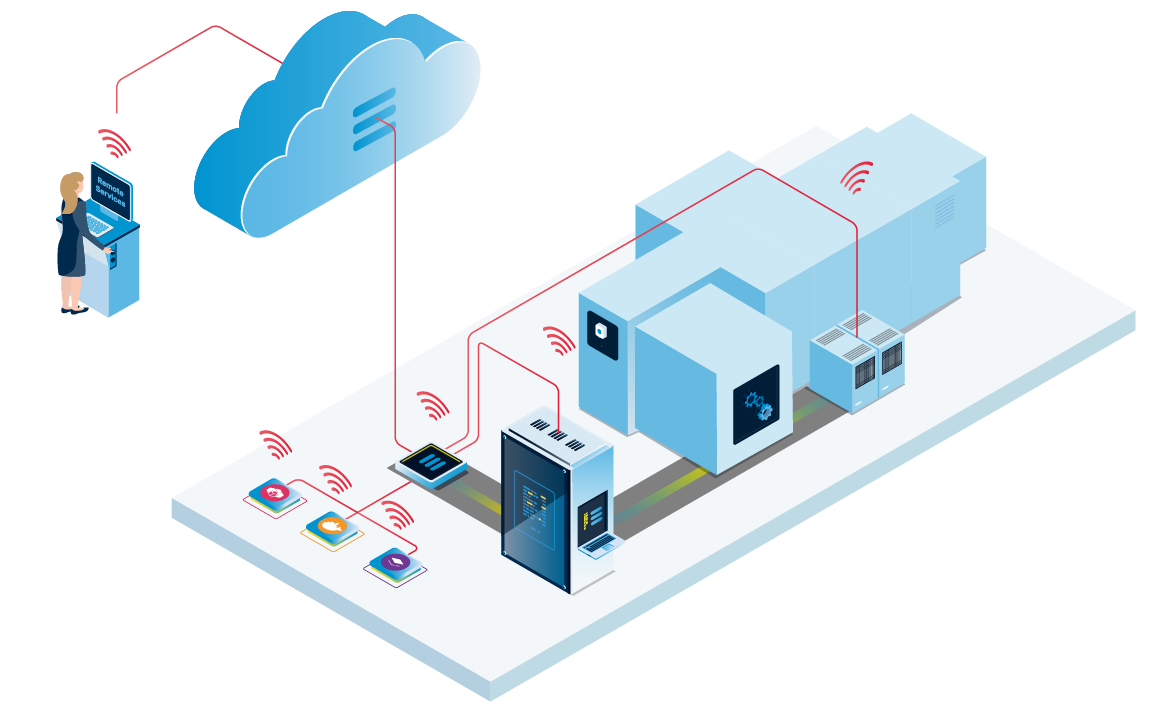
Remote connections
Remote connections are a fully integrated feature of Nerve. They are carried out in two ways: remote screens and remote tunnels.
- Remote screens are connections that are established between the Management System and a target. They are visualized by the Management System in a new browser tab and support SSH, RDP and VNC protocols.
- Remote tunnels are connections that are established from the local workstation to a target, similar to a VPN connection. They allow access to services and servers on the target from the user's local workstation. Remote tunnels are managed and established in the Nerve Connection Manager application and the Management System. The locally opened connection endpoint can then be used in a web browser, with SSH clients, or with remote desktop applications, depending on the target.
The targets of these remote connections can be nodes, workloads or external devices, which can be accessed from the node through the network.
Remote connections to workloads can be defined in existing workloads. Note that a workload does not have to be deployed again if a remote connection has been added. Defining a remote connection to a workload adds the remote connection to the workload across the Management System, meaning that it will also be available if the workload has already been deployed to nodes.
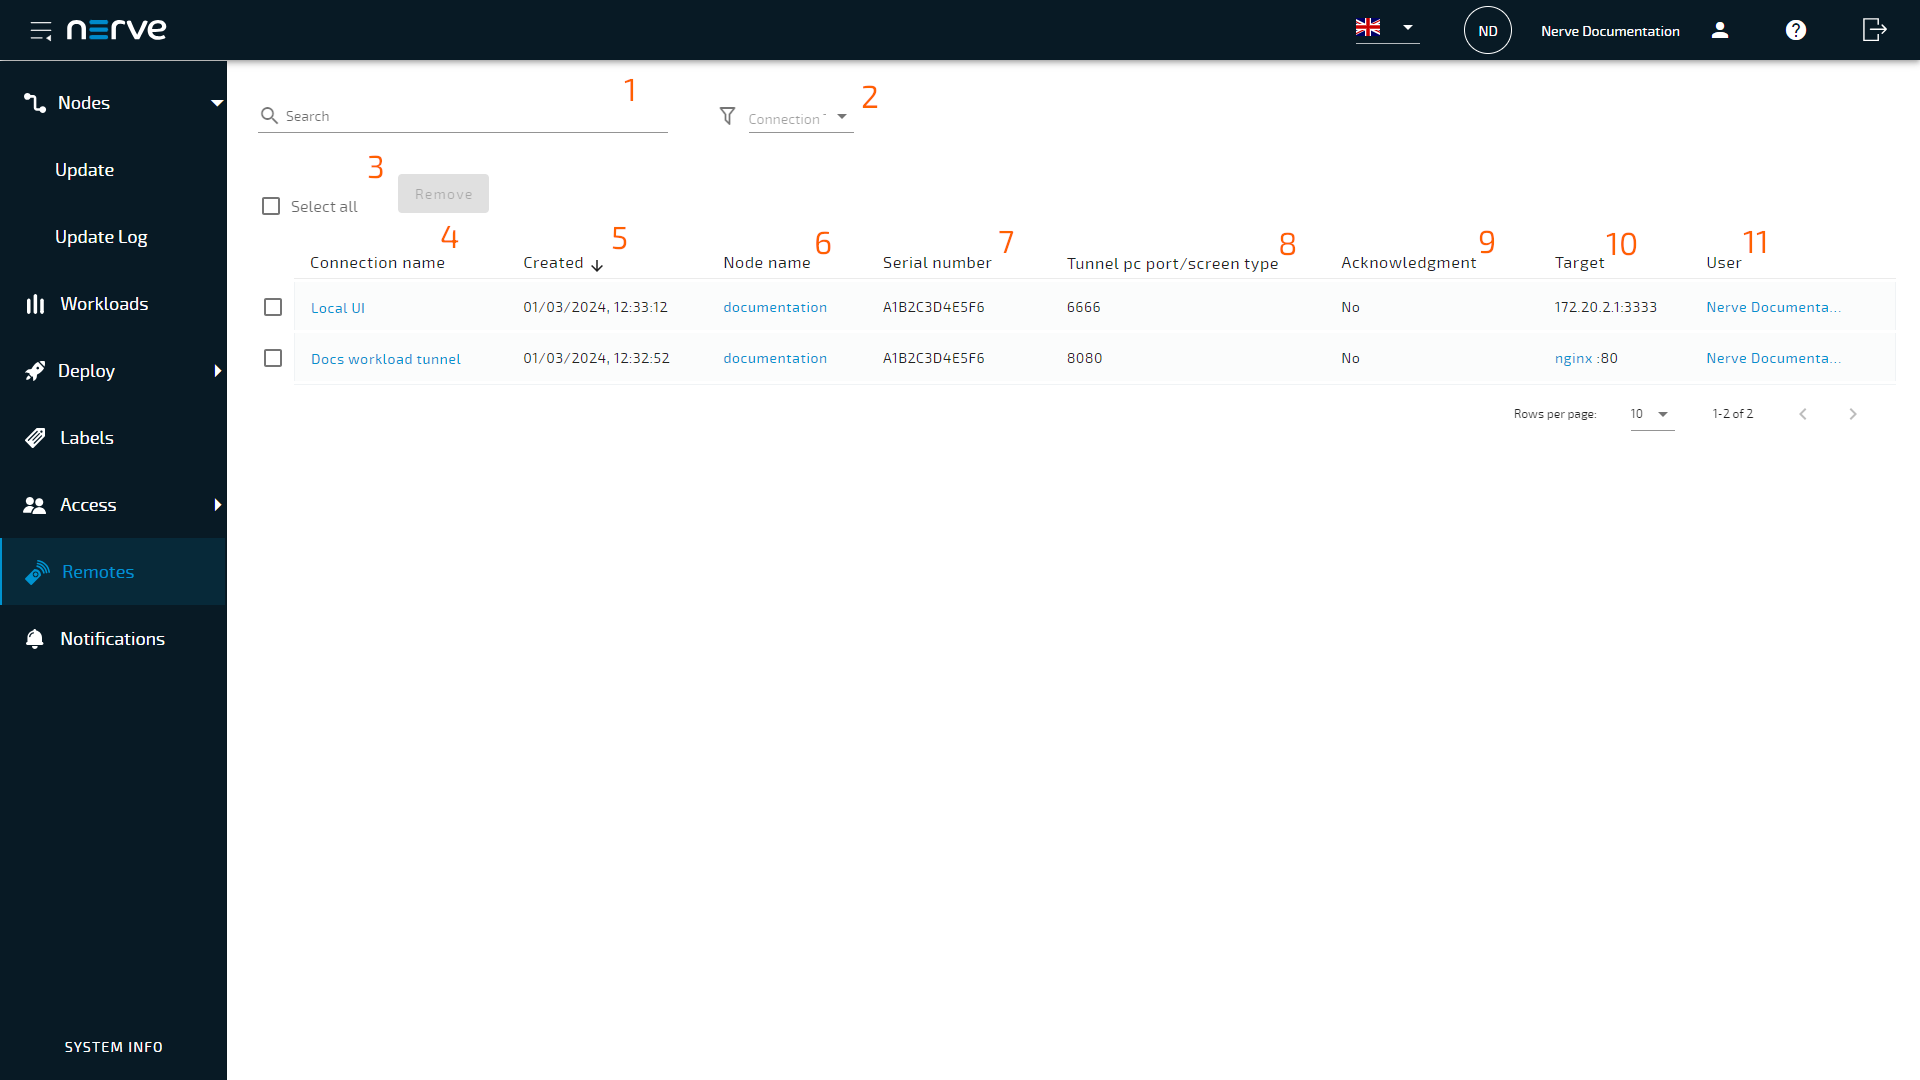
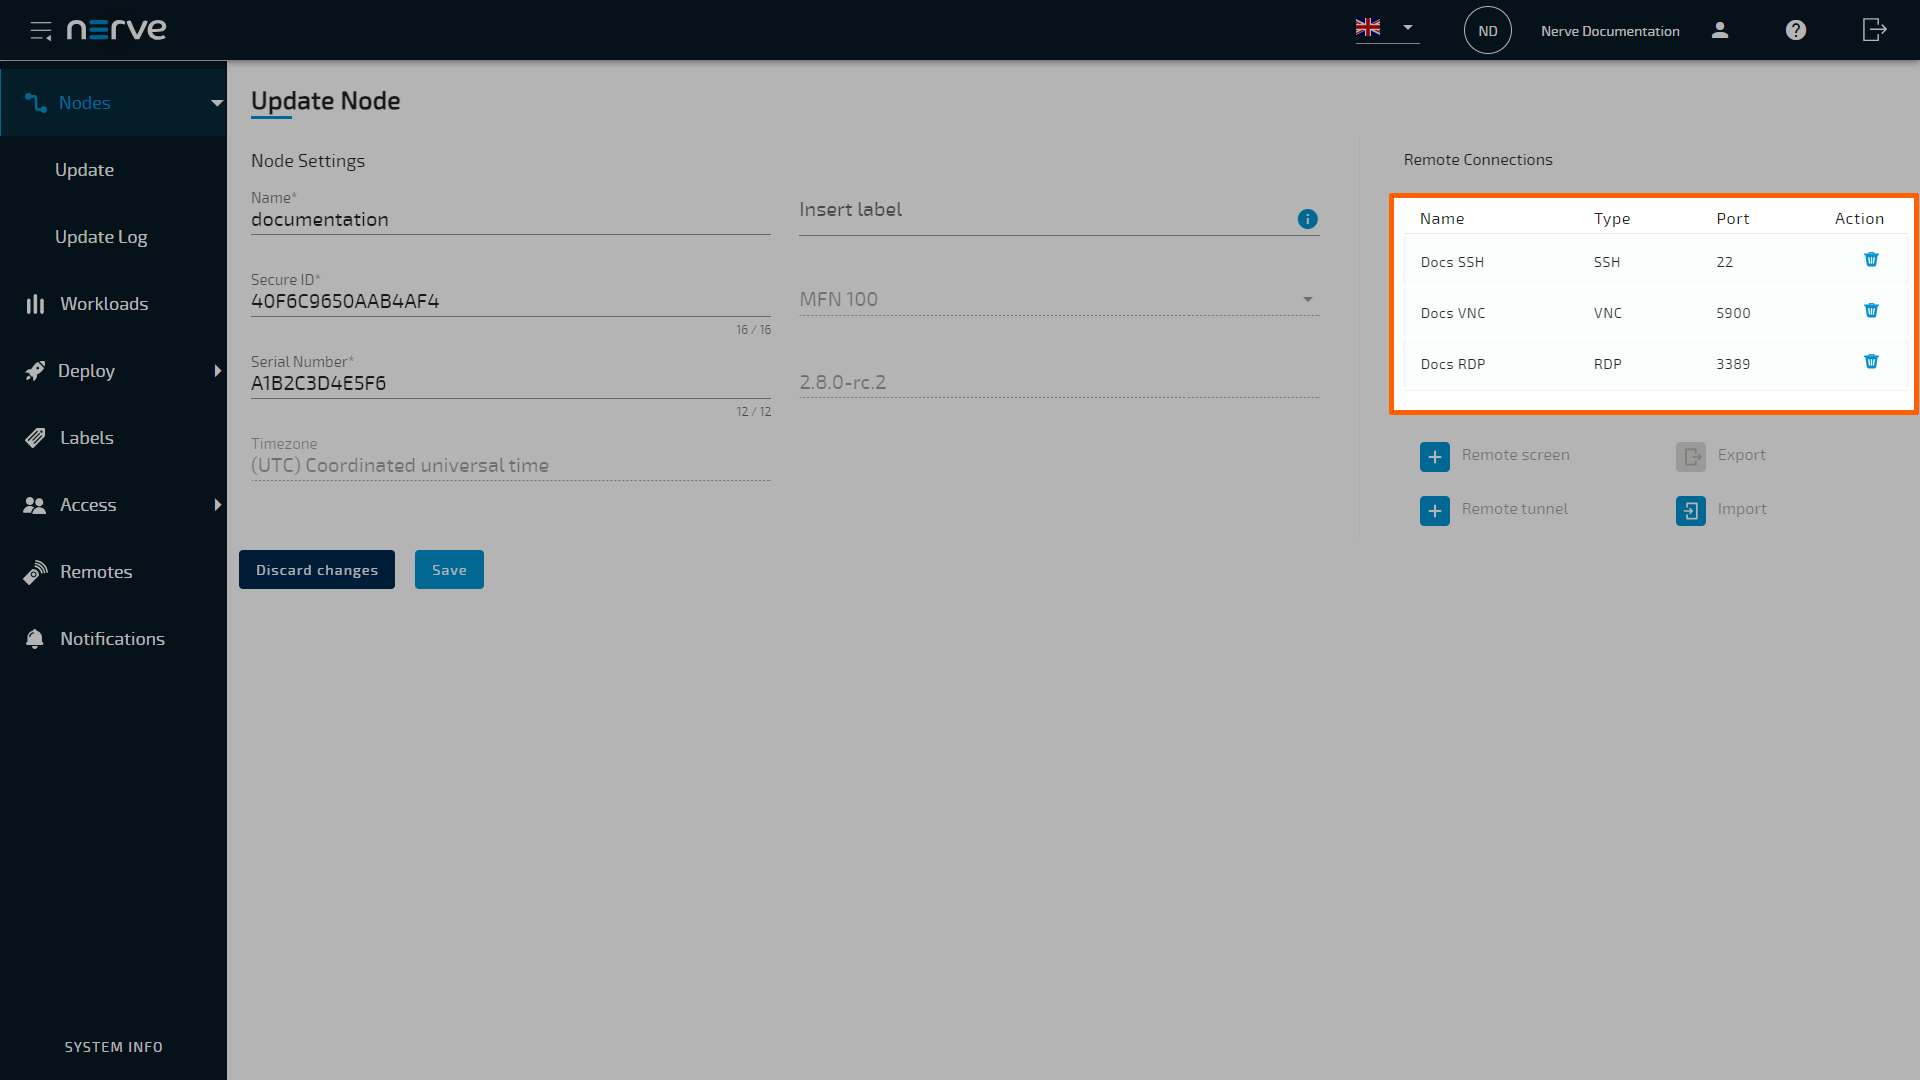
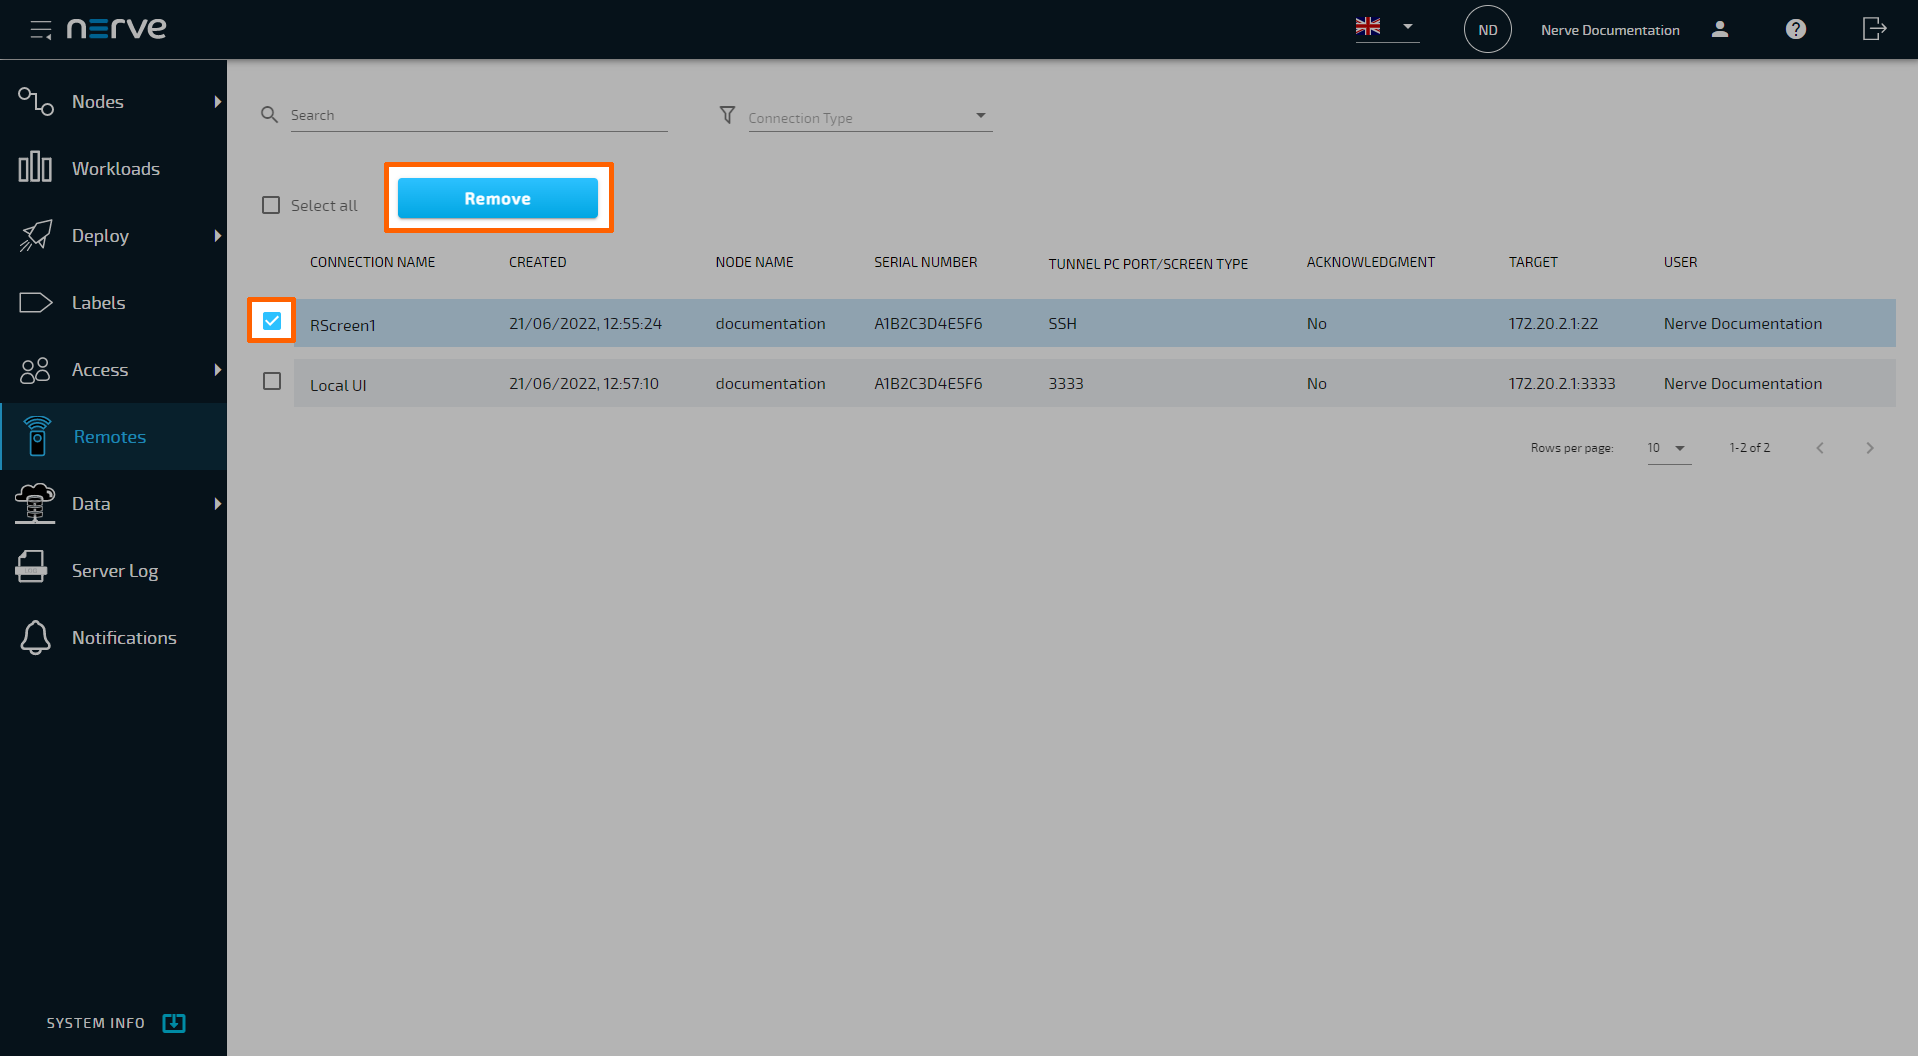
Select Remotes in the navigation on the left to view a list of currently established remote connections.
| Item | Description |
|---|---|
| Search bar (1) | Use the search bar to filter remote connections by name. |
| Connection type (2) | Filter the list of connections by connection type. Select the type of connection to display from the drop-down menu. Selections are All, Tunnel and Screen. |
| Remove button and checkboxes (3) | Tick the checkbox next to a connection and select the Remove button to terminate the connection and remove it from the list. Tick the checkbox next to Select all to select all connections. |
| Connection name (4) | This is the name of the remote connection that is defined when the remote connection is configured. Selecting the connection name link in this column redirects to two possible pages depending on the target of the remote connection:
|
| Created (5) | This is the point in time when the connection was established and a user started using it. The format is DD/MM/YYYY, hh:mm:ss. |
| Node name (6) | This is the name of the node the connection is established to. Selecting the link in this column redirects to the node details view of this node in the node tree. |
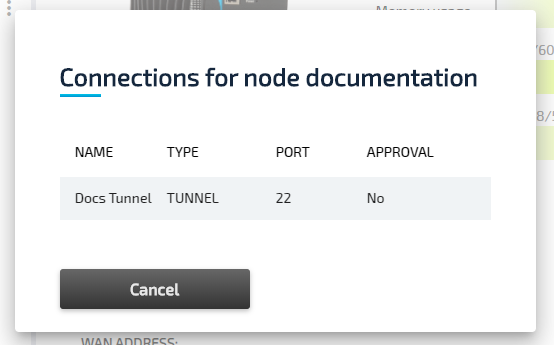
| Serial number (7) | This is the serial number of the node the remote connection is established to. In case of remote connections to workloads, the serial number of the node will be displayed to which the workload was deployed. For remote connections to external devices, the serial number of the node that the external device is connected to will be displayed. |
| Tunnel pc port/screen type (8) | The information here is different depending on the connection type. Remote screens In case of a remote screen, the type of screen is displayed here — SSH, VNC or RDP Remote tunnels For remote tunnels, the port on the PC used for the connection is displayed here. |
| Acknowledgment (9) | This column states if local acknowledgment is required to establish the connection. |
| Target (10) | This is the target of the remote connection. The hostname that was defined in the remote connection configuration is displayed here. For remote tunnels to workloads, the workload name and port used on the node is displayed here in the format <workloadname>:<targetport>. Also, if the target is a workload, selecting the workload name link redirects to the Basic tab in the workload version settings of this workload. |
| User (11) | This shows which user is using the established remote connection. If the same remote connection is used by two users, the remote connection will be listed again with a different user in the User column. Selecting the link in this column redirects to the user profile settings of this user. |
Note
- Note that the list of active remote connections is not updated in real-time. Refresh the page to see changes.
-
If a node goes offline while a remote connection is established, a cloud symbol will be displayed next to the remote connection to indicate that the connection to the node is interrupted.

Remote screens
A remote screen is established from the Management System to the target. It is opened in a new tab in the web browser as soon as the remote connection is established.
Below are instructions on how to create SSH, VNC and RDP connections to nodes and workloads in the Management System.
Note
If the target of the remote connection is the host of the Nerve system, use the IP address of the host: 172.20.2.1. Using localhost is not supported.
Configuring a remote screen to a node
Note that remote connections can also be configured when the node is being newly registered in the Management System. Select the connection type in the tabs below for the appropriate instructions.
An SSH connection to a node can be used for accessing the host operating system of the node or an external device connected to the node that is reachable through an SSH connection.
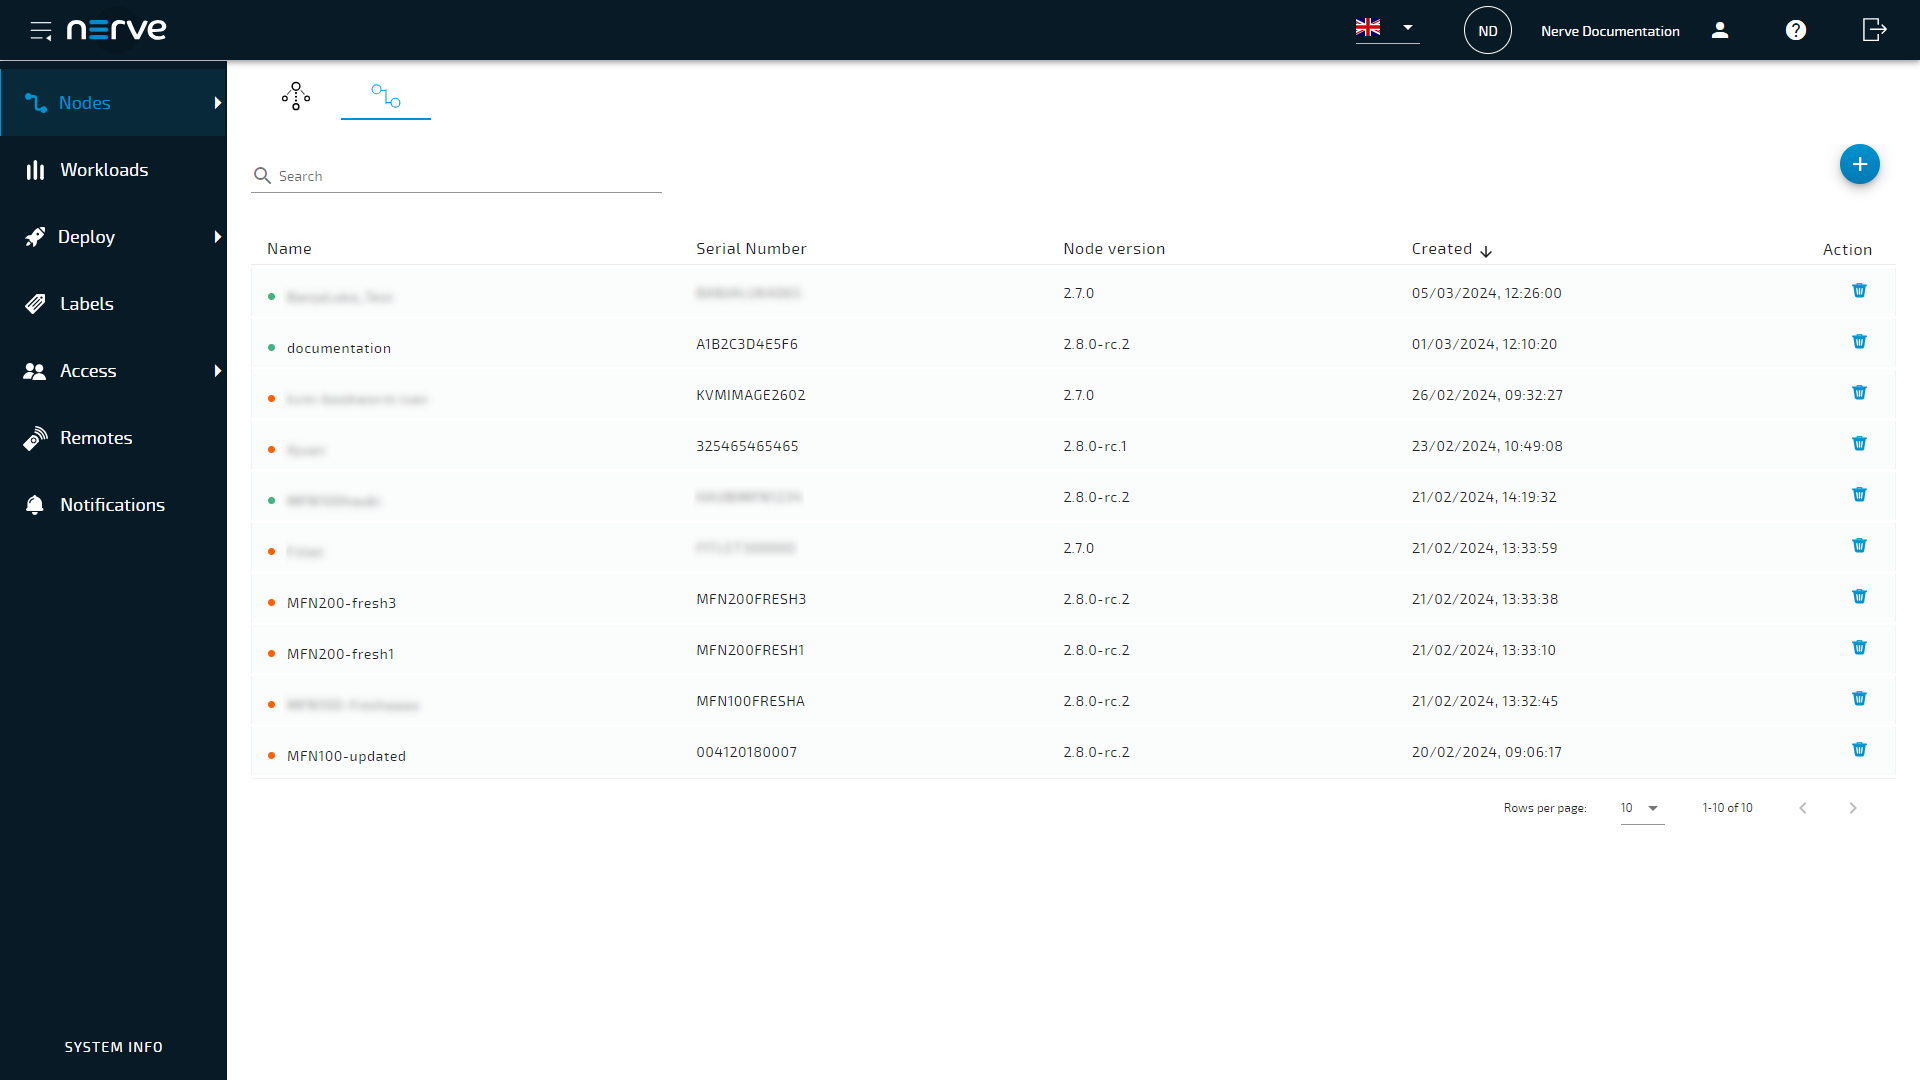
- Select Nodes from the navigation on the left.
- Select the nodes tab
 on the right to display the list of registered nodes.
 -
Select a node from the list to which a remote connection will be established.
-
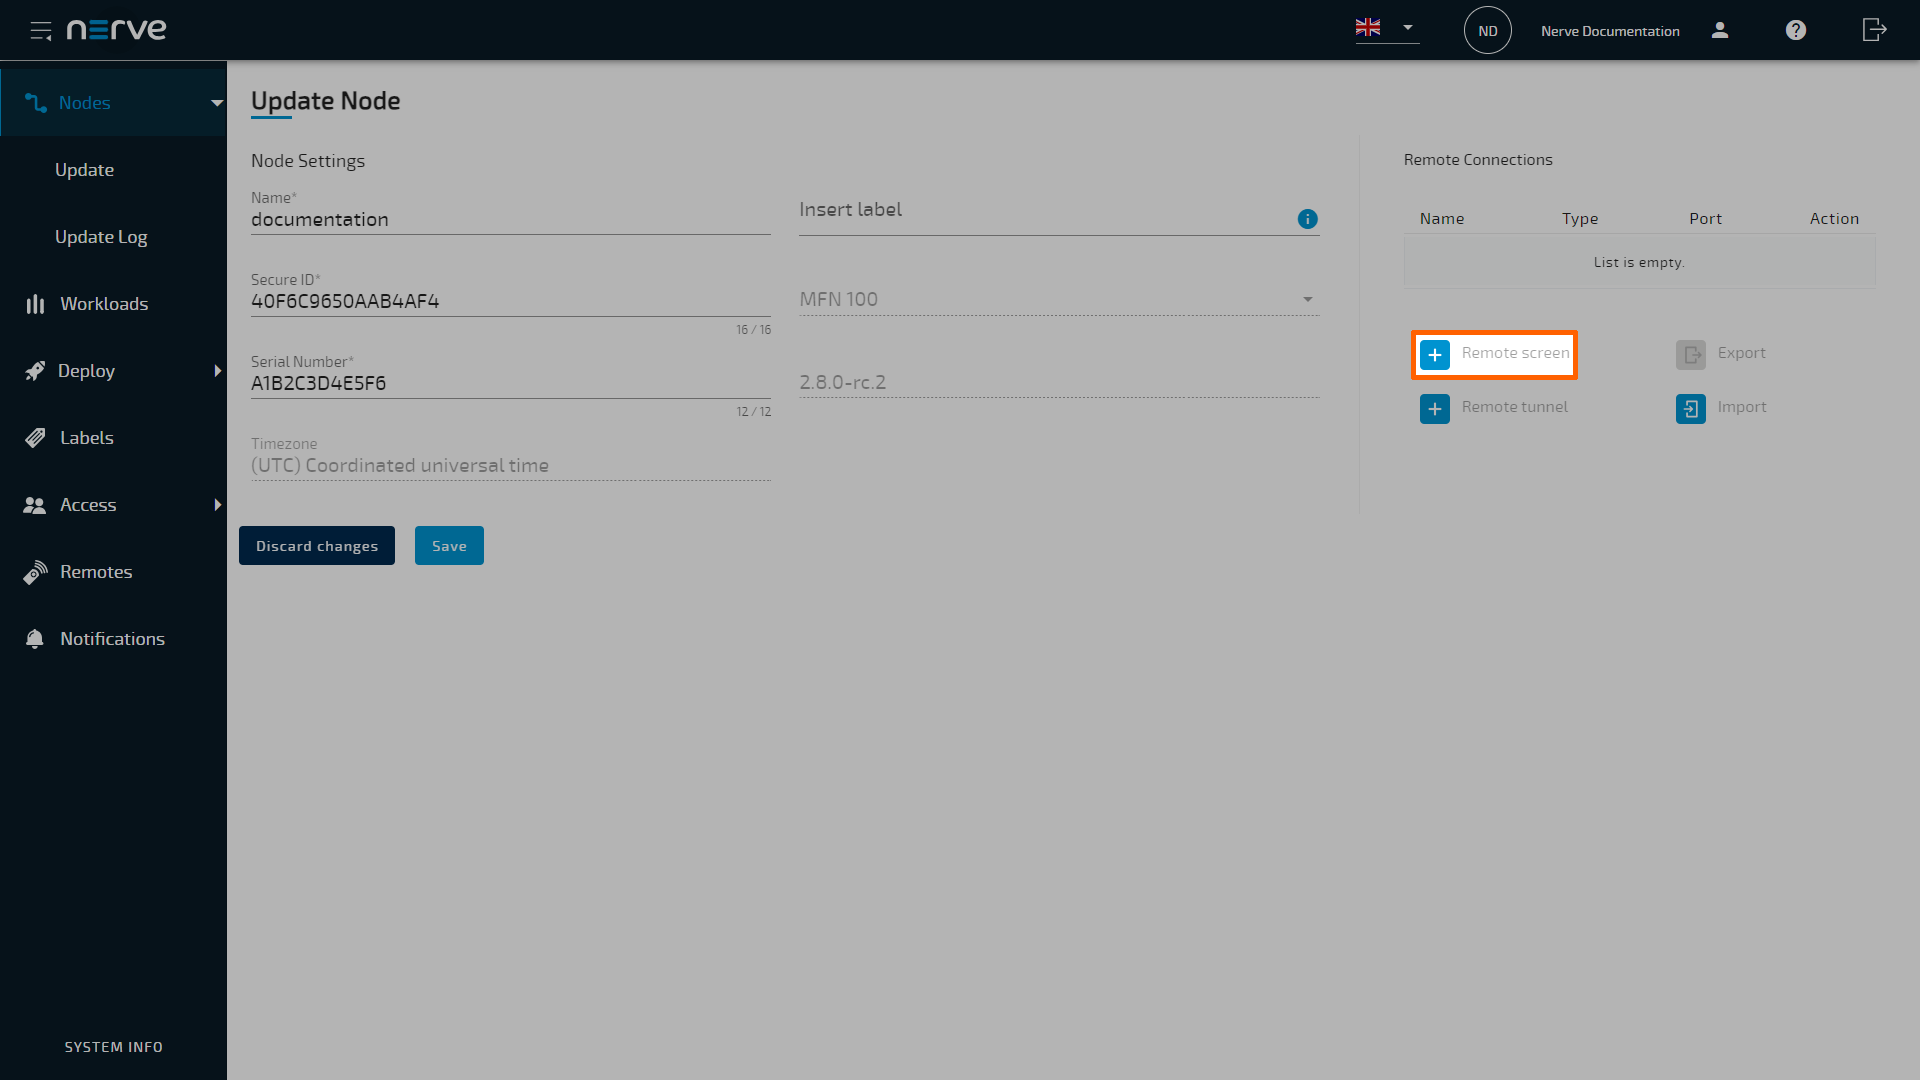
Select the plus icon next to Remote screen under Remote Connections.
-
Enter a name for the remote connection in the new window.
- Select SSH from the drop-down menu under Connection type.
- Enter the port used for SSH connection. The default port
22is automatically filled in. -
Enter the remaining information if applicable:
NERVE PARAMETERS Number of connections
Enter the maximum number of simultaneous connections. The default value is1.
Local acknowledgment
Select Yes or No from the drop-down menu.
Selecting Yes will require approval of the remote connection in the Local UI before the connection can be established. If No is selected, the settings in the Local UI do not apply.
Refer to Approving a remote connection for information on how to approve remote connections in the Local UI.NETWORK PARAMETERS Hostname
Enter the IP address or the hostname of the target here.
Autoretry
Set the number of retries if the remote connection fails. The default value is1.DISPLAY SETTINGS The display settings offer configuration options that affect visualization.
Swap red blue
If colors appear to not be displayed correctly, select true from the drop-down menu. This can occur when using VNC servers. Select false otherwise.
Cursor
This setting determines if the cursor is rendered locally or remotely. Enterlocalfor a local cursor or enterremotefor a remote cursor. If set toremote, the mouse pointer will be rendered remotely, and the local position of the mouse pointer will be indicated by a small dot. A remote mouse cursor will have added input lag compared to a local cursor. However, a remote cursor might be necessary if the server does not support sending the cursor image to the client.
Read only
Select true or false from the drop-down menu.
If set to true, no input will be accepted on the connection. Select false to allow input.AUTHENTICATION Enter Username and Password or tick the checkbox next to Private key authentication to use a private SSH key.
Note that ticking the checkbox changes the interface. Enter the username and choose one of the methods to add the private SSH key:- Select Choose File to open the local file browser and select the private SSH key file.
- Drag and drop the private SSH key file into the dotted line box saying Drop Private Key Here.
- Copy the private SSH key and paste it into the empty input field.
-
Select Add to add the remote connection.
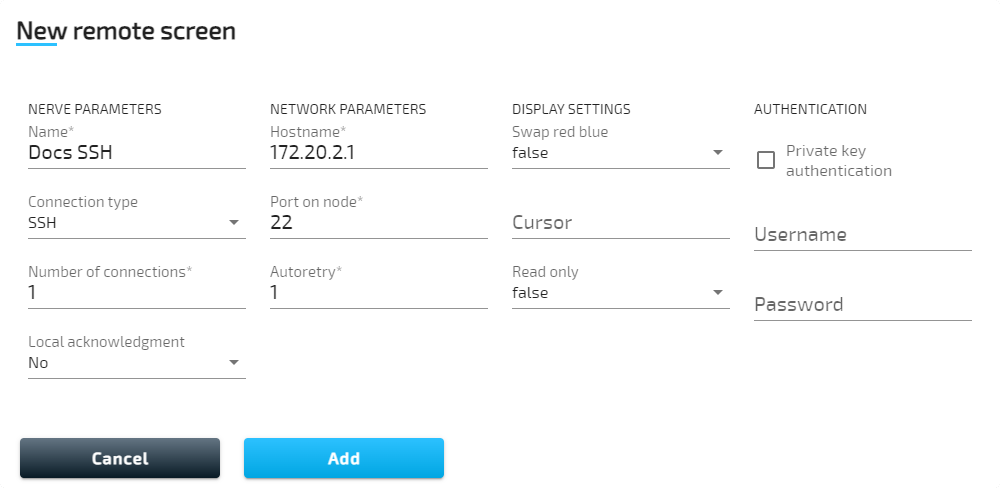
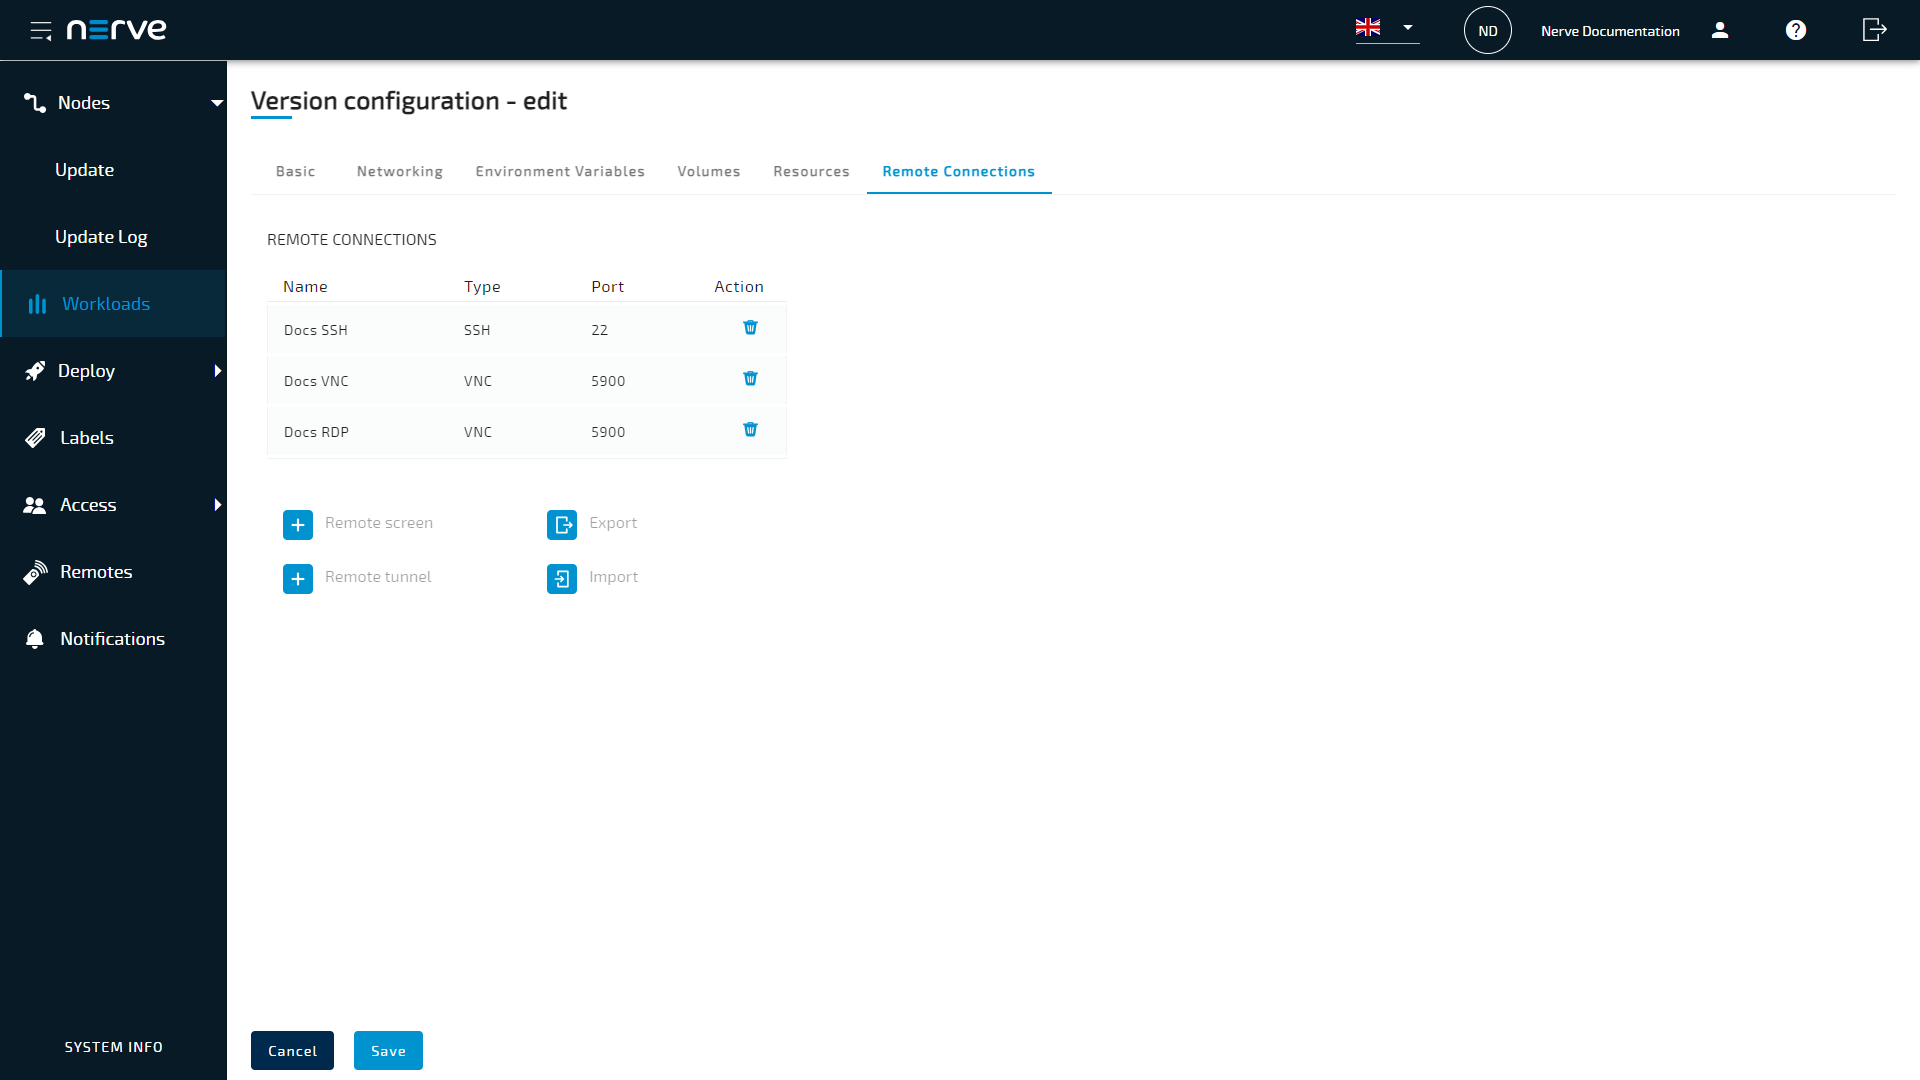
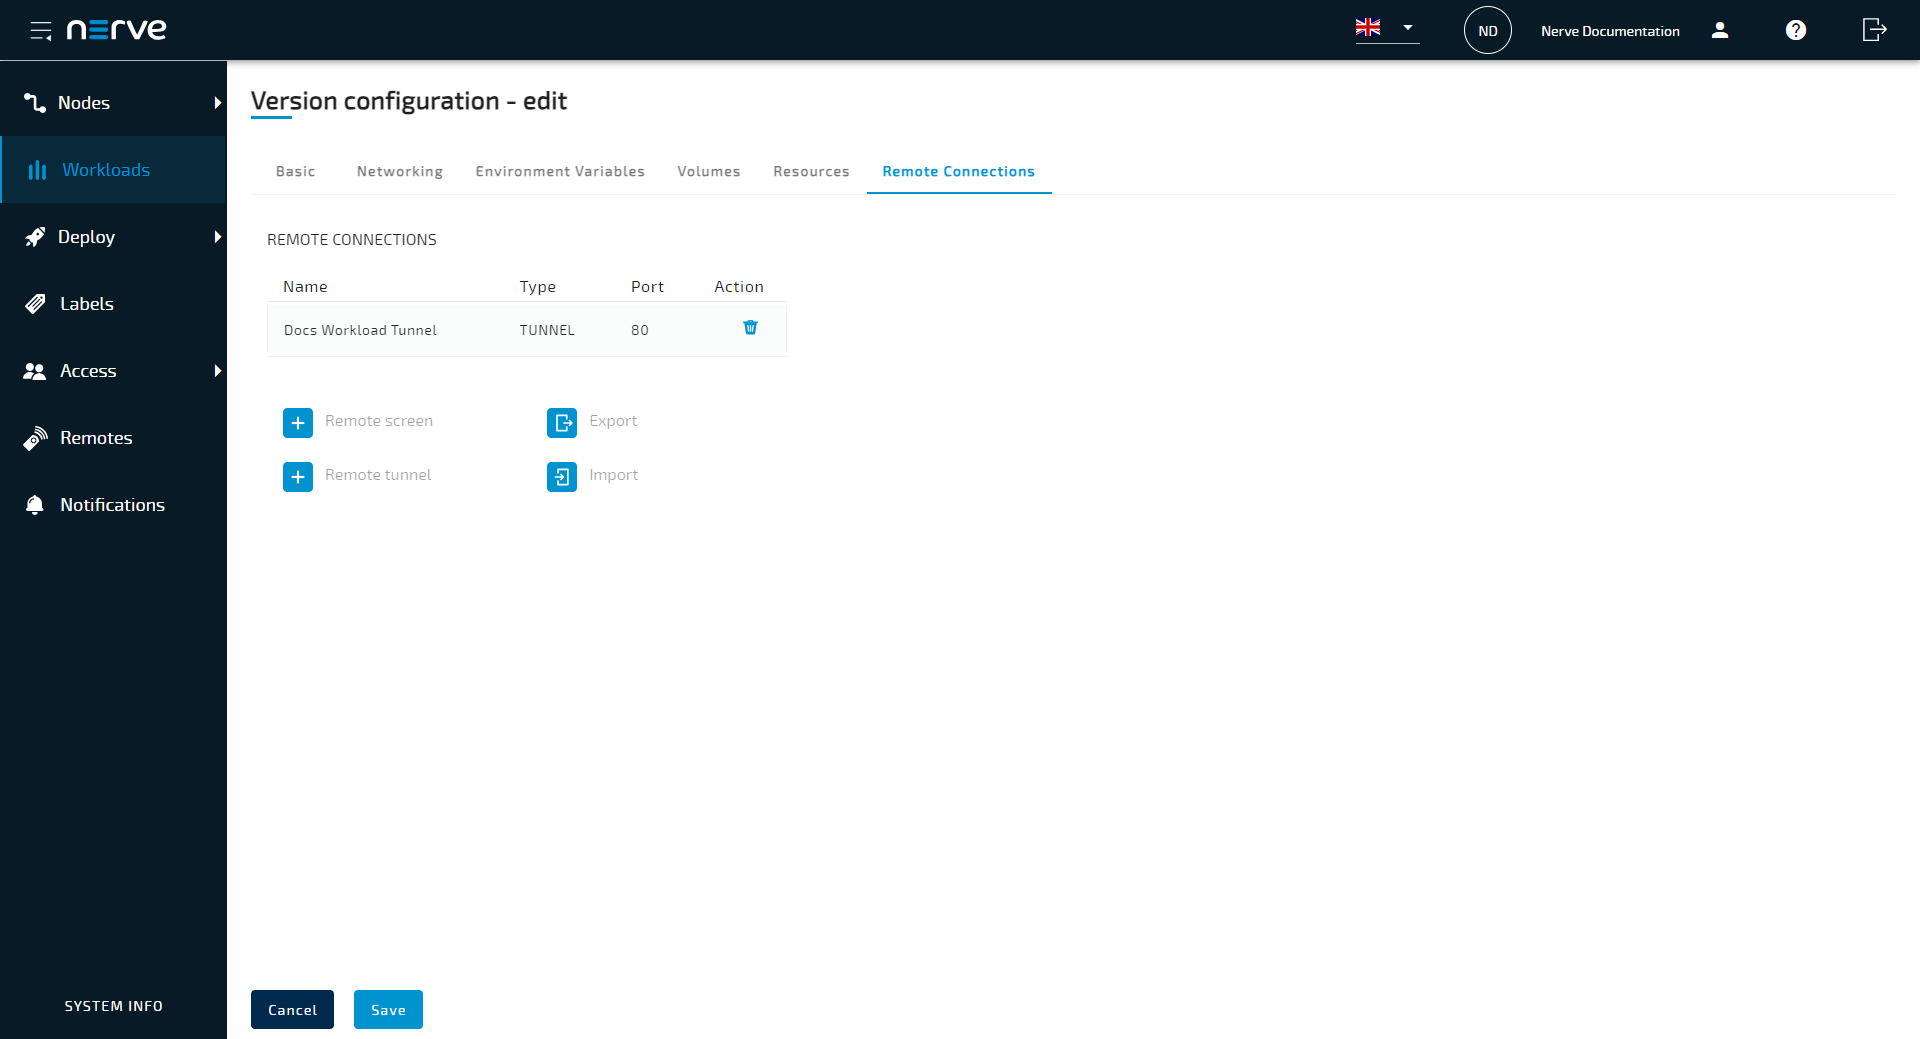
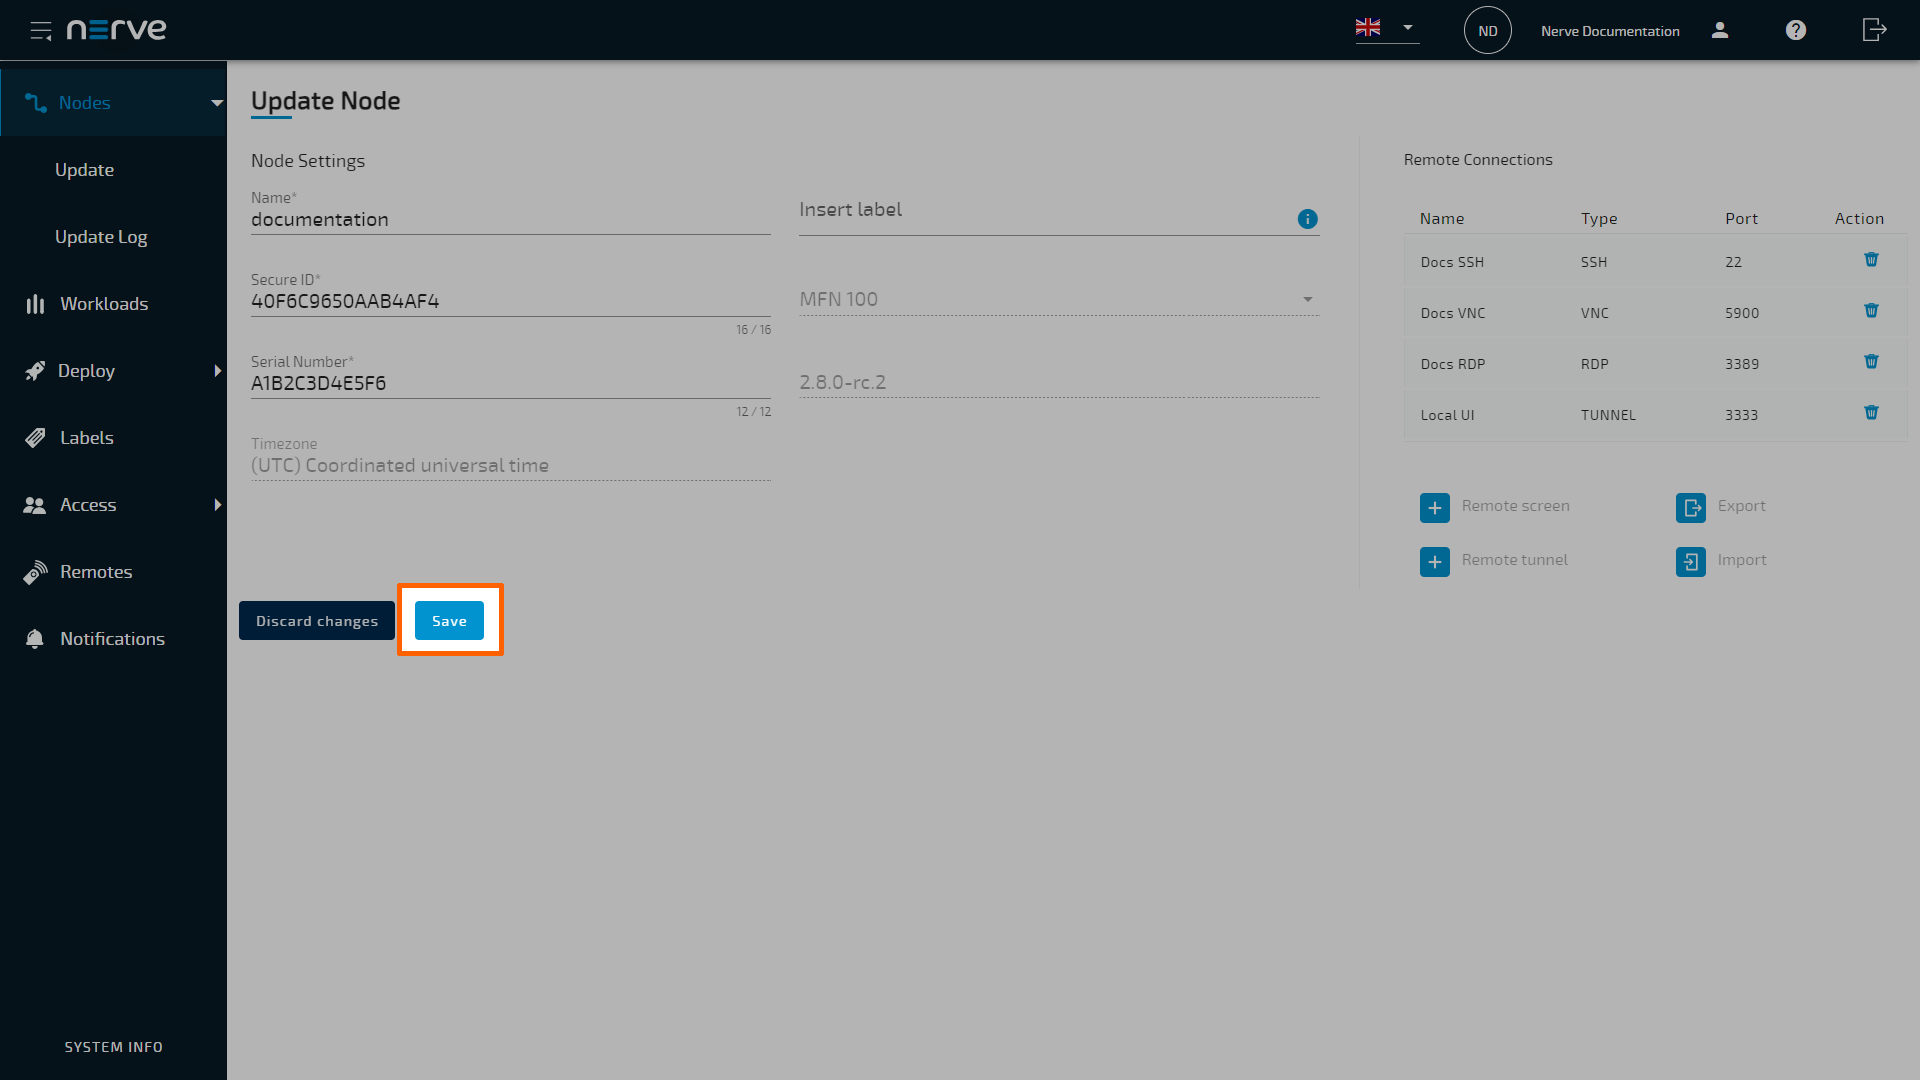
The connection is now displayed under Remote Connections, showing the Name, Type and Port of the remote connection.
-
Select Save to save the changes.
A VNC connection to a node can be used to connect to a Linux environment on an external device, which is connected to the node or to the same network that the node is connected to.
- Select Nodes from the navigation on the left.
- Select the nodes tab on the right to display the list of registered nodes.
-
Select a node from the list to which a remote connection will be established.
-
Select the plus icon next to Remote screen under Remote Connections.
-
Enter a name for the remote connection in the new window.
- Select VNC from the drop-down menu under Connection type.
- Enter the port used for VNC connection. The default port
5900is automatically filled in. -
Enter the password that was set for VNC connections at the target.
Note
Entering wrong login credentials will cause an error when the remote screen is established. If an error occurs, close the browser tab. Check the login credentials and re-establish the remote screen.
-
Enter the remaining information if applicable:
NERVE PARAMETERS Number of connections
Enter the maximum number of simultaneous connections. The default value is1.
Local acknowledgment
Select Yes or No from the drop-down menu.
Selecting Yes will require approval of the remote connection in the Local UI before the connection can be established. If No is selected, the settings in the Local UI do not apply.
Refer to Approving a remote connection for information on how to approve remote connections in the Local UI.NETWORK PARAMETERS Hostname
Enter the IP address or the hostname of the target here.
Autoretry
Set the number of retries if the remote connection fails. The default value is1.DISPLAY SETTINGS The display settings offer configuration options that affect visualization.
Swap red blue
If colors appear to not be displayed correctly, select true from the drop-down menu. This can occur when using VNC servers. Select false otherwise.
Cursor
This setting determines if the cursor is rendered locally or remotely. Enterlocalfor a local cursor or enterremotefor a remote cursor. If set toremote, the mouse pointer will be rendered remotely, and the local position of the mouse pointer will be indicated by a small dot. A remote mouse cursor will have added input lag compared to a local cursor. However, a remote cursor might be necessary if the server does not support sending the cursor image to the client.
Read only
Select true or false from the drop-down menu.
If set to true, no input will be accepted on the connection. Select false to allow input. -
Select Add to add the remote connection.
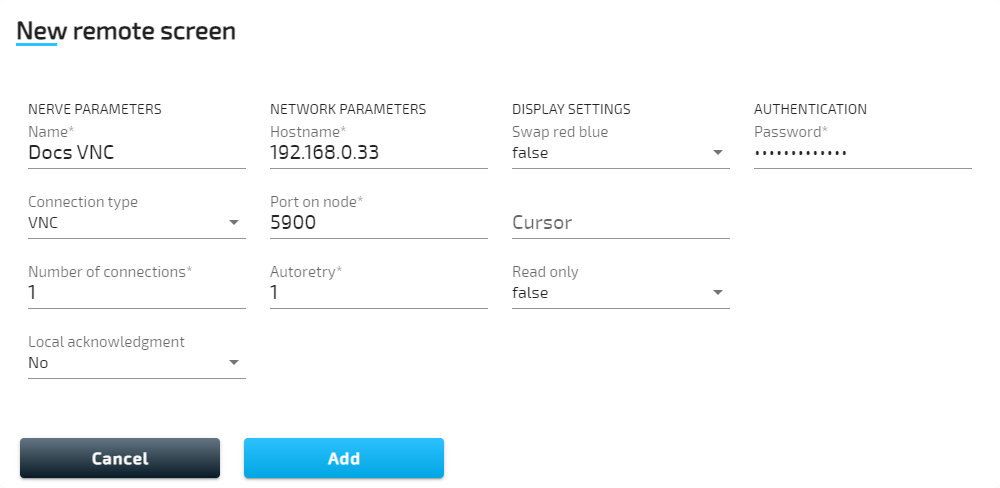
The connection is now displayed under Remote Connections, showing the Name, Type and Port of the remote connection.
-
Select Save to save the changes.
An RDP connection to a node can be used to connect to a Windows environment on an external device, which is connected to the node or to the same network that the node is connected to.
- Select Nodes from the navigation on the left.
- Select the nodes tab on the right to display the list of registered nodes.
-
Select a node from the list to which a remote connection will be established.
-
Select the plus icon next to Remote screen under Remote Connections.
-
Enter a name for the remote connection in the new window.
- Select RDP from the drop-down menu under Connection type.
- Enter the port used for RDP connection. The default port
3389is automatically filled in. -
Enter the remaining information if applicable:
NERVE PARAMETERS Number of connections
Enter the maximum number of simultaneous connections. The default value is1.
Local acknowledgment
Select Yes or No from the drop-down menu.
Selecting Yes will require approval of the remote connection in the Local UI before the connection can be established. If No is selected, the settings in the Local UI do not apply.
Refer to Approving a remote connection for information on how to approve remote connections in the Local UI.NETWORK PARAMETERS Hostname
Enter the IP address or the hostname of the target here.
Autoretry
Set the number of retries if the remote connection fails. The default value is1.
Security mode
This mode dictates how data will be encrypted and what type of authentication will be performed, if any. Select an option from the drop-down menu. Possible values are:- ANY
This is the default if the field is left blank. Automatically select the security mode based on the security protocols supported by both the client and the server. - NLA (Network Level Authentication)
This mode uses TLS encryption and requires the username and password to be given in advance. Unlike RDP mode, the authentication step is performed before the remote desktop session actually starts, avoiding the need for the Windows server to allocate significant resources for users that may not be authorized. - RDP encryption
This is the standard RDP encryption. It is generally only used for older Windows servers or in cases where a standard Windows login screen is desired. Newer versions of Windows have this mode disabled by default and will only accept NLA unless explicitly configured otherwise. - TLS encryption
Select this for RDP authentication and encryption implemented via TLS (Transport Layer Security). The TLS security mode is primarily used in load balanced configurations where the initial RDP server may redirect the connection to a different RDP server.
If checked, the certificate returned by the server will be ignored, even if that certificate cannot be validated. This is useful if the server and the connection to the server is universally trusted, and if the server's certificate cannot be validated (for example, if it is self-signed).DISPLAY SETTINGS The display settings offer configuration options that affect visualization.
Swap red blue
If colors appear to not be displayed correctly, select true from the drop-down menu. This can occur when using VNC servers. Select false otherwise.
Cursor
This setting determines if the cursor is rendered locally or remotely. Enterlocalfor a local cursor or enterremotefor a remote cursor. If set toremote, the mouse pointer will be rendered remotely, and the local position of the mouse pointer will be indicated by a small dot. A remote mouse cursor will have added input lag compared to a local cursor. However, a remote cursor might be necessary if the server does not support sending the cursor image to the client.
Read only
Select true or false from the drop-down menu.
If set to true, no input will be accepted on the connection. Select false to allow input.AUTHENTICATION Enter Username and Password for Windows login.
Note that entering wrong login credentials will cause an error when the remote screen is established. If an error occurs, close the browser tab. Check the login credentials and re-establish the remote screen. - ANY
-
Select Add to add the remote connection.

The connection is now displayed under Remote Connections, showing the Name, Type and Port of the remote connection.
-
Select Save to save the changes.
Configuring a remote screen to a workload
A remote screen to a workload can be configured, regardless of a workload being deployed or not. Configuring a remote screen for a workload will immediately add the remote screen to the workload on all nodes that it has been deployed to. Note that remote screens to CODESYS workloads cannot be established.
Note
Remote connections can also be configured when the workload is being newly provisioned in the Management System.
Select the connection type in the tabs below for the appropriate instructions.
- Select Workloads in the navigation on the left.
-
Select a workload from the list.
-
Select the workload version to which the remote connection will be added.
Note
The configured remote connection will only be available for the selected version.
-
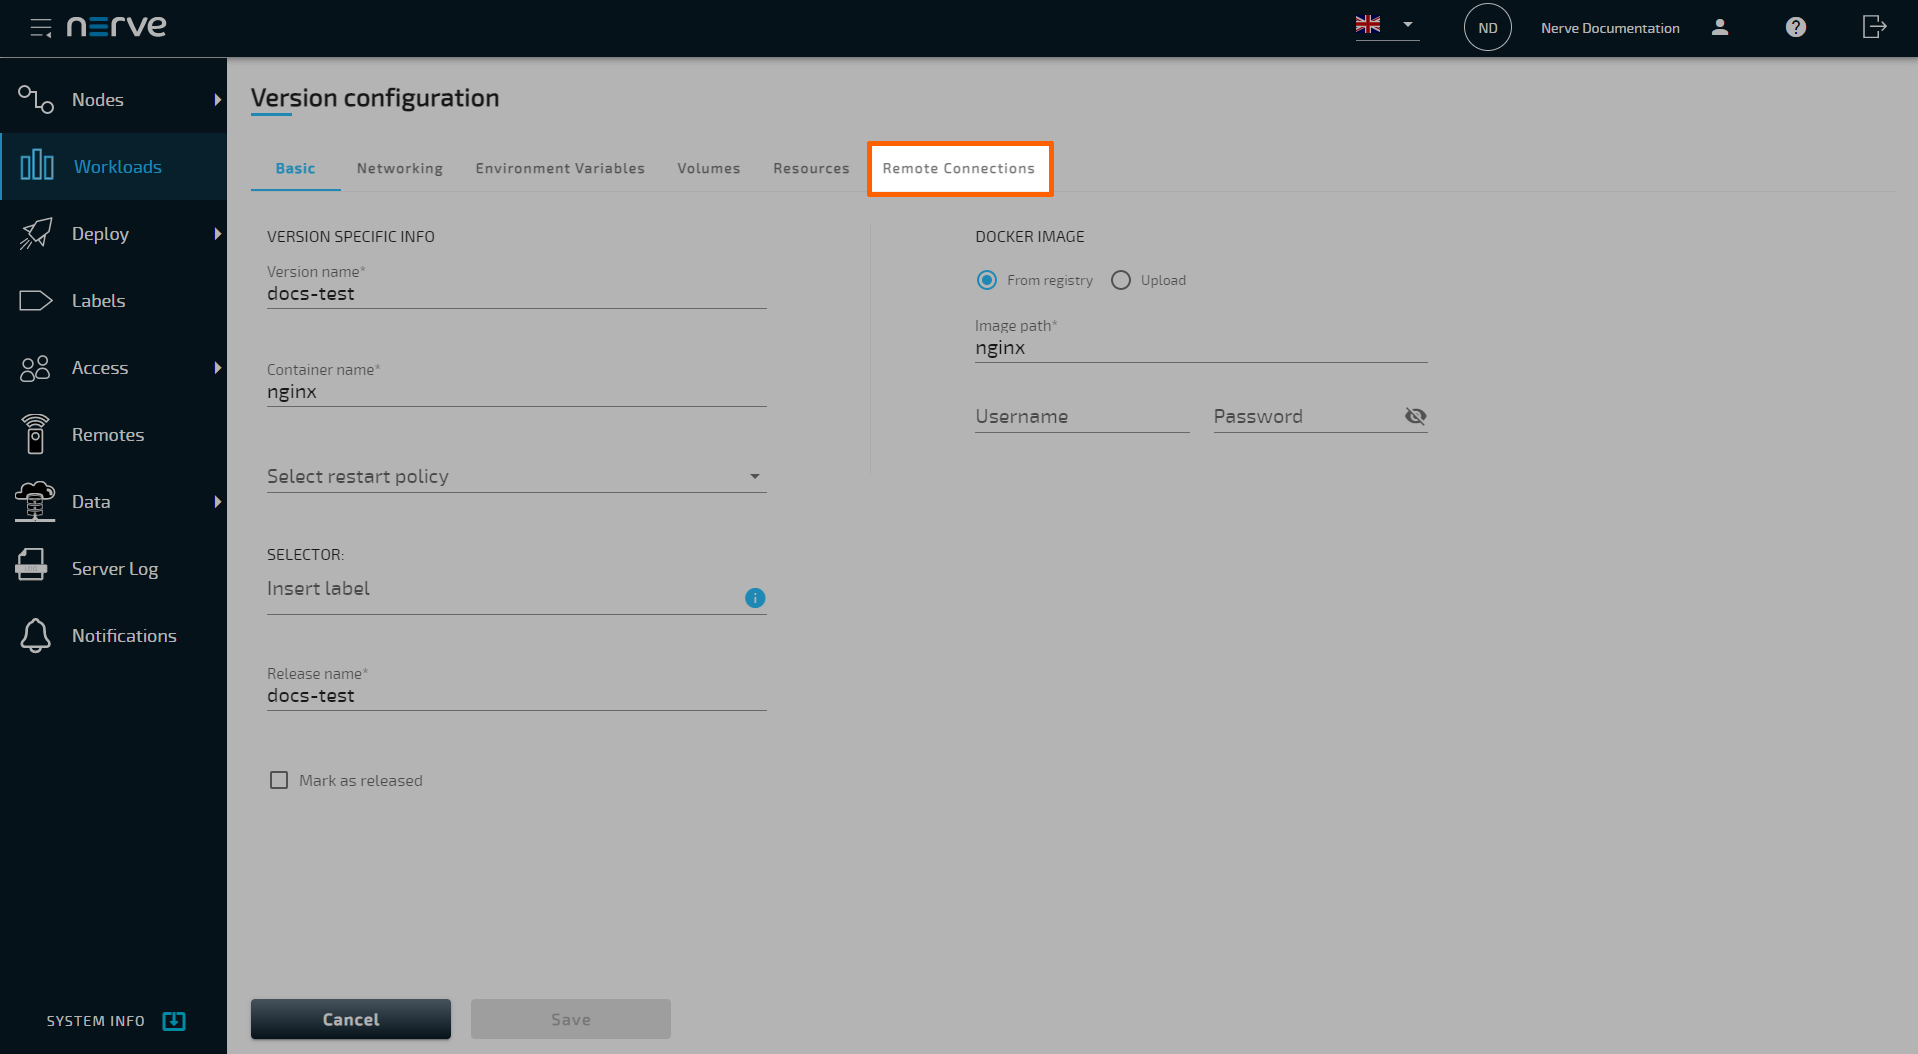
Select the Remote Connections tab.
-
Select the plus icon next to Remote screen under Remote Connections.
- Enter a name for the remote connection in the new window.
- Select SSH from the drop-down menu under Connection type.
- Enter the port used for SSH connection. The default port
22is automatically filled in. -
Enter the remaining information if applicable:
NERVE PARAMETERS Number of connections
Enter the maximum number of simultaneous connections. The default value is1.
Local acknowledgment
Select Yes or No from the drop-down menu.
Selecting Yes will require approval of the remote connection in the Local UI before the connection can be established. If No is selected, the settings in the Local UI do not apply.
Refer to Approving a remote connection for information on how to approve remote connections in the Local UI.NETWORK PARAMETERS Hostname
Enter the IP address or the hostname of the target here.
Note that adding the hostname is not required when configuring a remote screen to a Docker workload. The system automatically detects the hostname when the workload is deployed. In case of Virtual Machine workloads, enter the IP address or hostname under VM hostname / IP.
Autoretry
Set the number of retries if the remote connection fails. The default value is1.DISPLAY SETTINGS The display settings offer configuration options that affect visualization.
Swap red blue
If colors appear to not be displayed correctly, select true from the drop-down menu. This can occur when using VNC servers. Select false otherwise.
Cursor
This setting determines if the cursor is rendered locally or remotely. Enterlocalfor a local cursor or enterremotefor a remote cursor. If set toremote, the mouse pointer will be rendered remotely, and the local position of the mouse pointer will be indicated by a small dot. A remote mouse cursor will have added input lag compared to a local cursor. However, a remote cursor might be necessary if the server does not support sending the cursor image to the client.
Read only
Select true or false from the drop-down menu.
If set to true, no input will be accepted on the connection. Select false to allow input.AUTHENTICATION Enter Username and Password or tick the checkbox next to Private key authentication to use a private SSH key.
Note that ticking the checkbox changes the interface. Enter the username and choose one of the methods to add the private SSH key:- Select Choose File to open the local file browser and select the private SSH key file.
- Drag and drop the private SSH key file into the dotted line box saying Drop Private Key Here.
- Copy the private SSH key and paste it into the empty input field.
Note
For Docker Compose workloads the service needs to be specified in addition.
-
Select Add to add the remote connection.
The connection is now displayed under Remote Connections, showing the Name, Type and Port of the remote connection.
-
Select Save to save the changes.
- Select Workloads in the navigation on the left.
-
Select a workload from the list.
-
Select the workload version to which the remote connection will be added.
Note
The configured remote connection will only be available for the selected version.
-
Select the Remote Connections tab.
-
Select the plus icon next to Remote screen under Remote Connections.
- Enter a name for the remote connection in the new window.
- Select VNC from the drop-down menu under Connection type.
- Enter the port used for VNC connection. The default port
5900is automatically filled in. -
Enter the password that was set for VNC connections at the target.
Note
Entering wrong login credentials will cause an error when the remote screen is established. If an error occurs, close the browser tab. Check the login credentials and re-establish the remote screen.
-
Enter the remaining information if applicable:
NERVE PARAMETERS Number of connections
Enter the maximum number of simultaneous connections. The default value is1.
Local acknowledgment
Select Yes or No from the drop-down menu.
Selecting Yes will require approval of the remote connection in the Local UI before the connection can be established. If No is selected, the settings in the Local UI do not apply.
Refer to Approving a remote connection for information on how to approve remote connections in the Local UI.NETWORK PARAMETERS Hostname
Enter the IP address or the hostname of the target here.
Note that adding the hostname is not required when configuring a remote screen to a Docker workload. The system automatically detects the hostname when the workload is deployed. In case of Virtual Machine workloads, the hostname entry is not displayed.
Autoretry
Set the number of retries if the remote connection fails. The default value is1.DISPLAY SETTINGS The display settings offer configuration options that affect visualization.
Swap red blue
If colors appear to not be displayed correctly, select true from the drop-down menu. This can occur when using VNC servers. Select false otherwise.
Cursor
This setting determines if the cursor is rendered locally or remotely. Enterlocalfor a local cursor or enterremotefor a remote cursor. If set toremote, the mouse pointer will be rendered remotely, and the local position of the mouse pointer will be indicated by a small dot. A remote mouse cursor will have added input lag compared to a local cursor. However, a remote cursor might be necessary if the server does not support sending the cursor image to the client.
Read only
Select true or false from the drop-down menu.
If set to true, no input will be accepted on the connection. Select false to allow input.Note
For Docker Compose workloads the service needs to be specified in addition.
-
Select Add to add the remote connection.
The connection is now displayed under Remote Connections, showing the Name, Type and Port of the remote connection.
-
Select Save to save the changes.
- Select Workloads in the navigation on the left.
-
Select a workload from the list.
-
Select the workload version to which the remote connection will be added.
Note
The configured remote connection will only be available for the selected version.
-
Select the Remote Connections tab.
-
Select the plus icon next to Remote screen under Remote Connections.
- Enter a name for the remote connection in the new window.
- Select RDP from the drop-down menu under Connection type.
- Enter the port used for RDP connection. The default port
3389is automatically filled in. -
Enter the remaining information if applicable:
NERVE PARAMETERS Number of connections
Enter the maximum number of simultaneous connections. The default value is1.
Local acknowledgment
Select Yes or No from the drop-down menu.
Selecting Yes will require approval of the remote connection in the Local UI before the connection can be established. If No is selected, the settings in the Local UI do not apply.
Refer to Approving a remote connection for information on how to approve remote connections in the Local UI.NETWORK PARAMETERS Hostname
Enter the IP address or the hostname of the target here.
Note that adding the hostname is not required when configuring a remote screen to a Docker workload. The system automatically detects the hostname when the workload is deployed. In case of Virtual Machine workloads, enter the IP address or hostname under VM hostname / IP.
Autoretry
Set the number of retries if the remote connection fails. The default value is1.
Security mode
This mode dictates how data will be encrypted and what type of authentication will be performed, if any. Select an option from the drop-down menu. Possible values are:- ANY
This is the default if the field is left blank. Automatically select the security mode based on the security protocols supported by both the client and the server. - NLA (Network Level Authentication)
This mode uses TLS encryption and requires the username and password to be given in advance. Unlike RDP mode, the authentication step is performed before the remote desktop session actually starts, avoiding the need for the Windows server to allocate significant resources for users that may not be authorized. - RDP encryption
This is the standard RDP encryption. It is generally only used for older Windows servers or in cases where a standard Windows login screen is desired. Newer versions of Windows have this mode disabled by default and will only accept NLA unless explicitly configured otherwise. - TLS encryption
Select this for RDP authentication and encryption implemented via TLS (Transport Layer Security). The TLS security mode is primarily used in load balanced configurations where the initial RDP server may redirect the connection to a different RDP server.
If checked, the certificate returned by the server will be ignored, even if that certificate cannot be validated. This is useful if the server and the connection to the server is universally trusted, and if the server's certificate cannot be validated (for example, if it is self-signed).DISPLAY SETTINGS The display settings offer configuration options that affect visualization.
Swap red blue
If colors appear to not be displayed correctly, select true from the drop-down menu. This can occur when using VNC servers. Select false otherwise.
Cursor
This setting determines if the cursor is rendered locally or remotely. Enterlocalfor a local cursor or enterremotefor a remote cursor. If set toremote, the mouse pointer will be rendered remotely, and the local position of the mouse pointer will be indicated by a small dot. A remote mouse cursor will have added input lag compared to a local cursor. However, a remote cursor might be necessary if the server does not support sending the cursor image to the client.
Read only
Select true or false from the drop-down menu.
If set to true, no input will be accepted on the connection. Select false to allow input.AUTHENTICATION Enter Username and Password for Windows login.
Note that entering wrong login credentials will cause an error when the remote screen is established. If an error occurs, close the browser tab. Check the login credentials and re-establish the remote screen.Note
For Docker Compose workloads the service needs to be specified in addition.
- ANY
-
Select Add to add the remote connection.
The connection is now displayed under Remote Connections, showing the Name, Type and Port of the remote connection.
-
Select Save to save the changes.
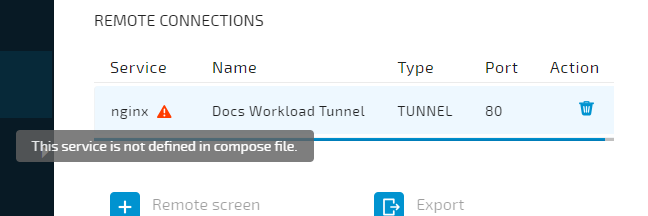
Note
In case of Docker Compose workloads, changing the Docker Compose file to alter services, e.g. by removing them, may cause configured remote connections to not work anymore. If that is the case, the Remote Connections tab will display a warning sign:
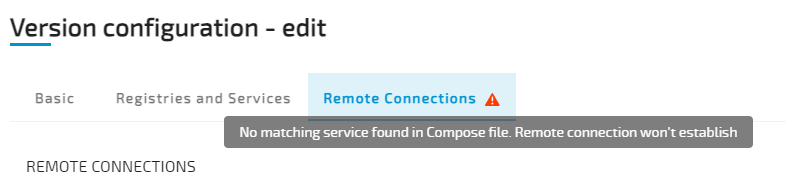
After selecting the Remote Connections tab, the affected service will also be highlighted by a warning sign:
Using a remote screen
Select the connection target in the tabs below for the appropriate instructions.
Configured remote connections are used from the target element in the Management System. So for remote connections established to the node, the remote connection is opened from the node details view.
- Select Nodes in the navigation on the left.
- Select the node tree tab on the right to display registered nodes in the node tree.
- Select a node with a remote screen from the node tree.
-
Select the Connect symbol in the node details on the right.
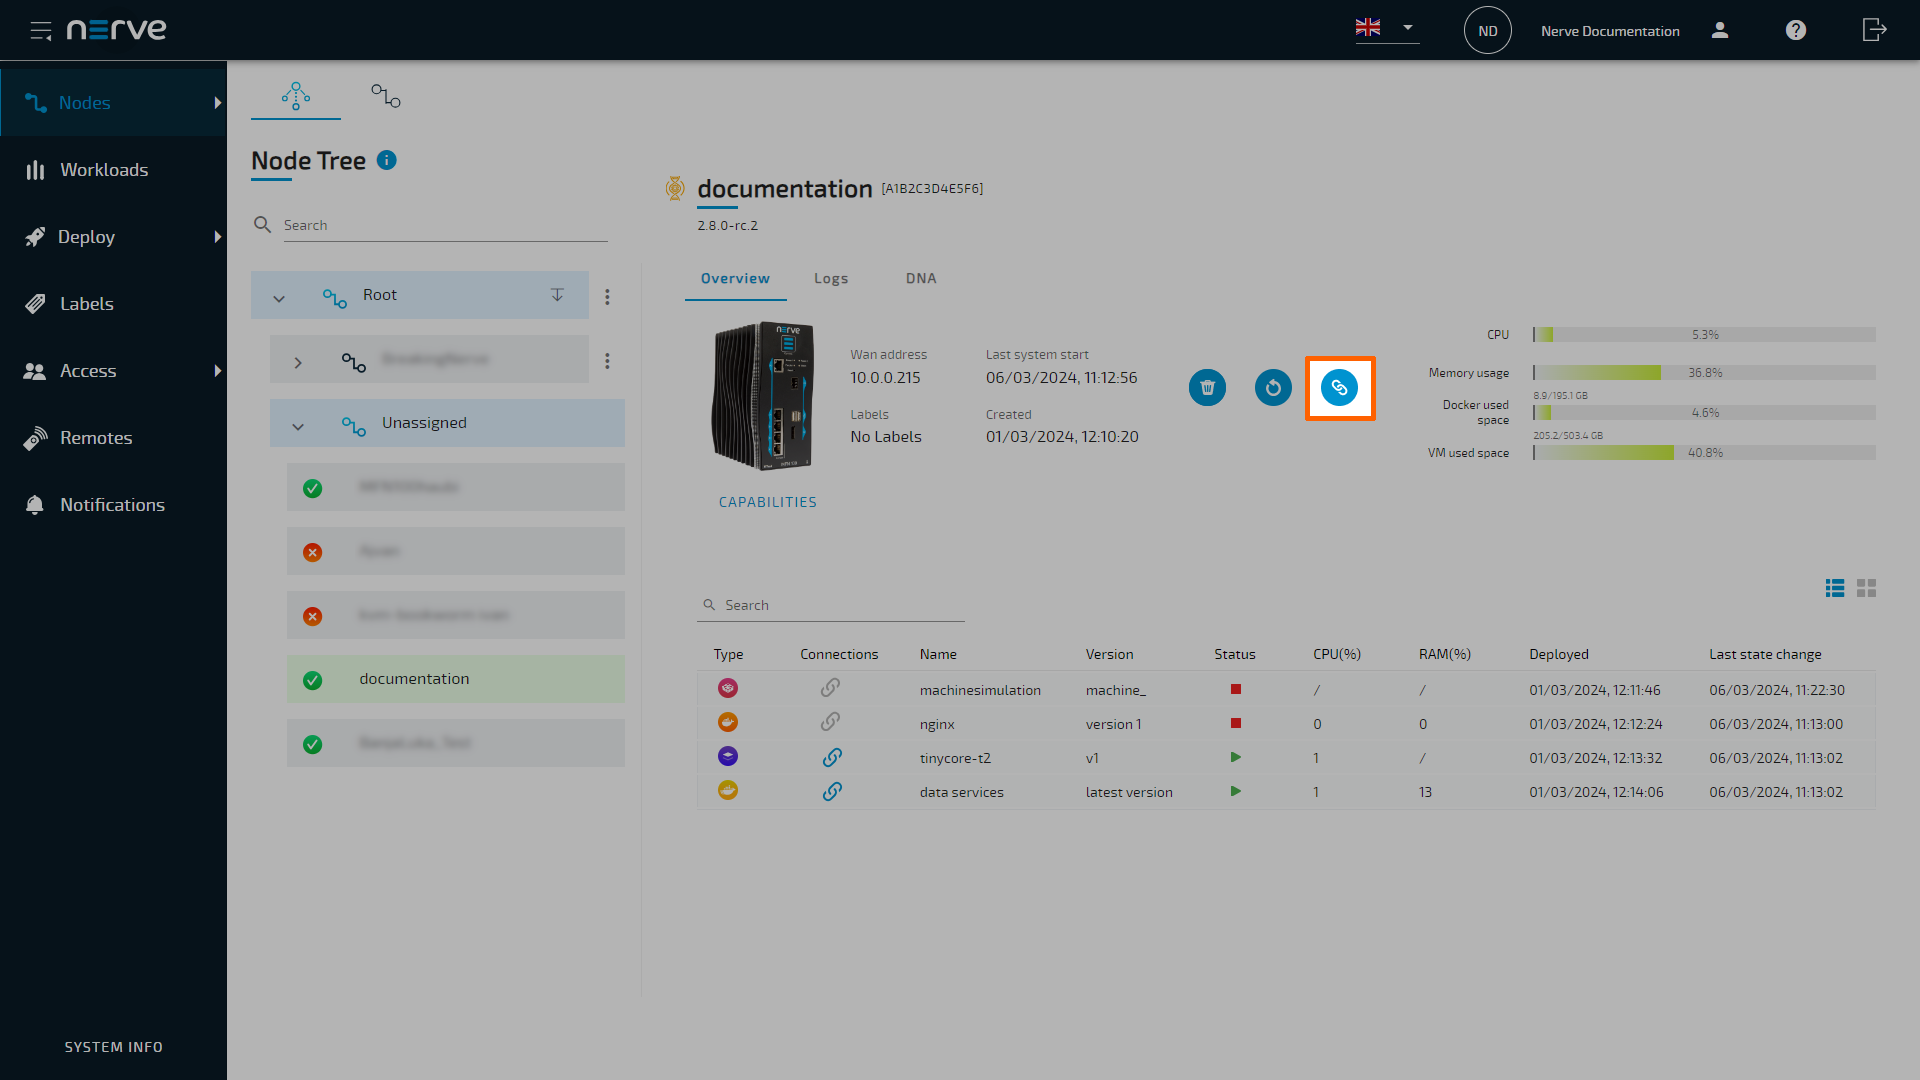
-
Select the remote connection from the list in the new window.

The remote screen will be opened and displayed in a new browser tab after a few seconds if Local acknowledgement has been set to No. If set to Yes, the remote connection has to be approved in the Local UI. Refer to Approving a remote connection for more information.
Note
Make sure not to exceed the defined number of connections of the same remote screen. This causes an error and the connection has to be terminated and established again. If there is a connection error, close the tab, terminate and re-establish the connection.
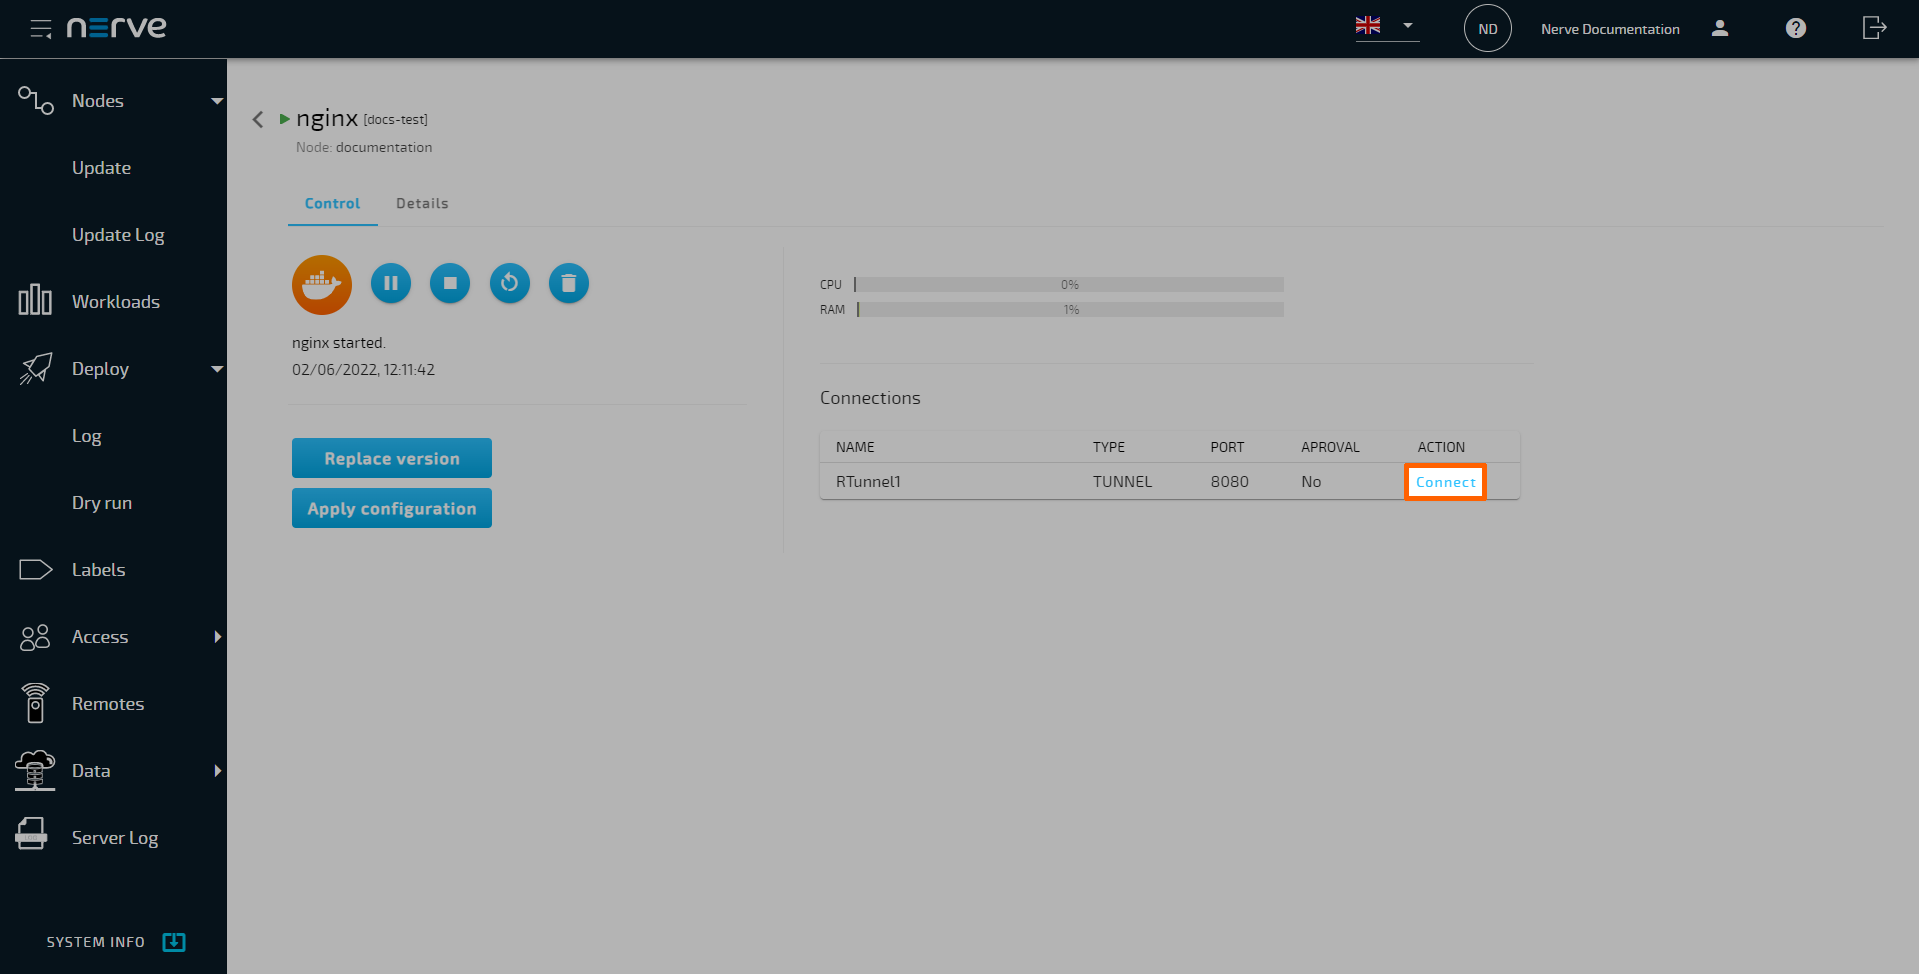
Configured remote connections are used from the target element in the Management System. So for remote connections established to a workload, the remote connection is opened from the workload control screen.
- Select Nodes in the navigation on the left.
- Select the node tree tab on the right to display registered nodes in the node tree.
- Select the node that has a deployed workload with a remote connection.
- Choose a workload from the list.
-
Select the connection icon of the workload. A new window will open.

-
Select a connection from the list. The connection process will begin.

The remote screen will be opened and displayed in a new browser tab after a few seconds if Local acknowledgement has been set to No. If set to Yes, the remote connection has to be approved in the Local UI. Refer to Approving a remote connection for more information.
Note
Alternatively, remote connections can also be opened from the workload control screen. Select a workload from the list and select Connect in the Connections list.
Note
Make sure not to exceed the defined number of connections of the same remote screen. This causes an error and the connection has to be terminated and established again. If there is a connection error, close the tab, terminate and re-establish the connection.
Remote tunnels
The Nerve Connection Manager is an application that is installed locally on the workstation. It is required for establishing and using remote connections from the local workstation. Download the Nerve Connection Manager from the Nerve Software Center first.
Note
When using older versions of nodes, refer to the compatibility matrix in the release notes to make sure if the used version is compatible with the Nerve Connection Manager.
The Nerve Connection Manager installation file is an executable file. Open the installation file and follow the installation process. The installation file is available in EXE and DEB formats for Windows or Linux.
Once installed, the Nerve Connection Manager will be associated with nerverm:// links that are generated in the Management System. Selecting such a link will automatically open the Nerve Connection Manager.
Note
If the target of the remote connection is the host of the Nerve system, use the IP address of the host: 172.20.2.1. Using localhost is not supported.
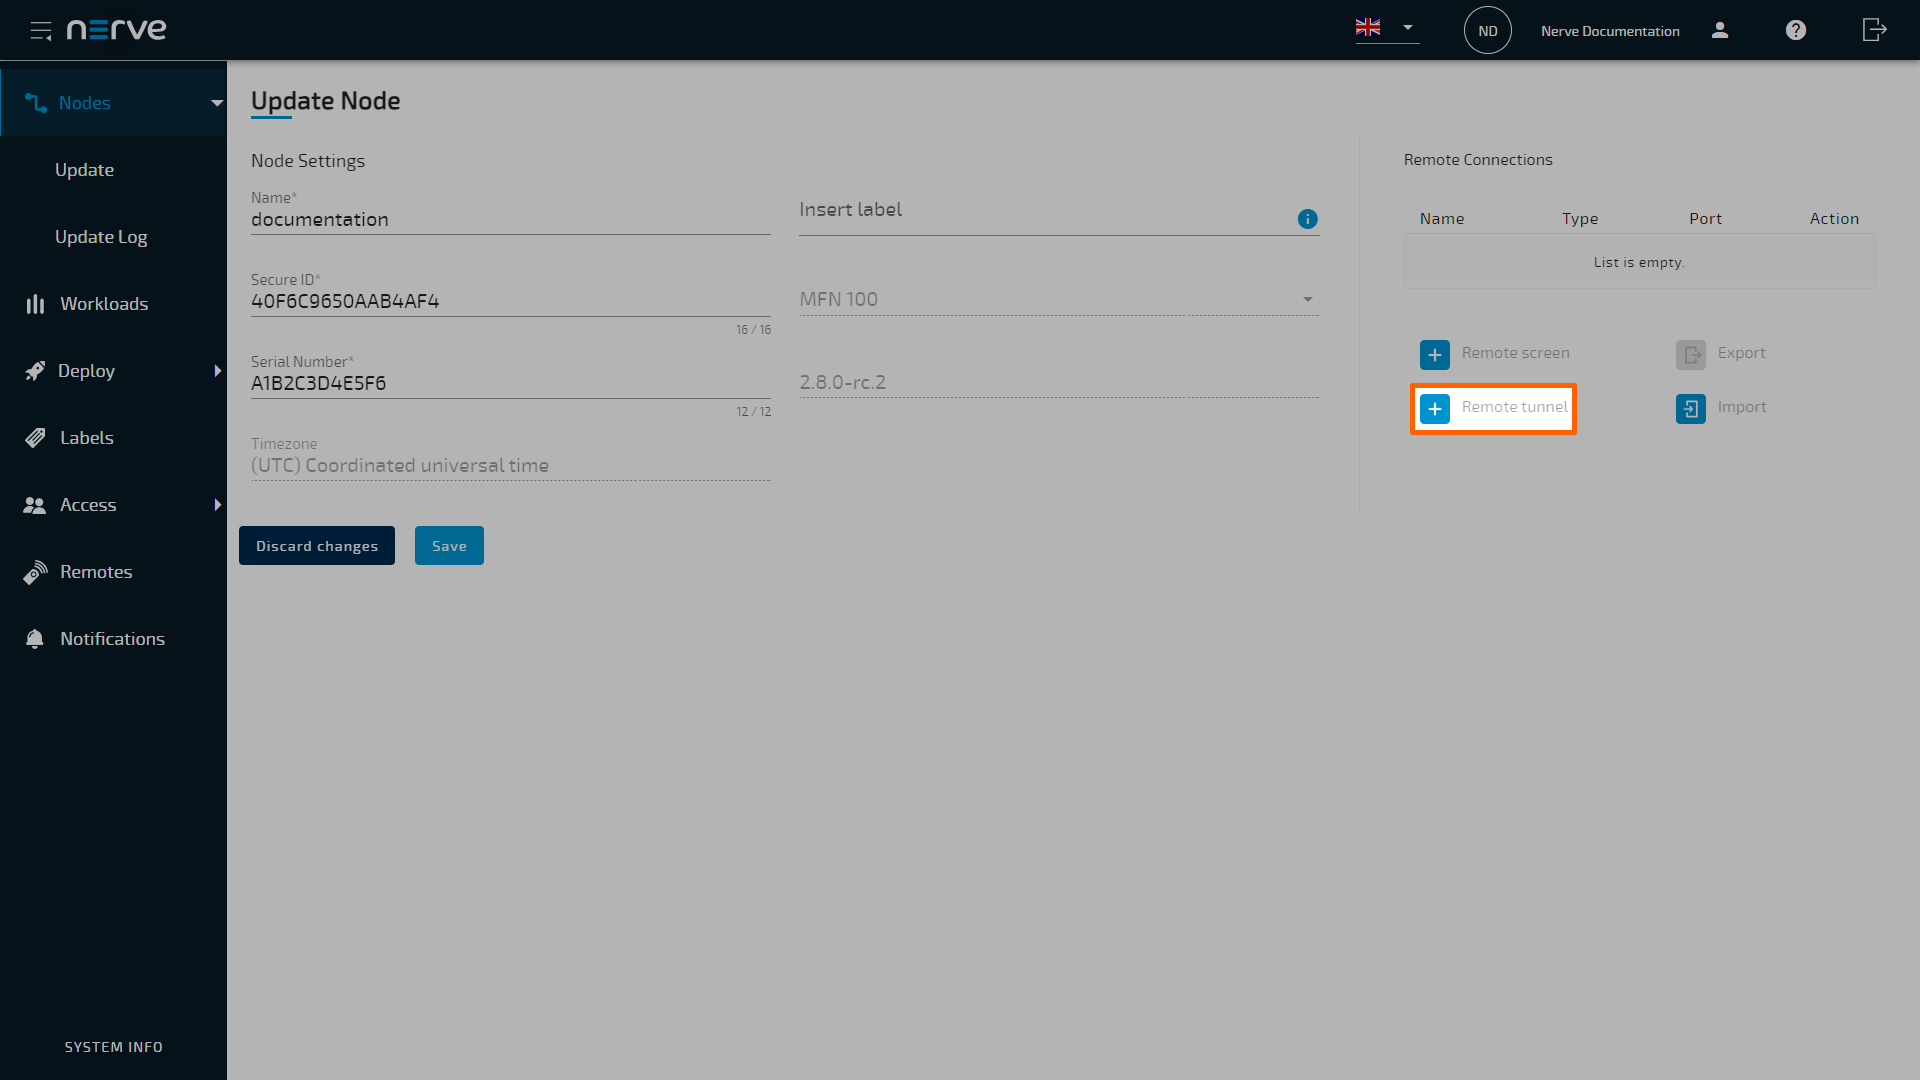
Configuring a remote tunnel
Select the connection target in the tabs below for the appropriate instructions.
Depending on the target, a remote tunnel to a node can be used in a web browser, with SSH clients, or with remote desktop applications, for example.
Note
Remote connections can also be configured when the node is being newly registered in the Management System.
- Select Nodes in the navigation on the left.
- Select the nodes tab on the right to display the list of registered nodes.
-
Select a node from the list.
-
Select the plus icon next to Remote tunnel under Remote Connections.
-
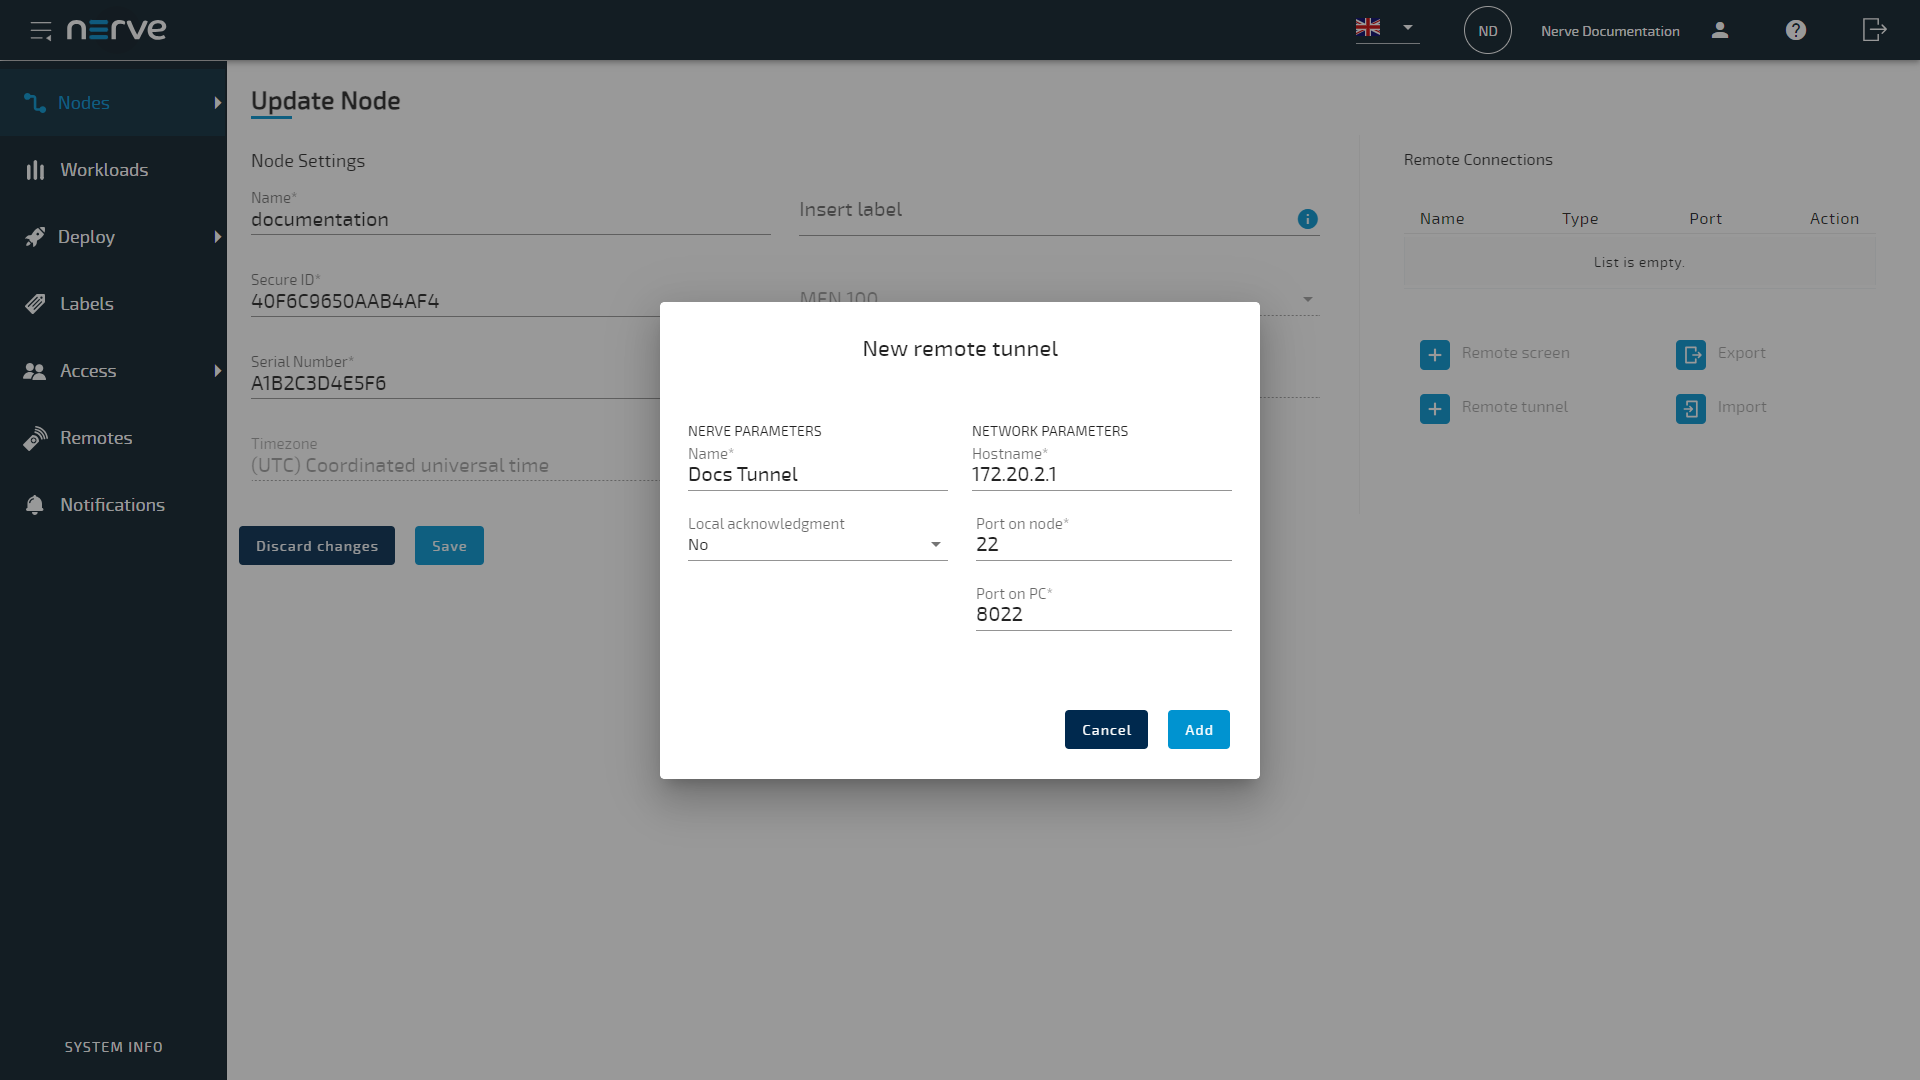
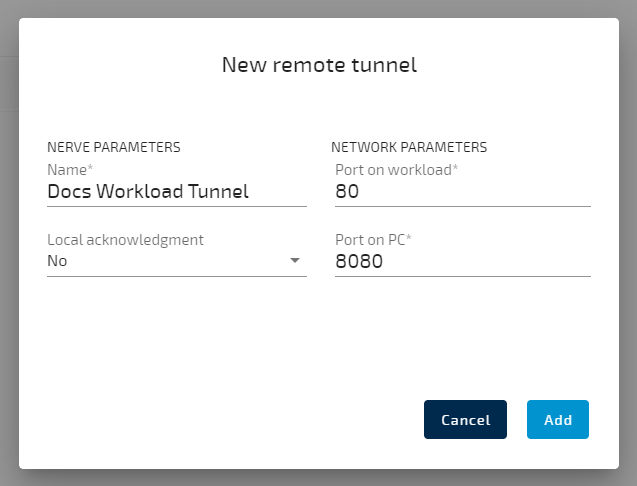
Enter the following information:
NERVE PARAMETERS Name
Enter a name for the remote connection.
Local acknowledgment
Select Yes or No from the drop-down menu.
Selecting Yes will require approval of the remote connection in the Local UI before the connection can be established. If No is selected, the settings in the Local UI do not apply.
Refer to Approving a remote connection for information on how to approve remote connections in the Local UI.NETWORK PARAMETERS Hostname
Enter the IP address or the hostname of the target here.
Port on node
Enter the port the target listens on.
Port on PC
Enter the port that will be used for communication on the local workstation. The port entered here serves as a default port that can be changed in the Nerve Connection Manager in case it is already in use. Note that some systems might restrict usage of ports under 1024. This is true for Linux systems especially. Enter port numbers higher than 1024 to avoid possible port conflicts. -
Select Add to save the remote connection configuration.
The connection is saved and now displayed under Remote Connections, showing the Name, Type and Port of the remote connection.
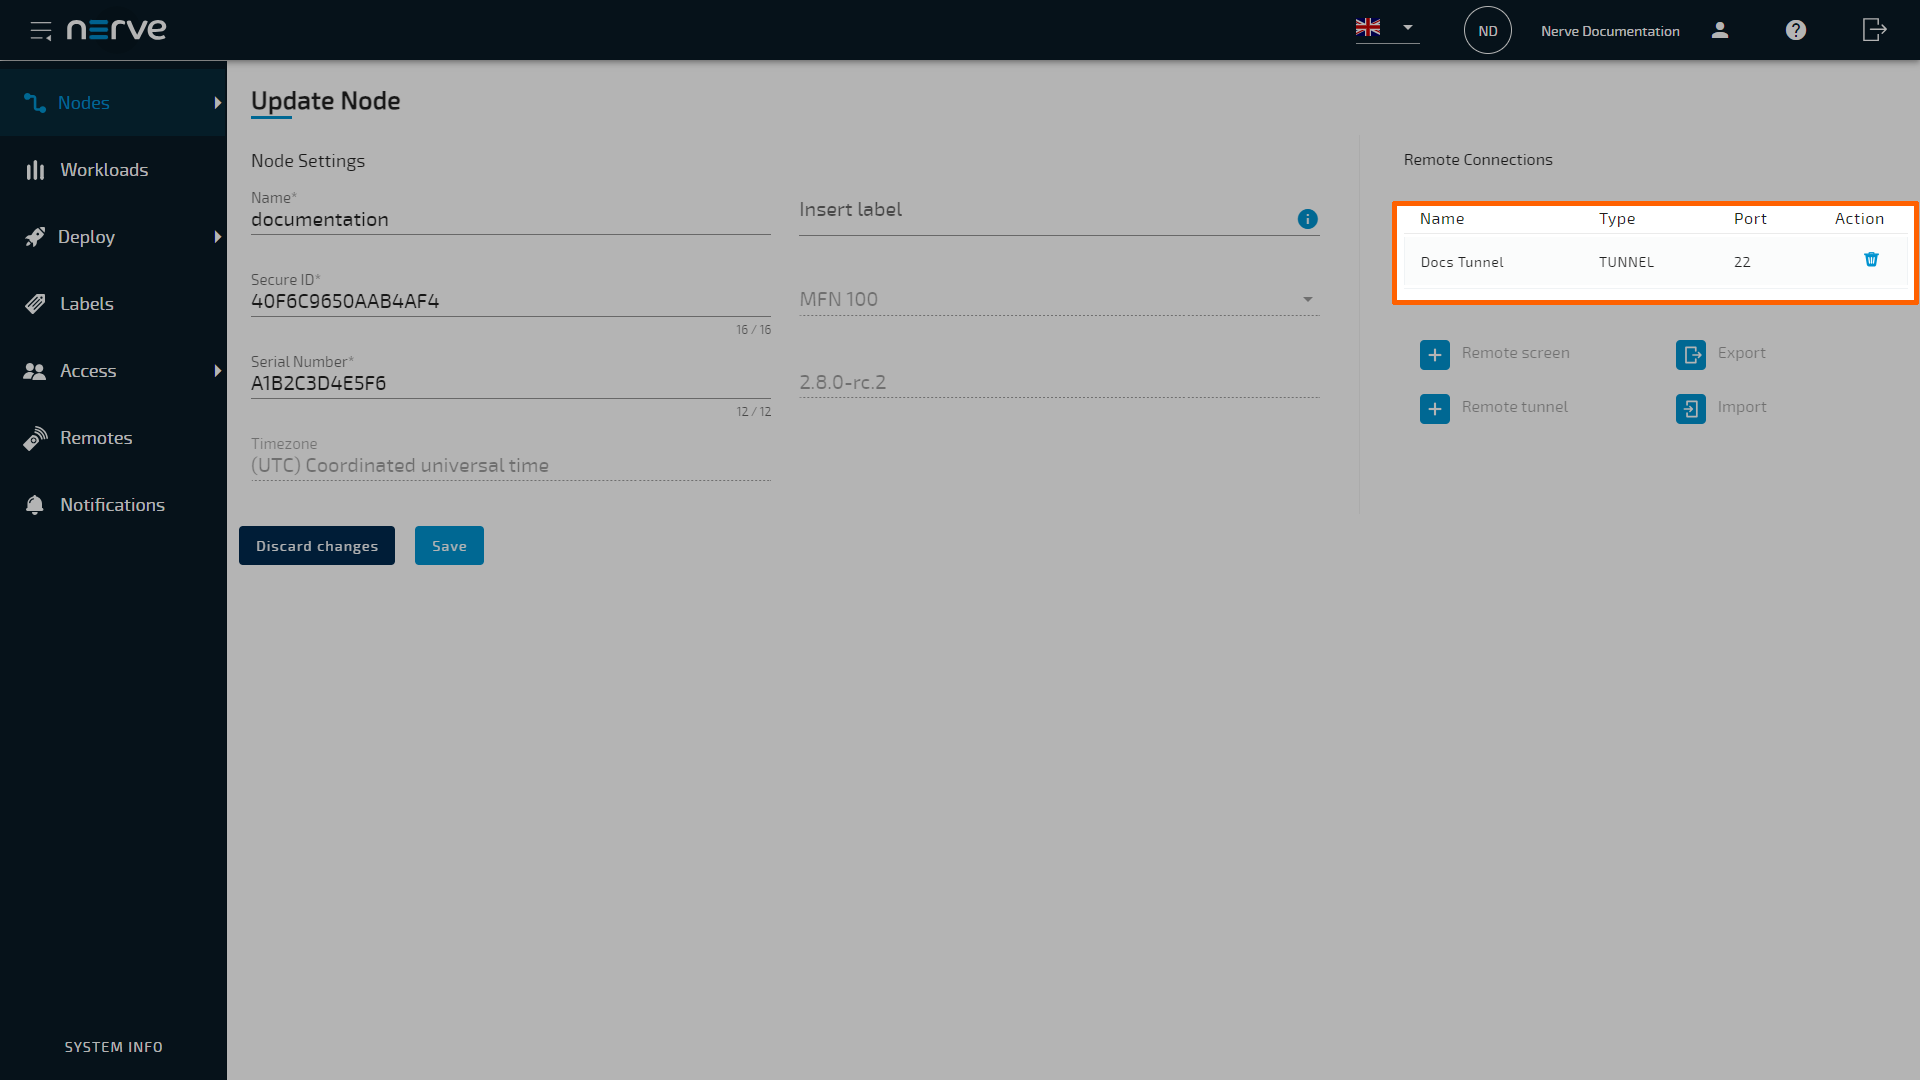
-
Select Save to save the changes.
A remote tunnel to a workload can be configured, regardless of a workload being deployed or not. Configuring a remote tunnel for a workload will immediately add the remote tunnel to the workload on all nodes that it has been deployed to. Depending on the target, a remote tunnel to a workload can be used in a web browser, with SSH clients, or with remote desktop applications, for example.
Note
Remote connections can also be configured when the workload is being newly provisioned in the Management System.
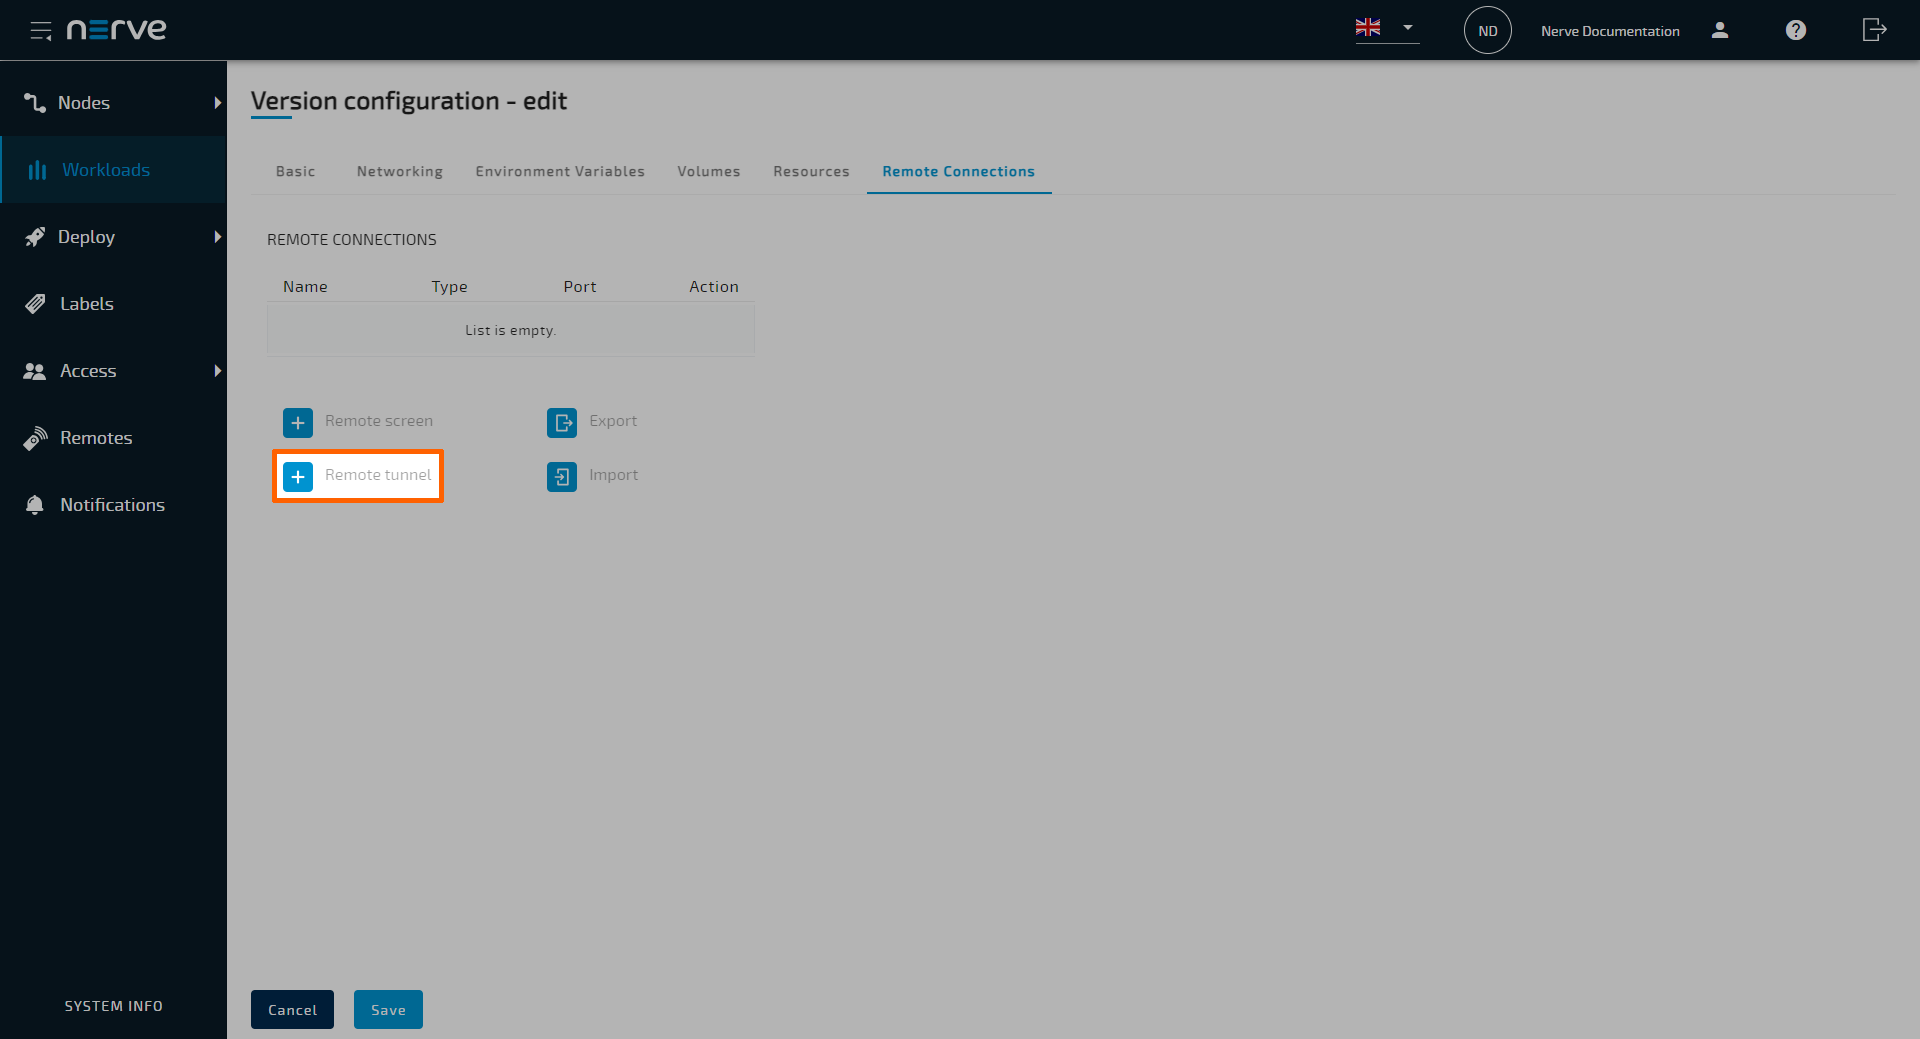
- Select Workloads in the navigation on the left.
-
Select a workload from the list.
-
Select the workload version to which a remote connection will be established.
Note
The configured remote connection will only be available for the selected version.
-
Select the Remote Connections tab.
-
Select the plus icon next to Remote tunnel under Remote Connections.
-
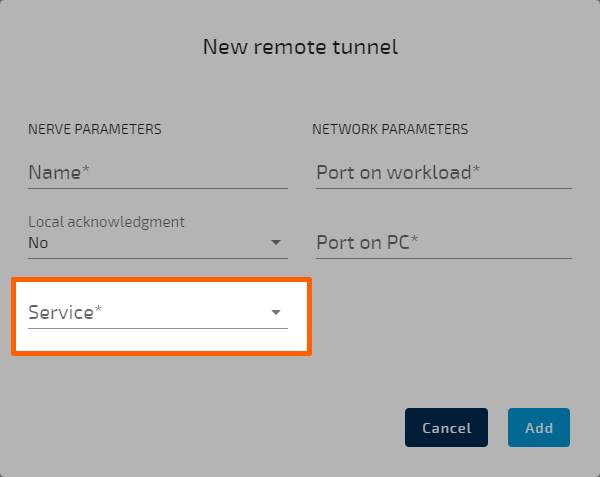
Enter the following information:
NERVE PARAMETERS Name
Enter a name for the remote connection.
Local acknowledgment
Select Yes or No from the drop-down menu.
Selecting Yes will require approval of the remote connection in the Local UI before the connection can be established. If No is selected, the settings in the Local UI do not apply.
Refer to Approving a remote connection for information on how to approve remote connections in the Local UI.<
Service
This parameter only applies when configuring a remote tunnel to a Docker Compose workload. For Docker Compose workloads, the service needs to be specified in addition, as remote connections can only be established to singular services.NETWORK PARAMETERS Hostname
Note that adding the hostname is not required when configuring a remote tunnel to a Docker workload. The system automatically detects the hostname when the workload is deployed.
For CODESYS workloads, the Hostname and Port on workload fields are filled in by the default. They contain the IP address and default port of the CODESYS runtime.
Port on workload
Enter the port the target listens on.
Port on PC
Enter the port that will be used for communication on the local workstation. The port entered here serves as a default port that can be changed in the Nerve Connection Manager in case it is already in use. Note that some systems might restrict usage of ports under 1024. This is true for Linux systems especially. Enter port numbers higher than 1024 to avoid possible port conflicts. -
Select Add to save the remote connection configuration.
The connection is saved and now displayed in the Remote Connections tab, showing the Name, Type and Port of the remote connection.
-
Select Save to save the changes.
Note
In case of Docker Compose workloads, changing the Docker Compose file to alter services, e.g. by removing them, may cause configured remote connections to not work anymore. If that is the case, the Remote Connections tab will display a warning sign:
After selecting the Remote Connections tab, the affected service will also be highlighted by a warning sign:
Using a remote tunnel
Note that the Nerve Connection Manager is required to use a remote tunnel. Download the Nerve Connection Manager from the Nerve Software Center and install it first.
Note
When using older versions of nodes, refer to the compatibility matrix in the release notes to make sure if the used version is compatible with the Nerve Connection Manager.
Configured remote connections are used from the target element in the Management System. So for remote connections established to the node, the remote connection is opened from the node details view.
- Select Nodes in the navigation on the left.
- Select the node tree tab on the right to display registered nodes in the node tree.
- Select a node with a remote tunnel from the node tree.
-
Select the Connect symbol in the node details on the right.
-
Select the remote connection from the list in the new window. Note that remote tunnels have the type TUNNEL.
-
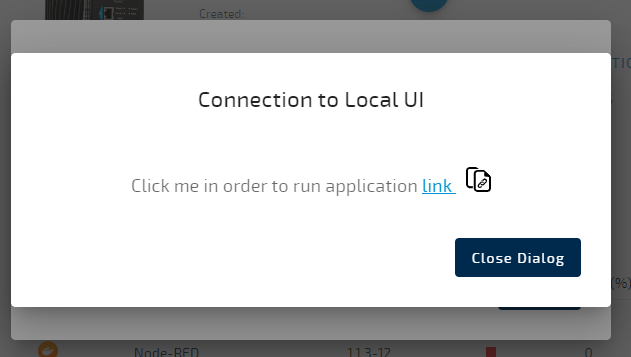
Select link in the new window.
Note
If Local acknowledgment is set to Yes, the Management System will wait for approval until the remote connection has been locally approved before displaying the window above. Refer to Approving a remote connection for more information.
-
If the Nerve Connection Manager installed correctly, confirm the browser message that the Nerve Connection Manager shall be opened.
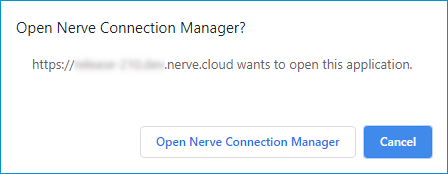
Depending on the browser that is used, this message will differ. The Nerve Connection Manager will start automatically once the message is confirmed.
Note
If the Nerve Connection Manager does not start automatically, select the copy to clipboard symbol next to Click me in order to run application in the Management System. This copies the remote connection URL.
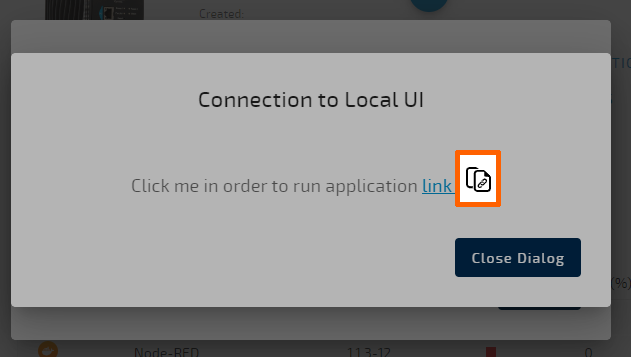
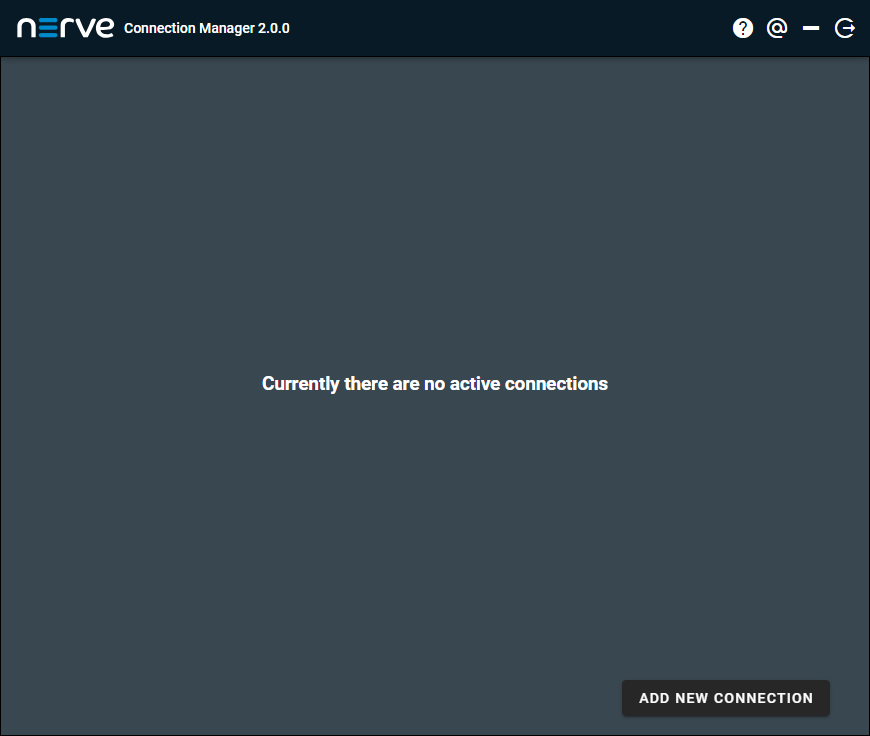
Start the Nerve Connection Manager manually and add the new connection by selecting ADD NEW CONNECTION in the lower right and pasting the URL.
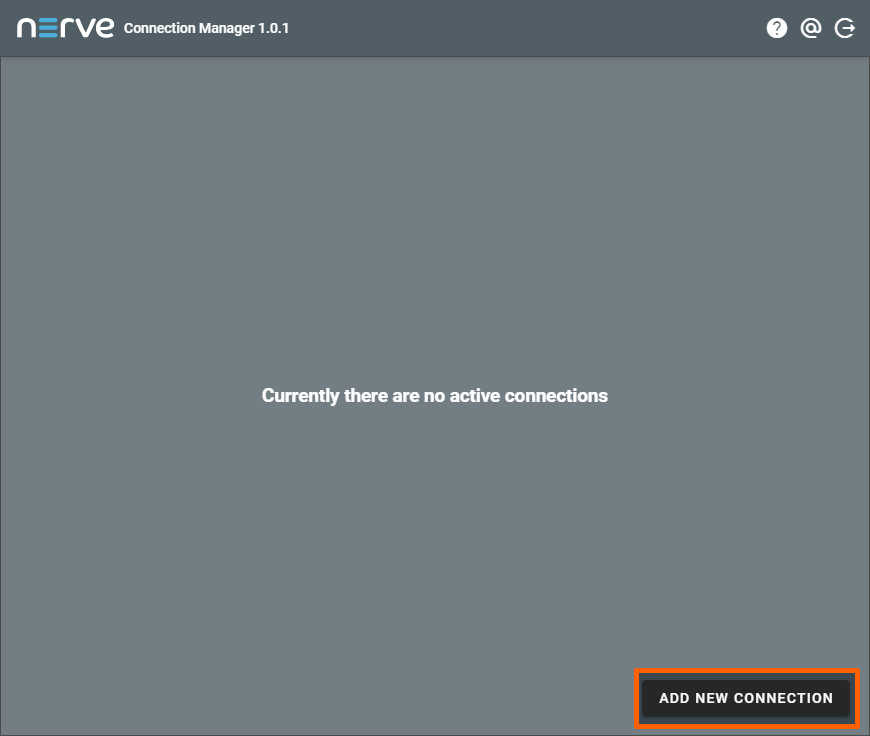
If an established connection already exists in the Nerve Connection Manager, select the Add new connection symbol next to Connections on the left side of the window.
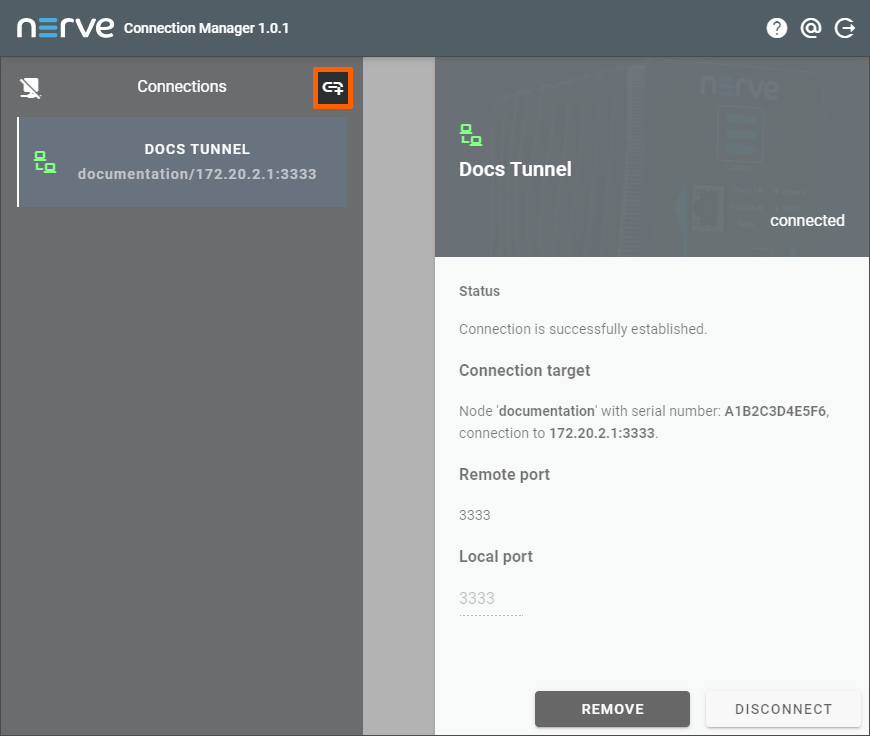
The remote connection will be established once the Nerve Connection Manager starts.
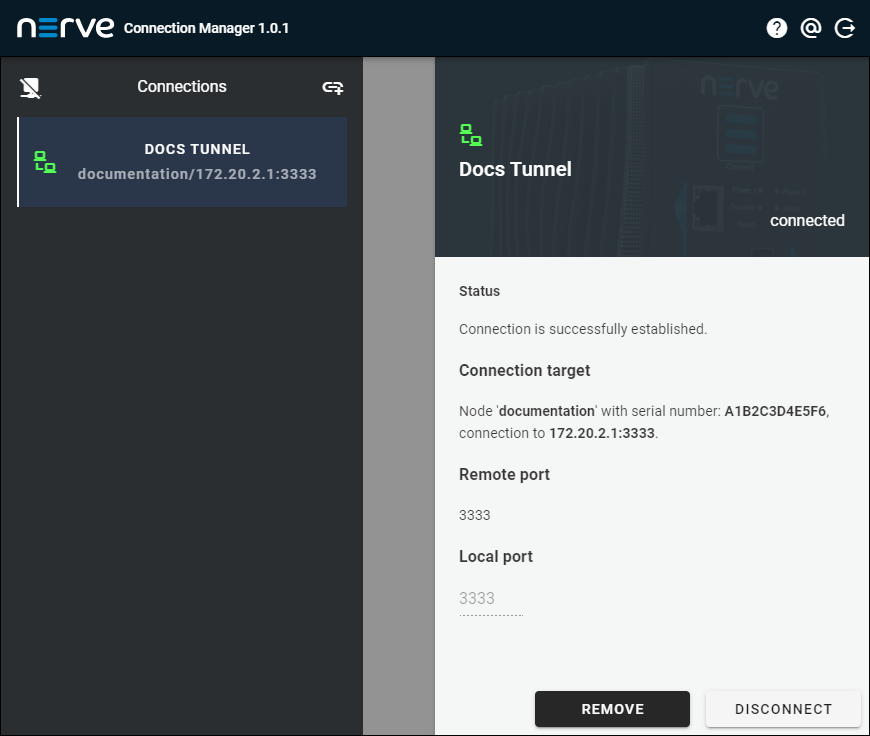
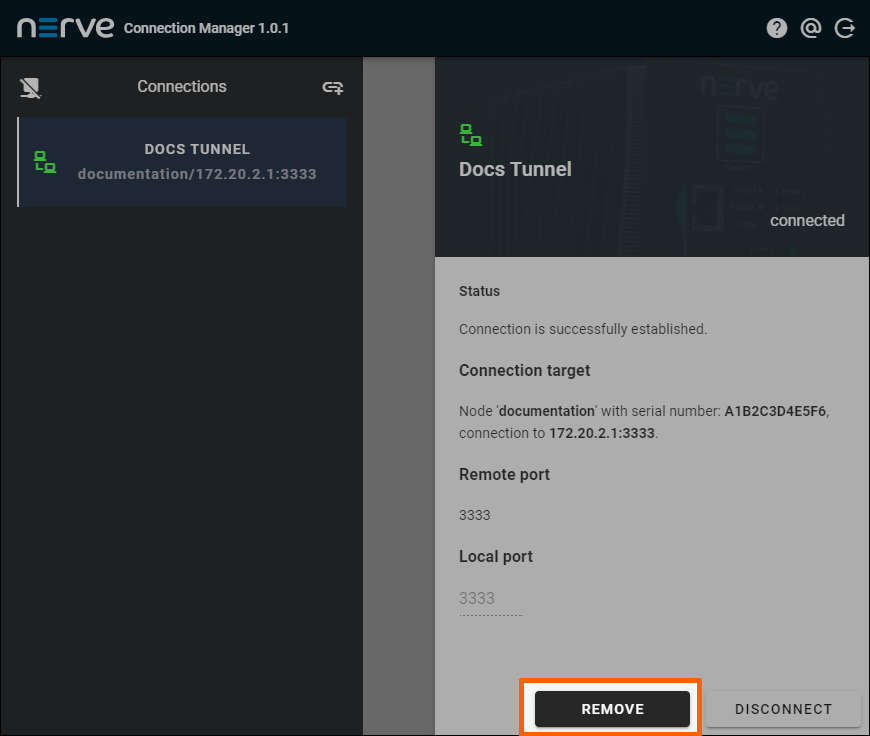
Data about the establish remote tunnel is displayed on the right half of the Nerve Connection Manager window, showing the Status, Connection target, Remote port and Local port with a summary on the left side under the remote tunnel name.
Note
If the local port on the local workstation is already in use or occupied by the system, the Nerve Connection Manager will not establish a connection. Local port will be marked on the right. Enter a different port in this field that is not used on the workstation in order to establish the remote tunnel.
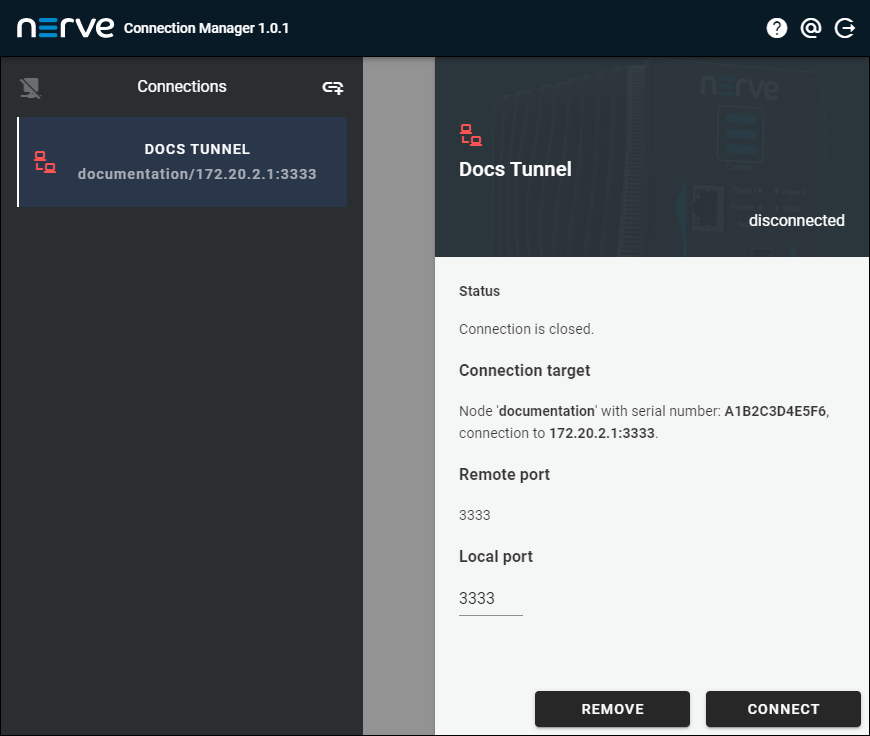
The connection can now be used from the local workstation by using localhost:<localport> through PuTTY in order to establish an SSH connection or in a web browser. Disconnect by selecting DISCONNECT in the lower right corner.
Note
Alternatively, all remote connections can be disconnected at once by selecting the Disconnect all symbol on the left side next to Connections.
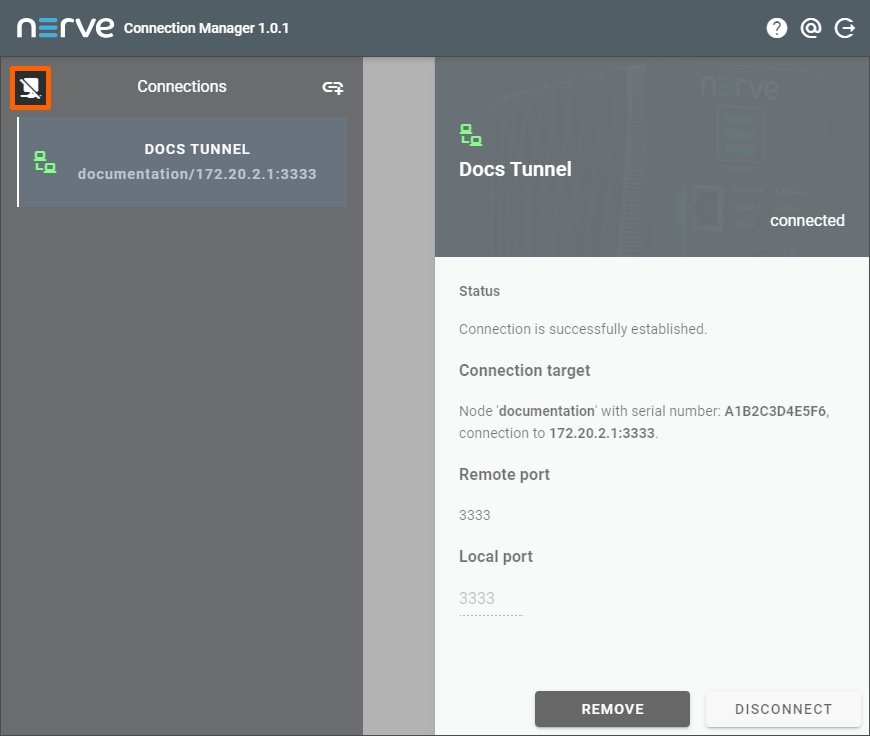
Note that disconnecting does not terminate the connection. The connection will stay established until it is terminated in the Nerve Connection Manager, the Local UI or the Management System.
Configured remote connections are used from the target element in the Management System. So for remote connections established to a workload, the remote connection is opened from the workload control screen.
- Select Nodes in the navigation on the left.
- Select the node tree tab on the right to display registered nodes in the node tree.
- Select the node that has a deployed workload with a remote connection.
-
Select the workload.
-
Select Connect from the Connections list.
-
Select link in the new window.
Note
If Local acknowledgment is set to Yes, the Management System will wait for approval until the remote connection has been locally approved before displaying the window above. Refer to Approving a remote connection for more information.
-
If the Nerve Connection Manager installed correctly, confirm the browser message that the Nerve Connection Manager shall be opened.
Depending on the browser that is used, this message will differ. The Nerve Connection Manager will start automatically once the message is confirmed.
Note
If the Nerve Connection Manager does not start automatically, select the copy to clipboard symbol next to Click me in order to run application in the Management System. This copies the remote connection URL.
Start the Nerve Connection Manager manually and add the new connection by selecting ADD NEW CONNECTION in the lower right and pasting the URL.
If an established connection already exists in the Nerve Connection Manager, select the Add new connection symbol next to Connections on the left side of the window.
The remote connection will be established once the Nerve Connection Manager starts.
Data about the establish remote tunnel is displayed on the right half of the Nerve Connection Manager window, showing the Status, Connection target, Remote port and Local port with a summary on the left side under the remote tunnel name.
Note
If the local port on the local workstation is already in use or occupied by the system, the Nerve Connection Manager will not establish a connection. Local port will be marked on the right. Enter a different port in this field that is not used on the workstation in order to establish the remote tunnel.
The connection can now be used from the local workstation by using localhost:<localport> through PuTTY in order to establish an SSH connection or in a web browser. Disconnect from the remote tunnel by selecting DISCONNECT in the lower right corner of the Nerve Connection Manager.
Note
Alternatively, all remote connections can be disconnected at once by selecting the Disconnect all symbol on the left side next to Connections.
Note that disconnecting does not terminate the connection. The connection will stay established until it is terminated in the Nerve Connection Manager, the Local UI or the Management System.
Connecting to a device remotely in CODESYS
A common use case for remote tunnels is connecting to a Nerve Device through the CODESYS Development System. Follow the instructions below to connect to a remote Nerve Device.
- Open a CODESYS project.
- Double-click Device (Nerve) in the tree view on the left.
- Go to Communication Settings in the middle of the window
-
Enter
127.0.0.1:<portonpc>in the text box under the device on the right.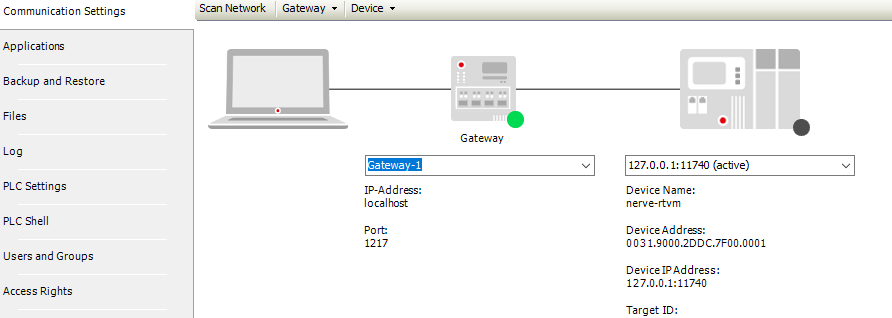
Note
Replace
<portonpc>with the port number that was defined under Port on PC in the Management System when the remote tunnel was defined.
Refer to First steps with CODESYS for more information on how to start working with CODESYS in Nerve.
Terminating remote connections
Remote connections can be used as long as they are not terminated. A remote connection can be terminated from the Management System, in the Local UI or in the Nerve Connection Manager. Also, remote connections terminate automatically after 30 minutes of inactivity. Once a connection has been terminated, it has to be established again.
Note
Note the behavior of the system in the following scenarios:
- If the power of the node is unplugged and remains unplugged, the remote connection will be removed from the Management System and the Nerve Connection Manager after 15 minutes.
- If the power of the node is unplugged and plugged back in, the remote connection will be removed as soon as the node comes back online.
- If the node is disconnected from the network and remains disconnected, the remote connection will be removed from the Management System, Local UI and Nerve Connection Manager after an hour has passed.
- If the node is disconnected from the network and connected again within an hour, the connection will be restored.
Terminating an open remote connection does not remove the configuration of the remote connection from the node or workload. If a remote connection is terminated, it has to be re-established in the Management System to be used again.
Select the location from where to terminate a remote connection for appropriate instructions.
- Connect to the Management System.
- Select Remotes in the navigation on the left.
- Tick the checkbox next to the remote connection.
-
Select the Remove button.
-
Select Yes in the new window.
Note
Once a remote screen has been terminated while the browser tab is still open, a pop-up window will appear that offers the option to reconnect. Selecting Reconnect in the pop-up window has no effect. Close the window and re-established the connection in the Management System.
- Connect to the Local UI.
- Select Remotes in the navigation on the left.
- Tick the checkbox next to the remote connection.
-
Select the Remove button.

-
Select Yes in the new window.
- Open the Nerve Connection Manager. Note that the Nerve Connection Manager will already be open if a remote tunnel has been established.
- Select a remote connection that will be terminated in the list on the left.
-
Select REMOVE in the lower-right.
-
Select YES in the overlay that appeared.
Note that exiting the Nerve Connection Manager terminates all remote tunnels.
Exporting and importing remote connections
All remote connections of a node or workload version can be exported into a YAML file. These exported YAML files can then be imported to other nodes or workloads to ease remote connection configuration. However, please note the following tips and tricks when working with exported remote connection YAML files:
| Create remote connections manually in the UI first and then export them. | This ensures that all required fields for the target of the remote connection are filled, the exported file is valid and issues when importing a file are minimal. |
| Export and import remote connections for the same type of target | When configuring a remote connection to a specific target, i.e. a node, there is no guarantee that importing the same remote connection to a different target, i.e. a workload, is going to configure a functioning remote connection. |
| Use schema files only for validation. | It is not recommended to use the schema files for the creation of remote connection YAML files. The schema files are simplified for validation purposes only, as there are differences between required fields depending on connection type or connection target. For example, the hostname field is required for all remote connections targeting nodes but not for workloads. |
| Passwords are not saved in exports for security reasons. | If a remote connection contains a password, such as VNC screens where they are required, the password needs to be added manually to the exported YAML file before the file is imported. |
| Only import remote connections for Docker Compose workloads if all services are present. | Take care to import remote connections with services and service names that match the ones listed in the compose file. It is possible to successfully import the remote connection file but the remote connections will effectively be rendered not usable if the services do not match. |
Take a look at the following examples of exported remote connections. Each file shows an example for every connection type — remote screens (SSH, VNC, RDP) and tunnels — configured for different targets:
- Examples for node
- Examples for CODESYS workloads
- Examples for Docker workloads
- Examples for Docker Compose workloads
- Examples for Virtual machine workloads
Remote connections schema files
For validation purposes, the following schema files can be used. However, note that they are not to be used for generating remote connection YAML files, as they are not complete schema files. Following the examples above, the first two lines of a remote connection YAML file look like this:
schemaVersion: '1.0'
remoteConnections:
After the second line, each remote connection type object with its parameters and values can be listed. So the following files are schema files for each connection type object:
- Remote tunnel object schema file
- Remote screen SSH object schema file
- Remote screen VNC object schema file
- Remote screen RDP object schema file
However, note that depending on the target, different parameters might be required. So to reiterate the tips and tricks table above, create remote connections manually first and then export them to make sure that all fields are filled in correctly for the appropriate target.
Exporting remote connections
Note that all remote connections are exported at once. Singling out one remote connection needs to be done manually in the exported YAML file.
- Select Nodes in the navigation on the left.
- Select the nodes tab on the right to display the list of registered nodes.
-
Select a node from the list.
-
Select Export.
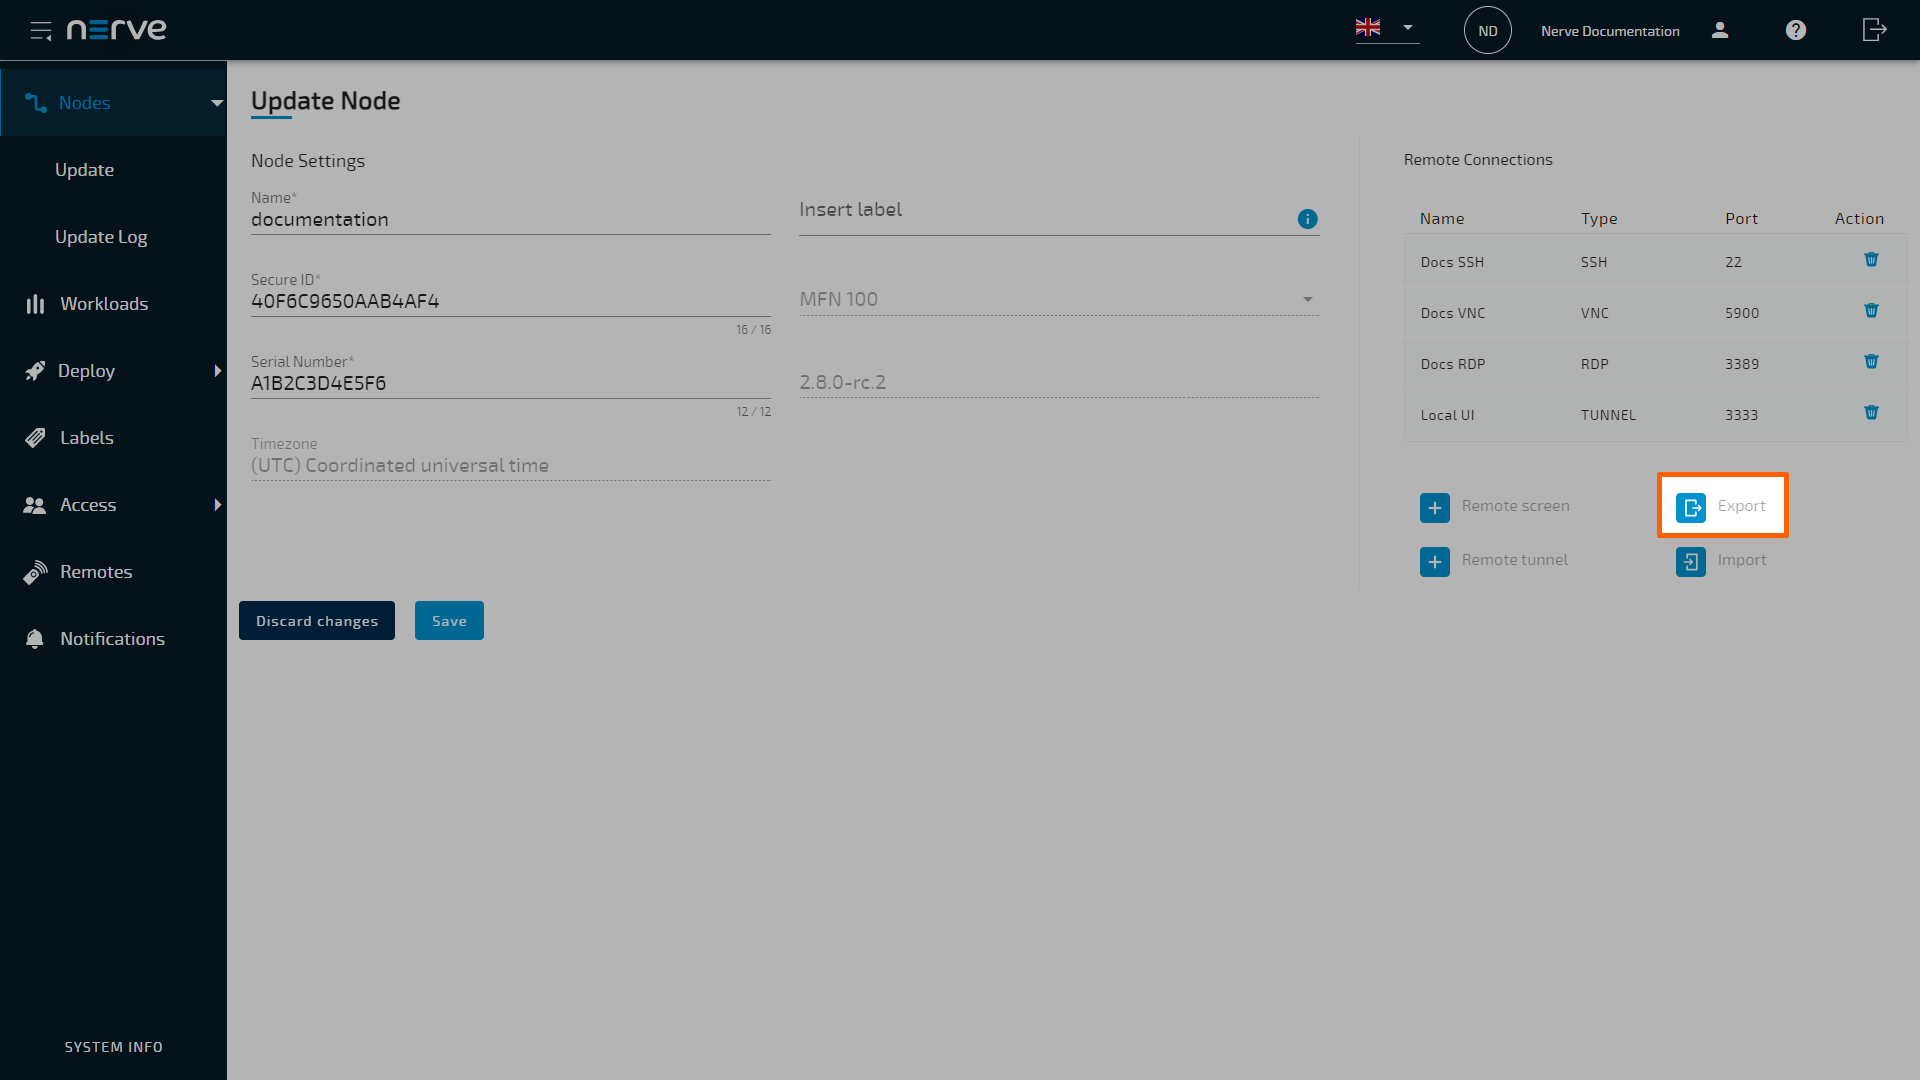
A YAML file containing all remote connections is downloaded.
- Select Workloads in the navigation on the left.
-
Select a workload from the list.
-
Select the workload version to which a remote connection will be established.
Note
The configured remote connection will only be available for the selected version.
-
Select the Remote Connections tab.
-
Select Export.
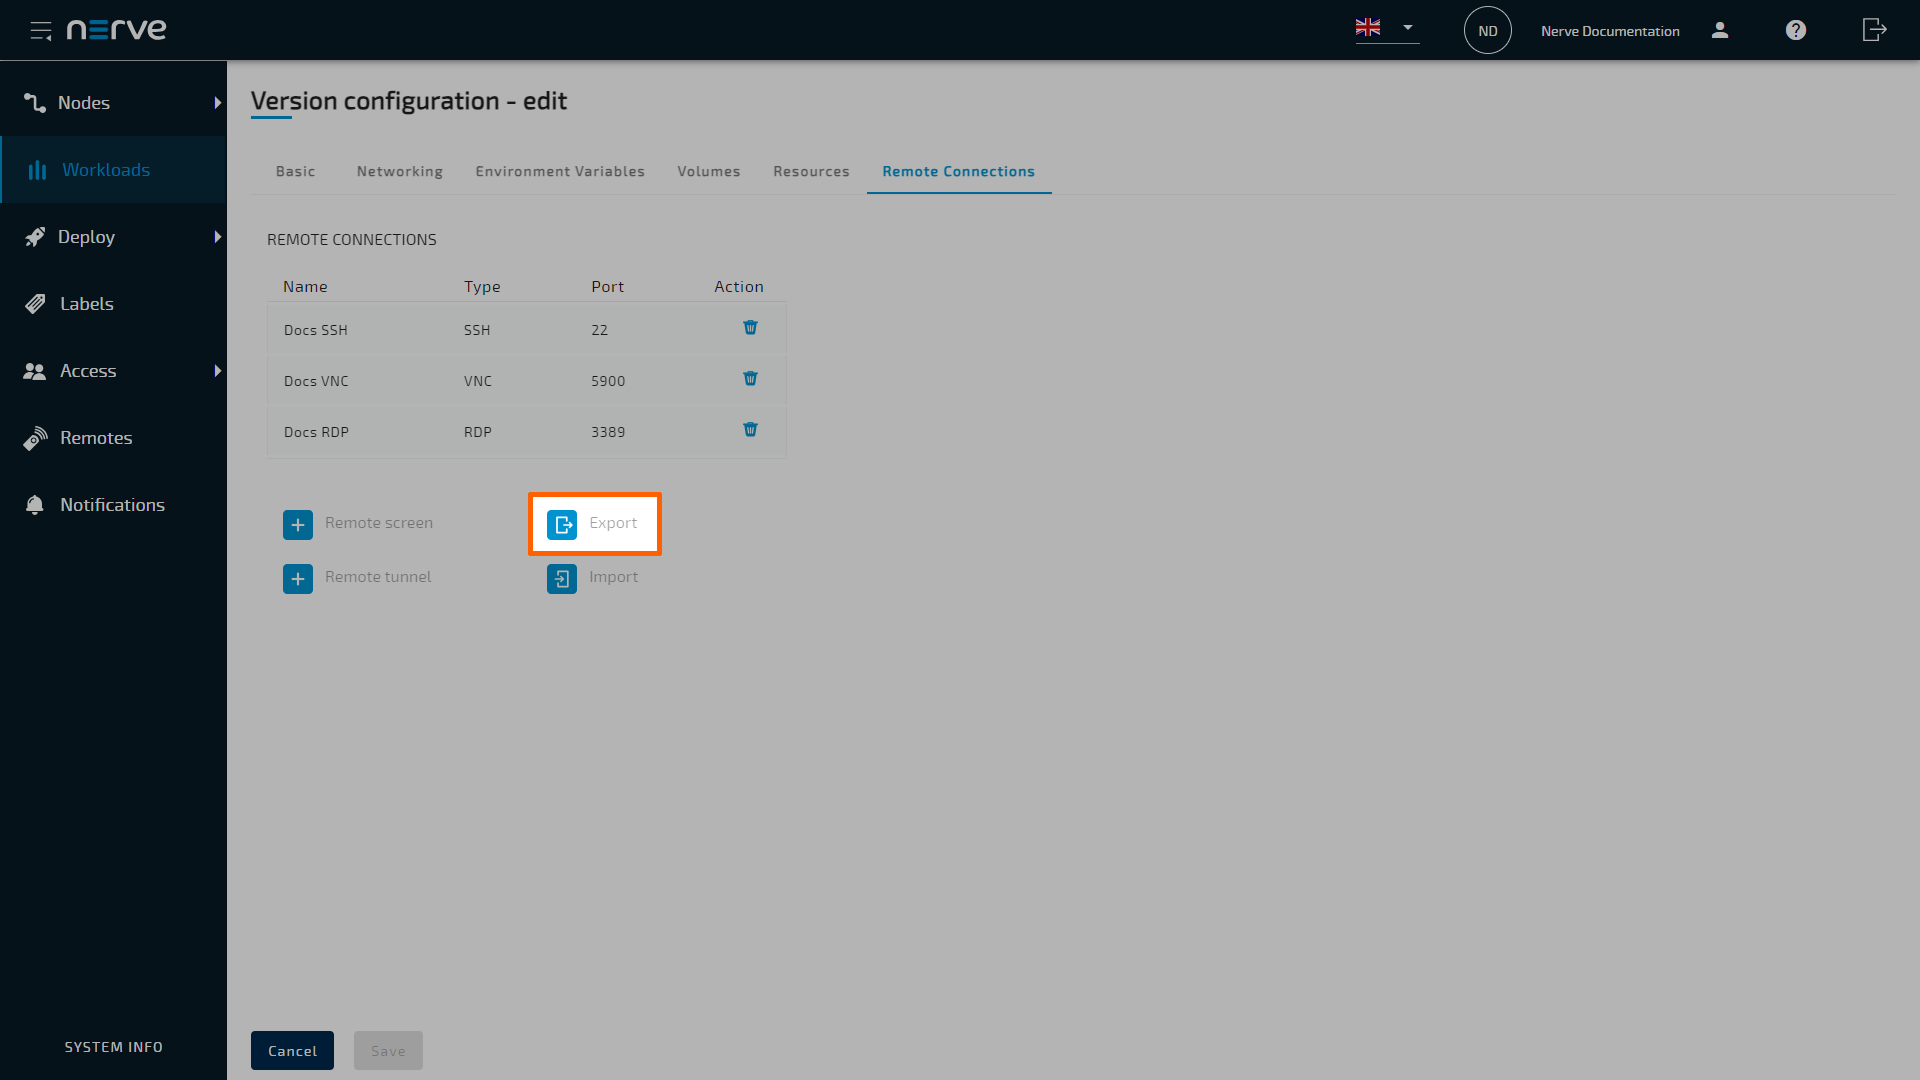
A YAML file containing all remote connections is downloaded.
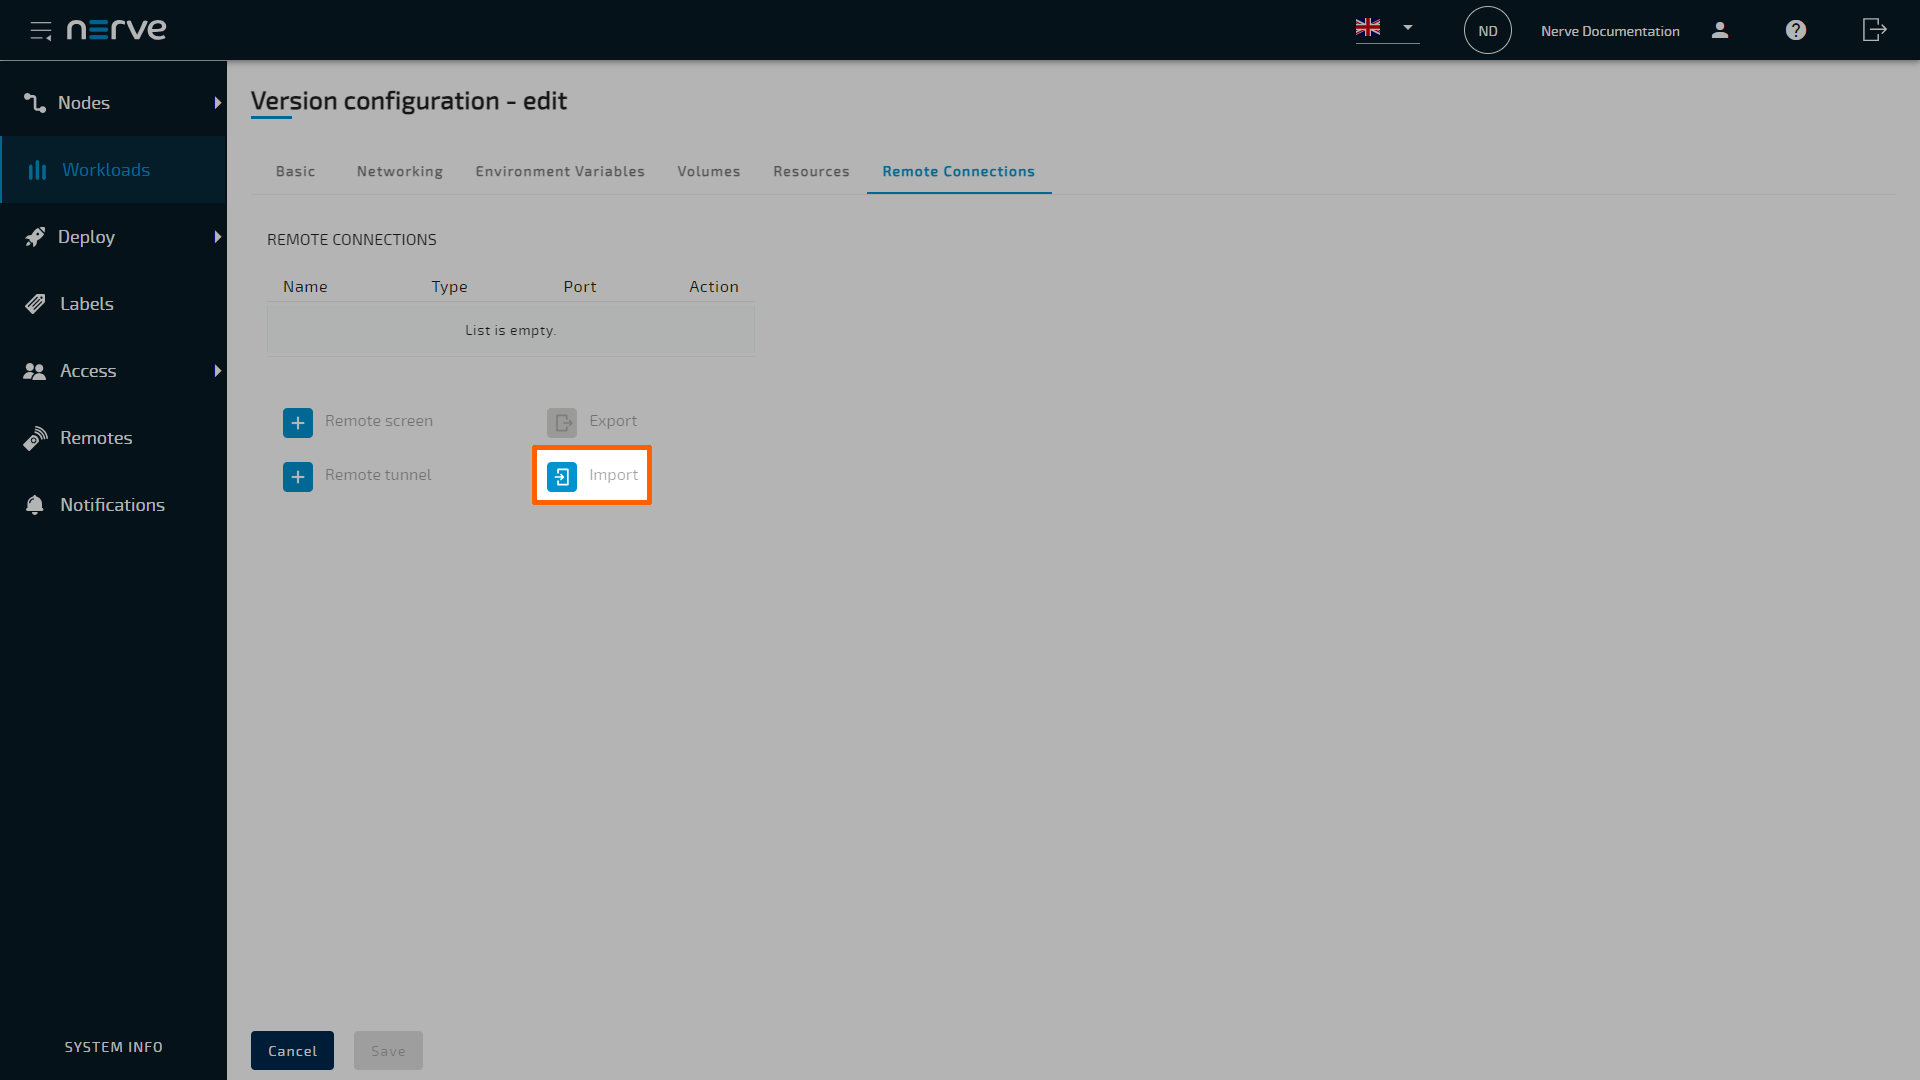
Importing remote connections
Make sure to have a YAML file containing remote connections ready before continuing with the instructions below. Refer to Exporting remote connections above for information on how to export remote connections.
Note
Remote connections can also be imported when the node is being newly registered in the Management System.
- Select Nodes in the navigation on the left.
- Select the nodes tab on the right to display the list of registered nodes.
-
Select a node from the list.
-
Select Import.

-
Add a previously exported YAML file containing remote connections in the file browser.
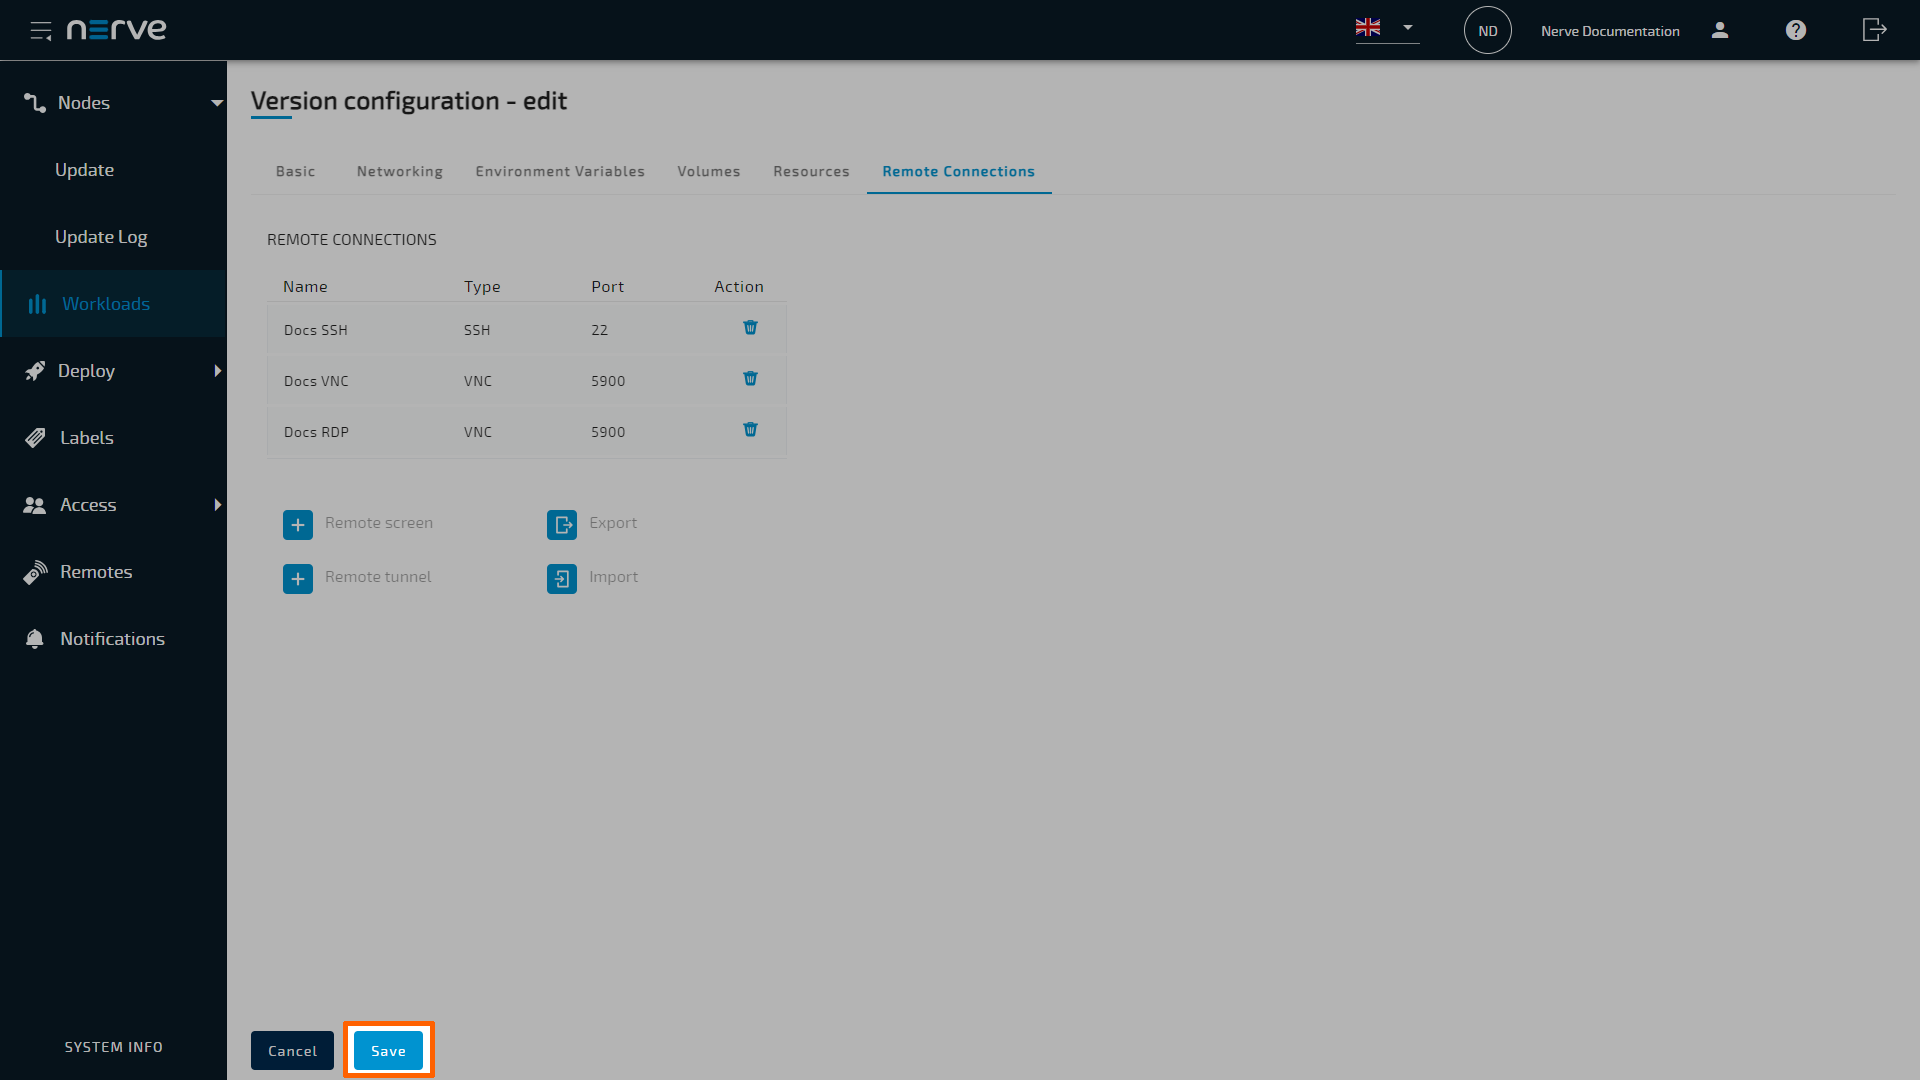
- Select Open. The imported remote connections will be shown in the table immediately but are not saved yet.
-
Select Save to save the changes.
Note
Remote connections can also be imported when the workload is being newly provisioned in the Management System.
- Select Workloads in the navigation on the left.
-
Select a workload from the list.
-
Select the workload version to which a remote connection will be established.
Note
The configured remote connection will only be available for the selected version.
-
Select the Remote Connections tab.
-
Select Import.
-
Add a previously exported YAML file containing remote connections in the file browser.
- Select Open. The imported remote connections will be shown in the table immediately but are not saved yet.
-
Select Save to save the changes.
Common error cases and known issues
Below is a list of most common error cases and known limitations. Hints how to avoid them or solve them the easiest way are given where applicable.
Remote screens
-
When trying to connect to a suspended workload, long loading times might occur. The connection can also seem established but the user will not be able to act in the remote screen window. The reason might be that a remote screen to a suspended workload was attempted. This is not supported.
Close the browser tab and terminate the connection in the Management System in that case. Make sure the workload is in the started state and re-establish the remote screen. If the behavior persists, investigate the workload settings or the node.
-
Remote screens to workloads will be shown as active under Remotes if the workload is undeployed while the remote screen is being used.
Remote tunnels
-
Using two remote tunnels to two nodes, accessing the Local UI of each node at the same time is not possible. This is due to authentication conflicts.
Use the incognito mode of the current browser for the second tab or a second browser if both Local UIs have to be operated at the same time.
-
Some systems might restrict usage of local ports lower than 1024. This is true for Linux systems especially. Enter ports higher than 1024 under Port on PC when configuring a remote tunnel to avoid port conflicts.