Registering a Node in the Management System#
In this version, it is required to register the node through the command line before you can use it in the Management System. The command line tool will be executed locally on the Nerve Device. The files have been sent as part of the delivery.
Note
If you have not received the required files for the registration of a node, please contact your sales representative or TTTech Industrial customer support at support@tttech-industrial.com.
Hardware Setup#
In order to connect the node to the Management System, you will need to set up the Nerve Device and connect your local workstation to the Nerve Device:
- Please set up your Nerve Device as described in Hardware Setup.
- Connect your workstation to the console port (P1) of the MFN 100.
With this, the hardware is ready for the registration process.
Note
Port 443 (HTTPS) and port 8883 (MQTTS) of the corporate firewall have to be open for communication between nodes and the Management System.
Copying the Tool to the Nerve Device#
As the dependencies for the command line tool are already installed on the Nerve Devices, you only need to copy it to the Nerve Device and execute it from there. To do so, you will need an SSH client and a file transfer client. PuTTY and WinSCP are used as examples.
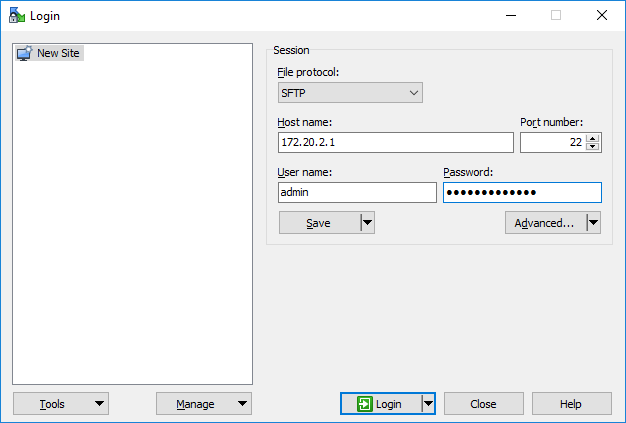
- Open a file transfer client like WinSCP.
- Enter
172.20.2.1under Host Name. -
Enter the credentials for host access to the Nerve Device from the customer profile below under User name and Password.
-
Copy the
nerve-onboard.pyto the Nerve Device. The default path is/home/admin/on the Nerve Device.
With the command line tool now copied to the Nerve Device, you can execute the tool on the Nerve Device. We will use an SSH connection to do so.
Using the Tool#
Now that all preparations are complete, you can execute the command line tool and start the registration of the node in the Management System.
- Open an SSH client like PuTTY.
-
Enter
172.20.2.1under Host Name (or IP address) to log in to the host of the Nerve Device.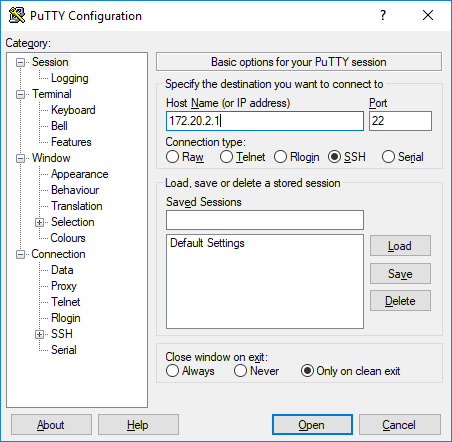
-
Click Open.
- Log in with the credentials for host access of the Nerve Device from the customer profile.
-
Enter
python3 nerve-onboard.py <domain> <serial>and replace the placeholders with this information:Item Description <domain> This is the URL of your cloud. Please enter the URL without the protocol in the beginning. You can find it in the customer profile.
Example:example.nerve.cloud<serial> Enter the serial number of your Nerve Device here. You can find it on the label of the Nerve Device. -
Enter the following information in the table. The tool will prompt you one by one:
Item Description New LocalUI password Define the new password for the local UI of your Nerve Device. New RT VM password Define the new password for the CODESYS runtime. New system password Define the new password for SSH host access. Cloud password Enter the password of your cloud access from the customer profile. 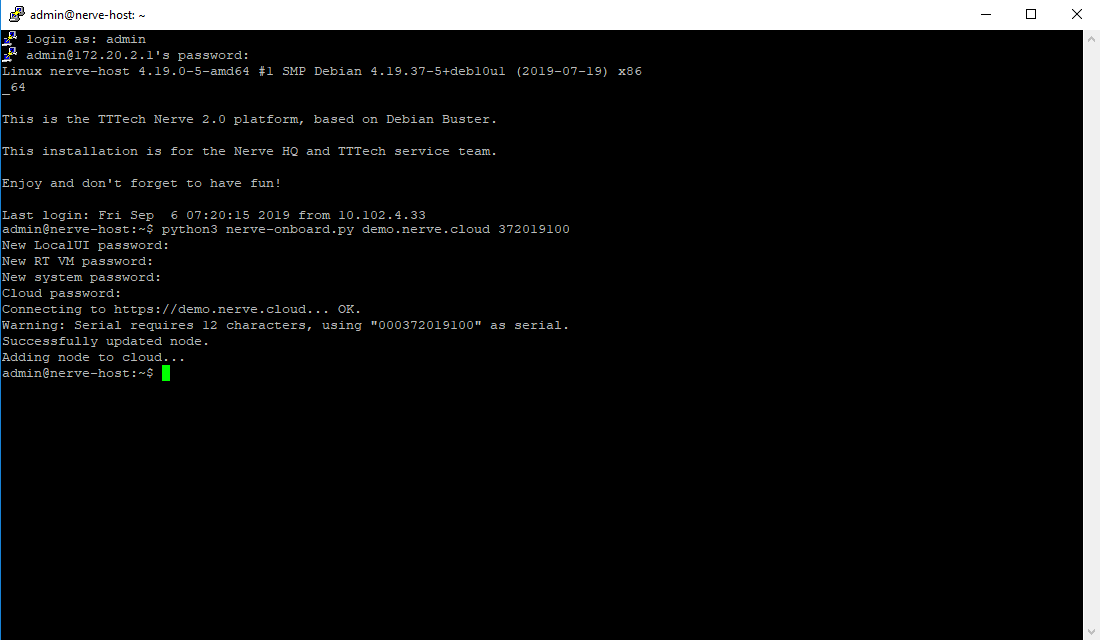
Note
The passwords above must be at least 8 characters long.
The node is now online and registered in the Management System. You can find it under Root > Unassigned in the Node Tree.

Note
Please make sure to note down the new passwords you have defined as you will need them later.