Vecow SPC-5600-i5-8500
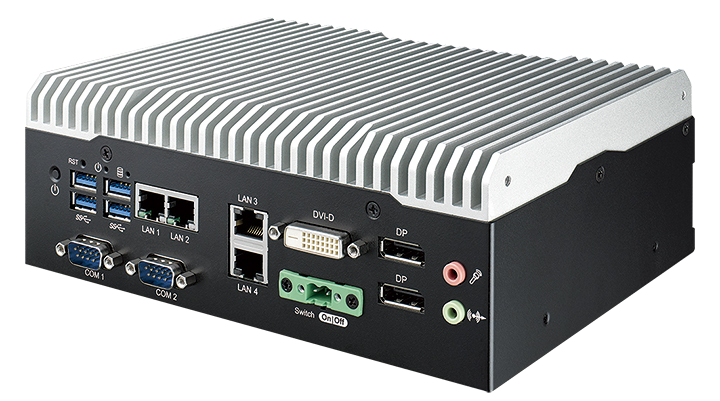
The Vecow SPC-5600 Series is powered by 8 Cores Intel® Core™ i5 and can be used for vehicle computing, smart manufacturing, in-vehicle infotainment, intelligent control or any IIoT application.
For more information refer to the information materials provided by the manufacturer:
Device specifications
The table below contains the key specifications of the specific hardware model that has been certified for Nerve usage. Use the article number listed here when ordering the device from the manufacturer only. Note that other device variants are not supported as Nerve Devices.
If required, contact sales@tttech-industrial.com for help with ordering Nerve Devices.
| Item | Description |
|---|---|
| Article number | SPC-5600A-8500T32 |
| CPU | Intel Core i5-8500T |
| Cores | 6 |
| RAM | 32 GB DDR4 |
| Storage | 512 GB 2.5" SATA SSD MLC |
| TPM | TPM 2.0 included |
| Interfaces |
|
Setting up the device for Nerve usage
Follow the instructions below to set up the hardware, install the Nerve software and make the node ready for use in the Management System. Note that the materials provided by the device manufacturer are also required to continue.
Requirements for the instructions below:
|
Refer to the user manual of the manufacturer to set up the hardware. Connect a keyboard and a monitor to the device and make sure that the device is ready to be powered on. Also, prepare a USB drive in case the BIOS version of the device needs to be updated.
BIOS update
To avoid possible issues and complications, the BIOS version on the SPC-5600 needs to be version V27.01.03. or later. Refer to the user manual of the manufacturer for information on how to update the BIOS version.
Required BIOS settings for Nerve
Certain BIOS settings need to be changed to ensure the desired performance of the Nerve system.
- Power on the device.
- Press Del while the device is booting to enter the BIOS menu.
-
Change the following settings:
Path Setting Advanced > CPU Configuration > Intel (VMX) Virtualization Technology Enabled Advanced > Power & Performance > CPU - Power Management Control > Boot performance mode Max Non-Turbo Performance Advanced > Power & Performance > CPU - Power Management Control > Intel (R) SpeedStep(tm) Disabled Advanced > Power & Performance > CPU - Power Management Control > Intel (R) Speed Shift Technology Disabled Advanced > Power & Performance > CPU - Power Management Control > C states Disabled Advanced > ACPI Settings > Enable Hibernation Disabled Advanced > ACPI Settings > ACPI Sleep State Suspend Disabled Advanced > Network Stack Configuration > Network Stack Enabled Chipset > System Agent (SA) Configuration > VT-d Enabled Security > Secure Boot > Secure Boot Disabled -
Save the changes and exit BIOS.
Installing Nerve
Note that in the following instructions <version_number> and <drivename> are used as a placeholders.
To obtain the correct version number for your device, contact sales@tttech-industrial.com or submit a request through the TTTech Industrial support portal.
Requirements for installing Nerve on the device:
|
In addition, a workstation is required to prepare the bootable USB drive. Connect the monitor and the keyboard to the Vecow SPC-5600.
Before beginning with the installation, make sure that the device will boot from the USB drive. Press Del when the device is booting to enter BIOS and change the boot device settings.
On Windows
- Download the
nerve-node-installer-<version_number>-amd64.img.gzfrom the Nerve Software Center to a workstation. - Extract the
nerve-node-installer-<version_number>-amd64.img.gzfile to retrieve thenerve-node-installer-<version_number>-amd64.img. Depending on the program used, the file might need to be extracted more than once. -
Transfer the extracted
nerve-node-installer-<version_number>-amd64.imgfile to the USB drive using Rufus.Note
Make sure to replace
<version_number>with the version number needed for your device. -
Plug the USB drive into a USB port of the Nerve Device.
- Make sure that the device will boot from the USB drive and power on the device.
The setup will start automatically and take a few minutes to complete part 1 of the installation. After a reboot, part 2 of the installation will continue. Once the installation is finished, follow the on screen instructions to either close the installation window or reboot the device. The device will then reach a log in screen, asking for host access log in credentials. Make sure that the device will boot from the hard disk if rebooting the device again.
Note
- In some cases, part 2 of the installation will proceed with a reboot before the installation window can be closed. This is due to certain services needing a device reboot to finish configuration.
- In case of error, the installation window in part 2 will change its background color to red and prompt the user the reinstall from the beginning. In this case, reboot the device and restart the installation from the USB drive.
On Linux
- Download the
nerve-node-installer-<version_number>-amd64.img.gzfile from the Nerve Software Center. -
Enter the following commands to extract the
nerve-node-installer-<version_number>-amd64.img.gzfile and transfer the extracted file to the USB drive:tar xf nerve-node-installer-<version_number>-amd64.img.gz sudo dd if=nerve-node-installer-<version_number>-amd64.img bs=4M of=/dev/sd<drivename> status=progress syncNote
Make sure to replace
<drivename>with the system name of the USB drive. Make sure to replace<version_number>with the version number needed for your device. -
Plug the USB drive into a USB port of the Nerve Device.
- Make sure that the device will boot from the USB drive and power on the device.
The setup will start automatically and take a few minutes to complete part 1 of the installation. After a reboot, part 2 of the installation will continue. Once the installation is finished, follow the on screen instructions to either close the installation window or reboot the device. The device will then reach a log in screen, asking for host access log in credentials. Make sure that the device will boot from the hard disk if rebooting the device again.
Note
- In some cases, part 2 of the installation will proceed with a reboot before the installation window can be closed. This is due to certain services needing a device reboot to finish configuration.
- In case of error, the installation window in part 2 will change its background color to red and prompt the user the reinstall from the beginning. In this case, reboot the device and restart the installation from the USB drive.
Connecting the device to a network
The device needs to be connected to a network in order to communicate with the Management System and perform key features of Nerve. The Nerve system has a designated network interface for communication with the network — the wan interface. This interface is mapped to LAN 2 for this device. Connect an ethernet cable to LAN 2 for establishing network access and communication with the Management System. Note that communication with the Management System is happening over port 443 (HTTPS).
When setting up the device, there are a few things to keep in mind regarding network access:
- Where is the Management System hosted?
The Nerve Management System is either hosted in the cloud by TTTech Industrial or on premise in the internal company network.
When the Management System is hosted in the cloud, the node will likely require internet access. The easiest way of doing that is connecting an ethernet cable to LAN 2. The wan interface will then receive an IP address from a DHCP server and establish internet access automatically. However, contact the IT administrator on how to allow devices to connect to the internet inside of the internal company network. When the Management System is hosted on premise, nodes do not necessarily need internet access to communicate with the Management System. If that is the case, it is required to make sure that the Nerve Device and the Management System are located in the same network. - License activation
The license activation process is affected by the possible situations described above, making offline license activation necessary under certain conditions. If the Management System is hosted on premise, the node might not have internet access. If that is the case, a file-based offline license activation method is necessary to activate the Nerve license. However, a separate workstation with internet access is required to complete the license activation.
Note
Note that connecting the device to the internet is the best use case, as it enables the easiest way to activate the Nerve license and easy communication with a Management System hosted in the cloud. If the device does not have internet access and the Management System is hosted on premise, make sure to connect the device to the same network as the Management System. If neither can be guaranteed, ignore this step until after the node is configured for Management System connection in the Local UI. Also, contact the IT administrator for help on how to allow external devices to connect to the internet or internal network. When connecting the device to the internet through port LAN 2, the device will receive an IP address through DHCP. A static IP address can also be configured but only after the Nerve software license has been activated.
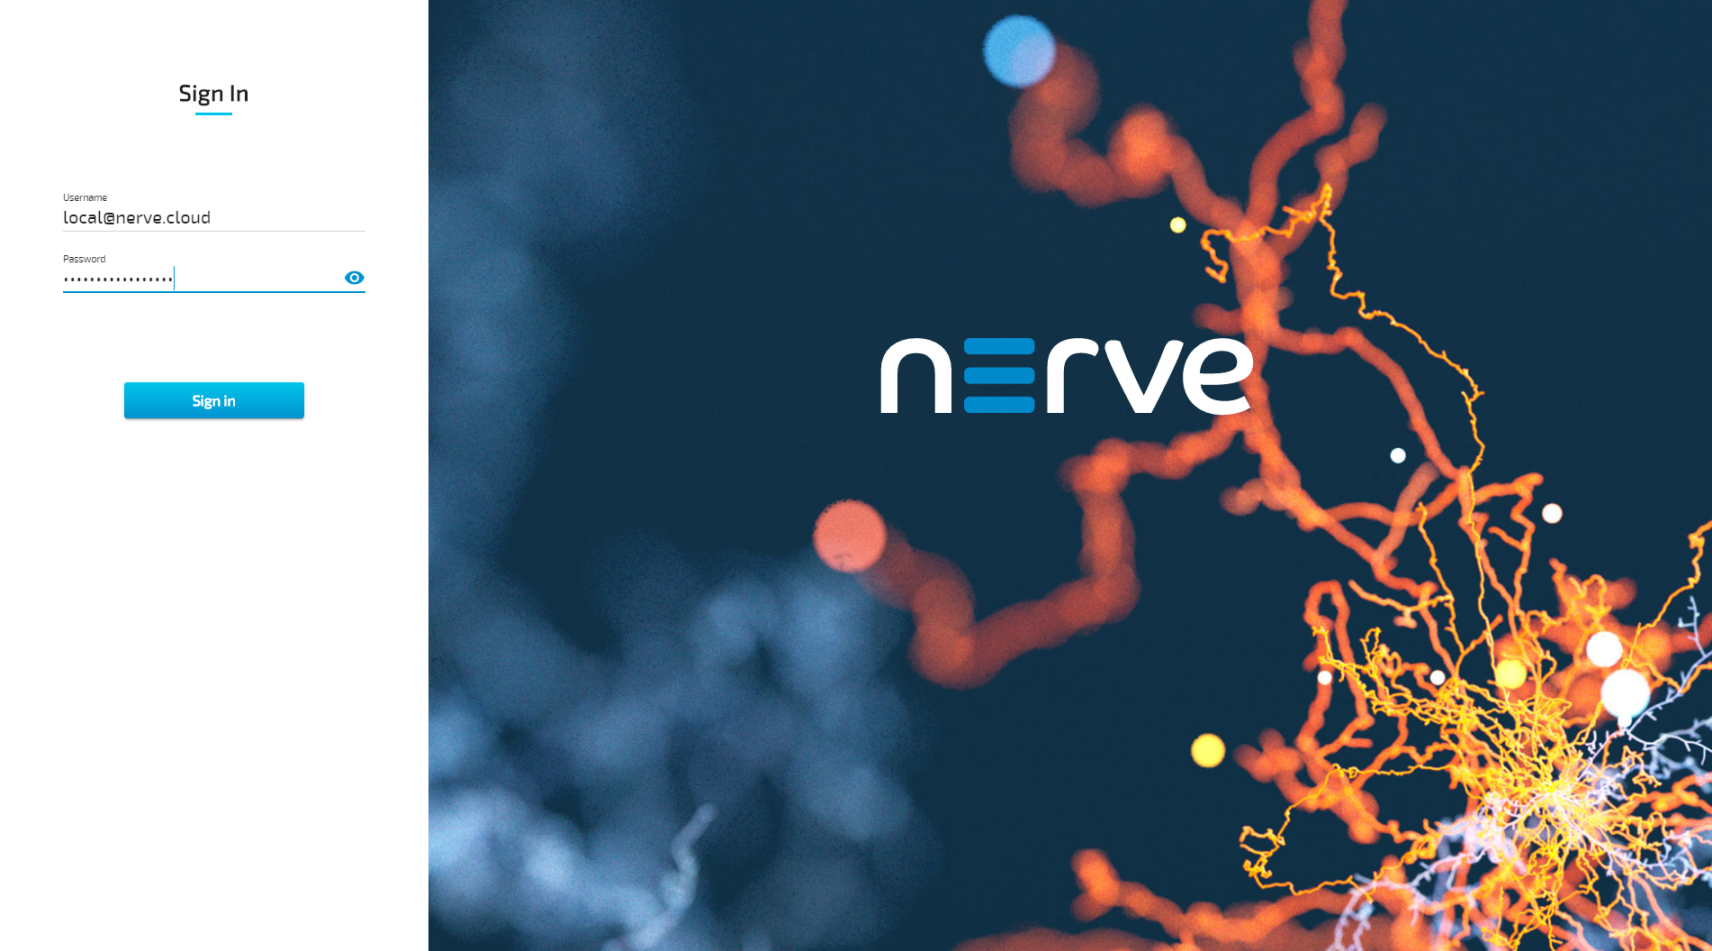
Accessing the Local UI
After the image installation, the device can be powered on after setup for product license activation. For that, a connection to the Local UI needs to be established.
- Connect a workstation to port LAN 1.
-
Configure the network adapter of the workstation. The IP address has to be in the range from
172.20.2.5to172.20.2.254with a255.255.255.0subnet mask.Note
Do not use
172.20.2.27for the network adapter IP address. This IP address is used internally by the Nerve system. -
Open a browser window or tab.
- Enter http://172.20.2.1:3333/ to access the Local UI.
At first, only the required elements to activate the Nerve product license are shown in the Local UI. The full extent of the Local UI is unlocked after product license activation and requires a login. For first time log in use the credentials from the customer profile.
Activating the Nerve license
After logging in to the Local UI, the product license can be activated so that Nerve can be used on the device. Make sure that the Local UI can be accessed as described above. License activation can be done either online or offline.
-
Online activation
When the node has internet access, the node will automatically connect to the licensing server. This is the most straightforward way of activating licenses. -
Offline activation
In case of the node not having internet access, the license can be activated with a file-based method. However, note that a workstation with an internet connection is required for connecting to the licensing server in order to upload and download files. This might be the way to activate the license if the Management System is hosted on premise.
Refer to License activation in the user guide for more information.
Registering the device in the Management System
With the license activated, the node needs to be configured for use in the Management System through the Local UI. Afterwards the node needs to be registered in the Management System.
- Make sure that the Local UI can be accessed as described above.
- Follow this link to connect to the Local UI: http://172.20.2.1:3333/
-
Log in with the credentials from the customer profile.
-
Refer to Node configuration for information on how to configure the device for use in the Management System.
- Refer to Adding a node for information on how to register the node in the Management System.
Additional device specific information
The following information below is device specific information for use with Nerve.
Physical ports and network interfaces
The table offers a quick overview of the network interfaces that can be reached through the physical ports of the SPC-5600.
| Physical port | Network name |
|---|---|
| LAN 1 | mgmt |
| LAN 2 | wan |
| LAN 3 | extern1 |
| LAN 4 | io0 |
For more information on node internal networking, refer to Node internal networking.