Nerve DNA
Nerve DNA stands for Deterministic Node Automation and is an infrastructure as code mechanism introduced to ease node configuration. Working in a declarative way of configuration, a target configuration file is uploaded to a registered node in the Management System. The system then compares the target configuration file to the current configuration file and takes the required steps to reach the target configuration in an automated process, in which the node will install workloads from the Management System workload repository. Multiple nodes can be configured more easily this way.
Nerve DNA can be operated through the Management System API and the UI in the Management System. However, as of now, it is possible to configure only one node per API call.
Note
A user with DNA permissions is required. Make sure to assign NERVE_DNA:VIEW and NERVE_DNA:EDIT permissions to a user before continuing. Refer to Roles and permissions for information on how to add permissions to a user.
States and transitions
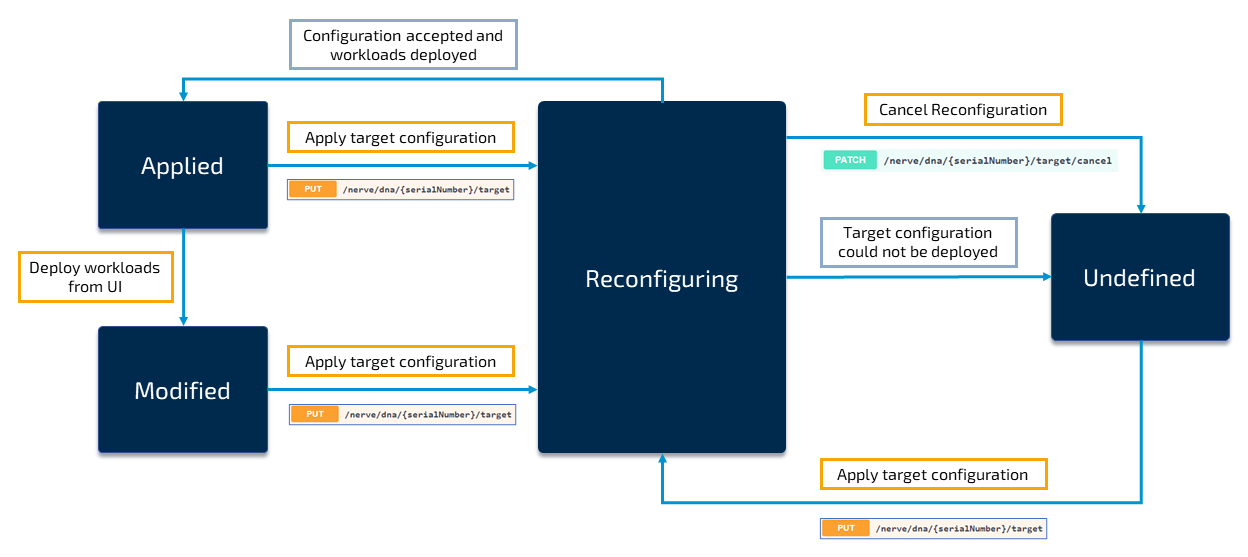
In the Nerve DNA process, the system transitions from different states to others. The states are: Applied, Reconfiguring, Modified, Undefined and Cancelling. Take a look at the graphic below, illustrating the states and how the system transitions between them:
Read the following for a detailed description of every state:
| State | Description |
|---|---|
| Initial | Initial state entered after Nerve is installed. No target file was applied yet. |
| Applied | The default state of the node, when the target configuration and current configuration of the node match. The node returns to this state after a target configuration has been applied successfully. |
| Reconfiguring | This state is entered when users apply a valid target configuration through the apply configuration function (PUT /nerve/dna/{serialNumber}/target). While reconfiguration is ongoing, new target configuration files cannot be applied. Similarly, configuration files cannot be requested in this state as well. If the reconfiguration is successful, the node will be in the Applied state. |
| Modified | The node enters the Modified state when users perform manual changes to the node through the UI. However, the Modified state can only entered if the node was in the Applied state before. When a new target configuration is applied, the node will proceed to the Reconfiguring state. Note that the node will stay in modified even if a workload is undeployed again and theoretically matches the target configuration again. The modified state will persist until a new target configuration is applied. |
| Undefined | In case of an error, the Undefined state is entered. If a cancel command is sent while in Reconfiguring state, then Undefined is entered as a result as well. Note that it is not possible to rollback to a previous configuration. A new target configuration needs to be applied for the node to leave the Undefined state and enter the Reconfiguring state. Note that there is no guarantee in the Undefined state, e.g. current configuration file that are fetched while the node is in the Undefined state might be incorrect since there are no means to pinpoint the cause for entering the state and where the reconfiguration was interrupted. |
| Cancelling | A transitional state only. Cancelling an action is possible at any time. When the cancel command is executed, the current action is stopped, a clean-up is executed (e.g. removing of workload image parts downloaded up until the cancellation) and the system goes to the Undefined state. |
Workload DNA
Since Nerve DNA revolves around the deployment of workloads, note the behavior of existing workloads when additional workloads are deployed through Nerve DNA depending on the restartAllWLs parameter inside the API call PUT /nerve/dna/{serialNumber}/target :
| Workload type | restartAllWLs (boolean) |
System behavior |
|---|---|---|
| Virtual machine workloads | true (default) |
|
| CODESYS workloads | true (default) |
|
| Docker workloads | true (default) |
|
| Docker Compose workload | true (default) | docker-compose down and then docker-compose up is executed in order to retrieve a possibly changed ENV file. |
| All workload types | false | No change performed. |
Workloads added to the target configuration file need to be provisioned and available in the workload repository of the Management System.
Configuration file syntax for workload DNA
The target configuration file is written in YAML format and applied to nodes through the PUT /nerve/dna/{serialNumber}/target call in the Management System API. Download the schema file here in order to validate the YAML file with a schema validator of choice.
The target configuration YAML file can be uploaded by itself and does not need a specific file name. However, if other files, i.e. an ENV file, are uploaded as well, then the files need to be compressed into a ZIP file. When the current configuration file is downloaded by the user, it is in the form of a ZIP file that contains the current configuration YAML file and ENV files if applicable.
When declaring a workload in the target configuration, the name and version attributes are mandatory. While hash is not required, it is strongly recommended to ensure precise identification of the workload in some use cases. Refer to The importance of the hash below for more information.
Take a look below for an example target configuration YAML file:
schema_version: 1
workloads:
  - name: DC1
    version: version1
    hash: hash1
    compose_env: .env
  - name: DC2
    version: version2
  - name: DC3
    version: version3
    compose_env: folderLocation/envFileName3.env
  - name: docker1
    version: version-d1
  - name: vm1
    version: version-vm2
    hash: hash4
  - name: docker2
    version: version-d2
    hash: hash-d2
In the file above, there are 6 workloads defined:
- a Docker Compose workload with a hash and ENV file in the root folder
- a Docker Compose workload without a hash or ENV file
- a Docker Compose workload without a hash but with an ENV file inside of a folder
- a Docker workload
- a Virtual Machine workload with a hash
- a Docker workload with a hash
The compose_env property is only used with Docker Compose workloads. It needs to list a path to a file containing environment variables. These files can only be transferred through Nerve DNA. There are no ways to transfer an ENV file or add environment variables to a Docker Compose workload through the Management System or the Local UI. When uploading a ZIP file, take note of the following criteria for the contents of the ZIP file:
- It can only contain one YAML file.
- It can contain one or more ENV files.
- All ENV files must be referenced in the YAML file.
- One ENV file can be referenced by multiple Docker Compose workloads.
Note
Keep the amount of workloads to a reasonable number according to resources available. The system will try to reach the desired state but there is no guarantee for successful reconfiguration.
Deployment order of the workloads
The workloads are deployed in the order as specified in the file. The workload listed first is deployed first. When the current or target file is retrieved from a node, the workloads within the generated file are ordered according to the order in which they were deployed.
The importance of the hash
The hash is a unique identifier for workloads, generated from the workload image and its settings. It is unique even across multiple Management Systems. Including the hash in the configuration file is strongly recommended to ensure precise identification of workloads. Note that workloads that were deployed in version 2.5.0 and persisted through an update to 2.6.0 do not have a hash. To elaborate on this more, here is an explanation of system behavior and a use case, where the hash is vital.
The system analyzes whether the workloads on the node are the same as the ones specified in the target configuration file. The name, version and hash properties are compared to check this. So according to the values of these properties, the system behaves the following way.
| name | version | hash | Behavior |
|---|---|---|---|
| The existing workload stays on the node. | |||
| None | The existing workload stays on the node. | ||
| The existing workload is removed and a new workload is deployed. |
This means that if workload settings are changed but the name and version name of a workload stay the same, the DNA process will not detect a change in the workload if the hash property is not included. So even though hash is optional, it is strongly recommended for precise identification of workloads.
Obtaining the hash and workload details
Obtaining the hash and the workload details can be done two ways: through the Management System or the API. For the API section, Swagger UI is used as a demonstration. Refer to the appropriate section below for instructions.
Management System
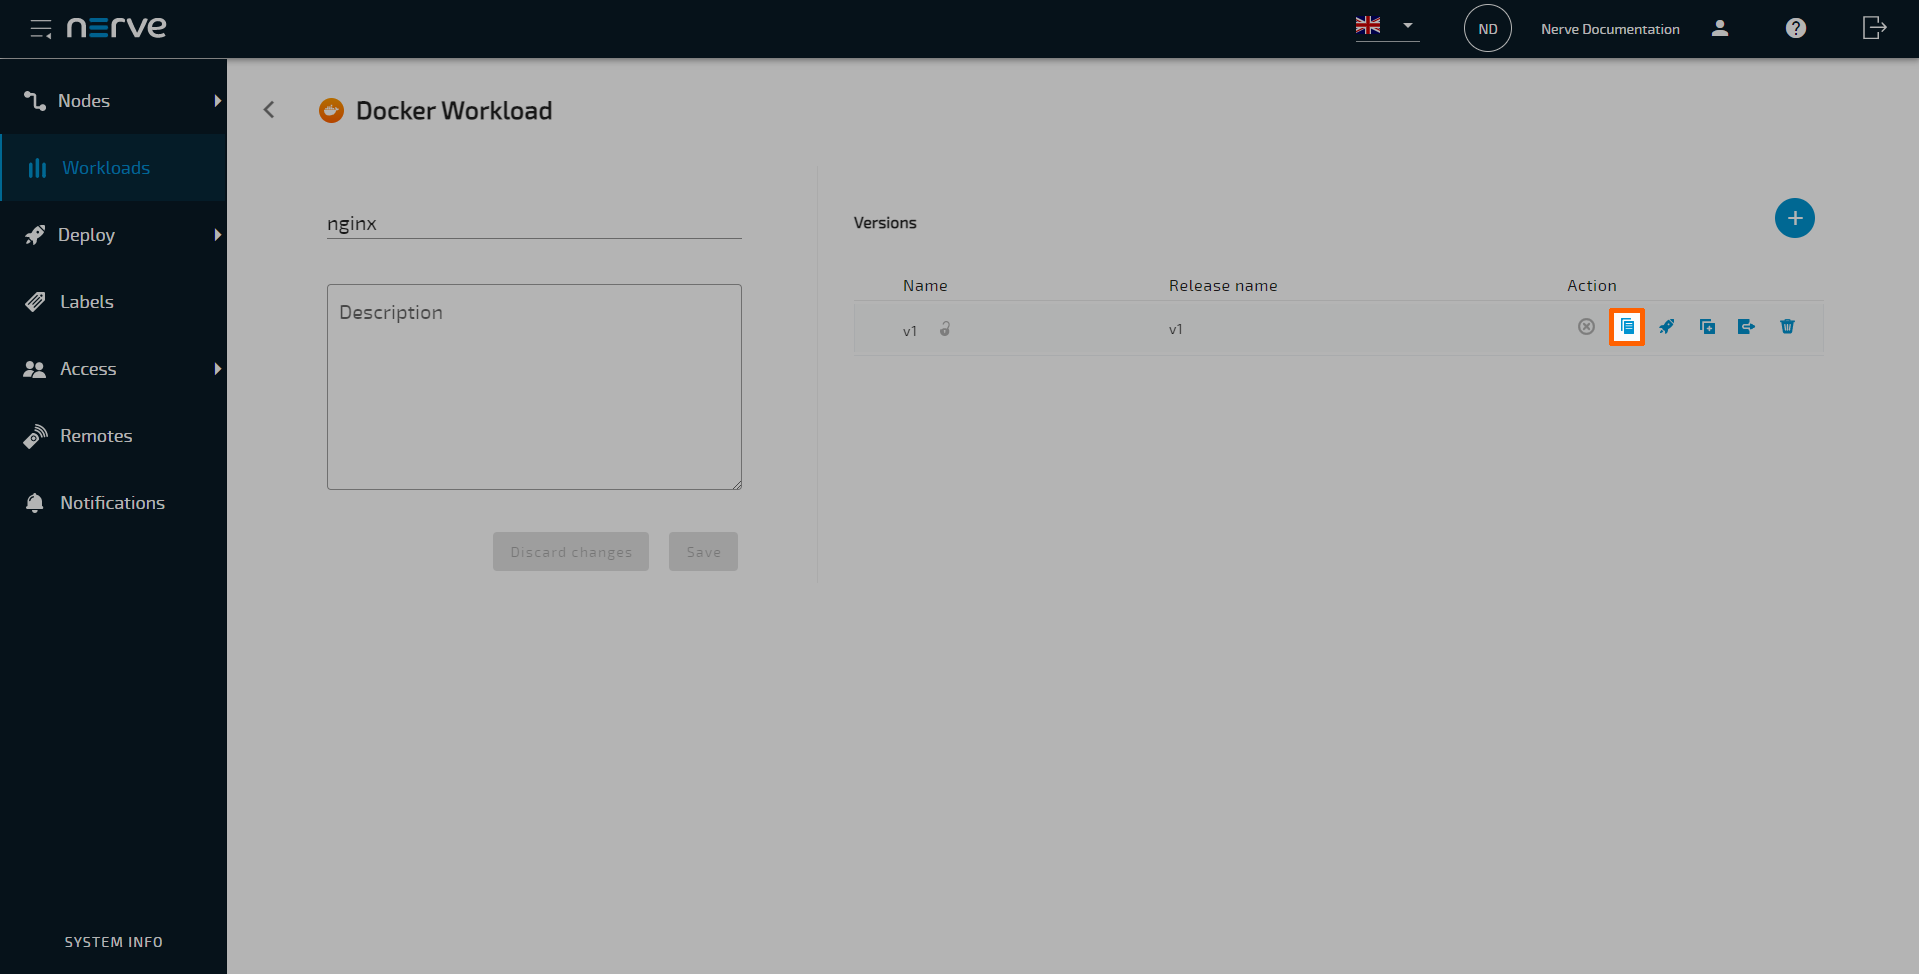
Workload version details can be copied directly to the clipboard through the Copy Details button in the workloads menu.
- Log in to the Management System.
- Select Workloads in the navigation on the left.
- Select a workload from the list.
-
Select the Copy Details button in the workload version list.
The details are copied in the following format, making it convenient to copy them directly into a target configuration YAML file:
name: <workloadname>
version: <versionname>
hash: <hashvalue>
API
In order to find out workload details, the workload ID and version ID of the workload need to be known. There are different approaches to get these IDs for Docker Compose workloads and all other workloads through the API. In general, the workflow is the following:
- Fetch a list of workloads to get the workload ID.
- Use the workload ID to fetch a list of versions of that workload.
- Take the version ID from the list of workload versions.
- Use the workload ID and version ID to fetch the unique info of the workload version.
The steps below are split into three parts to make them easier to follow. They also assume that the user is already logged in. Follow Trying out the Management System API to log in. Note that Swagger UI is used as a demonstration, as in the Management System API section.
Getting the workload ID
-
Expand GET /nerve/v3/workloads under WORKLOAD.
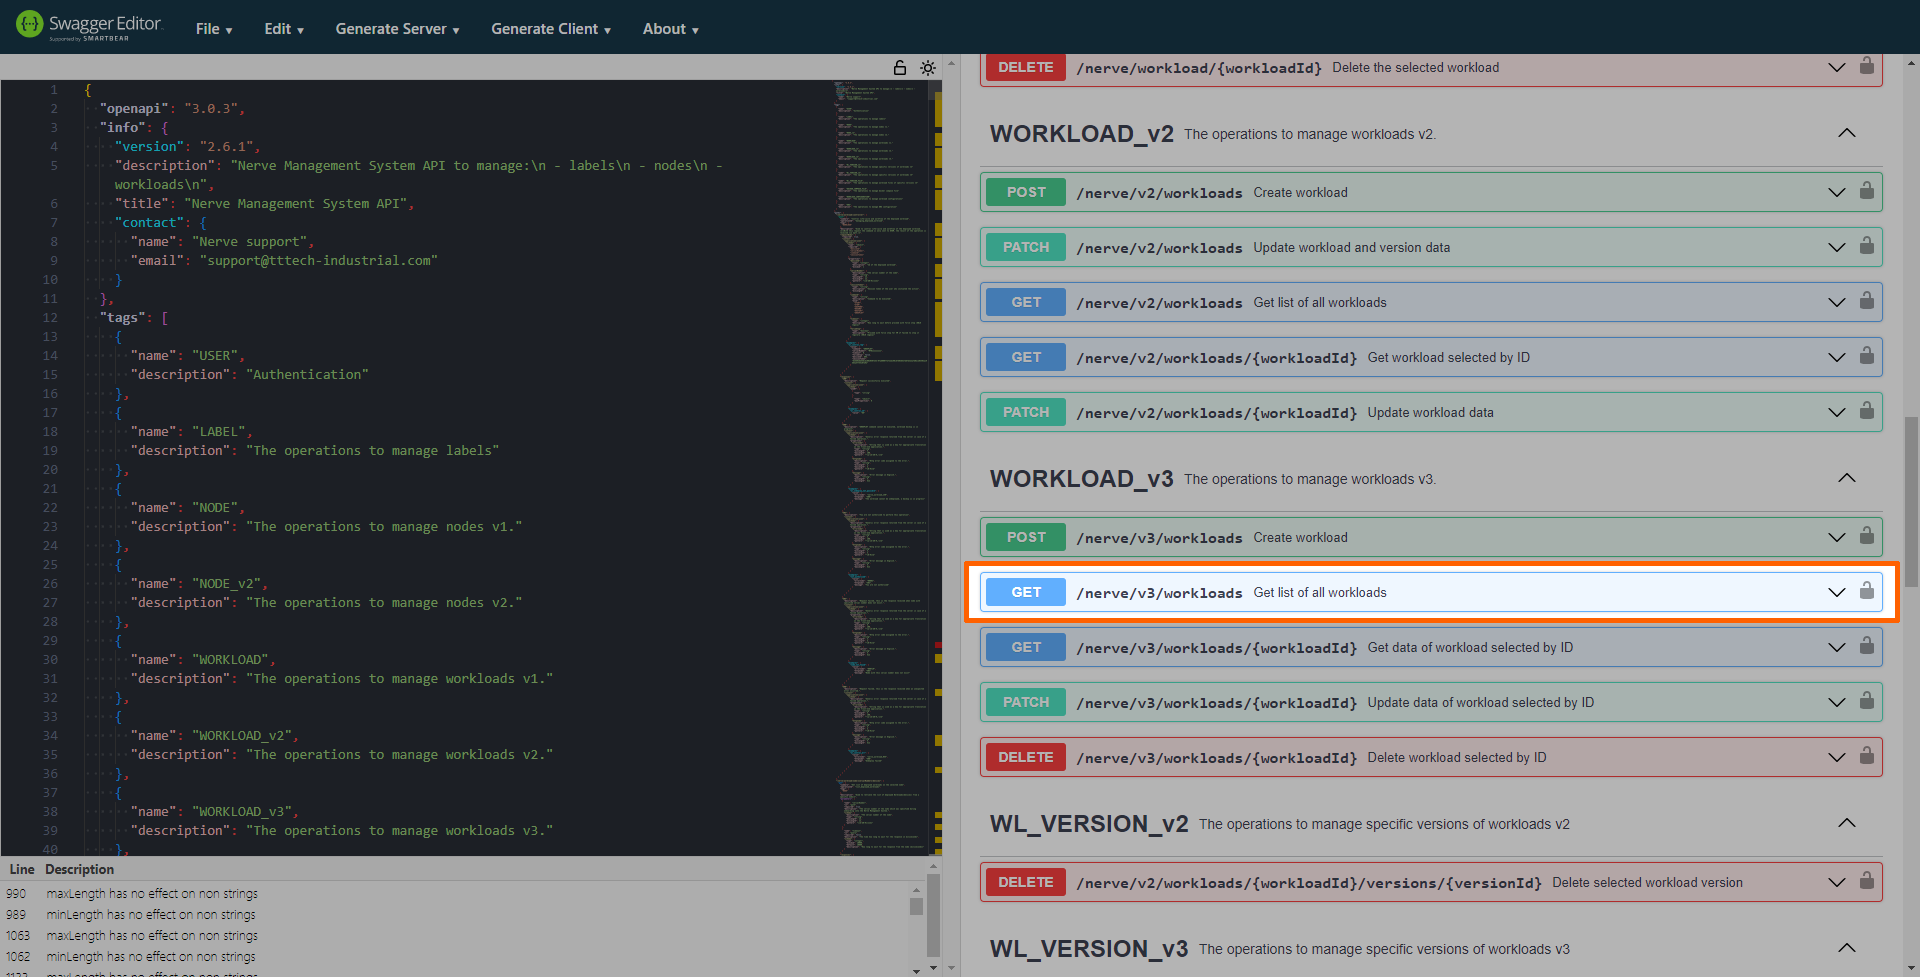
-
Select Try it out.
-
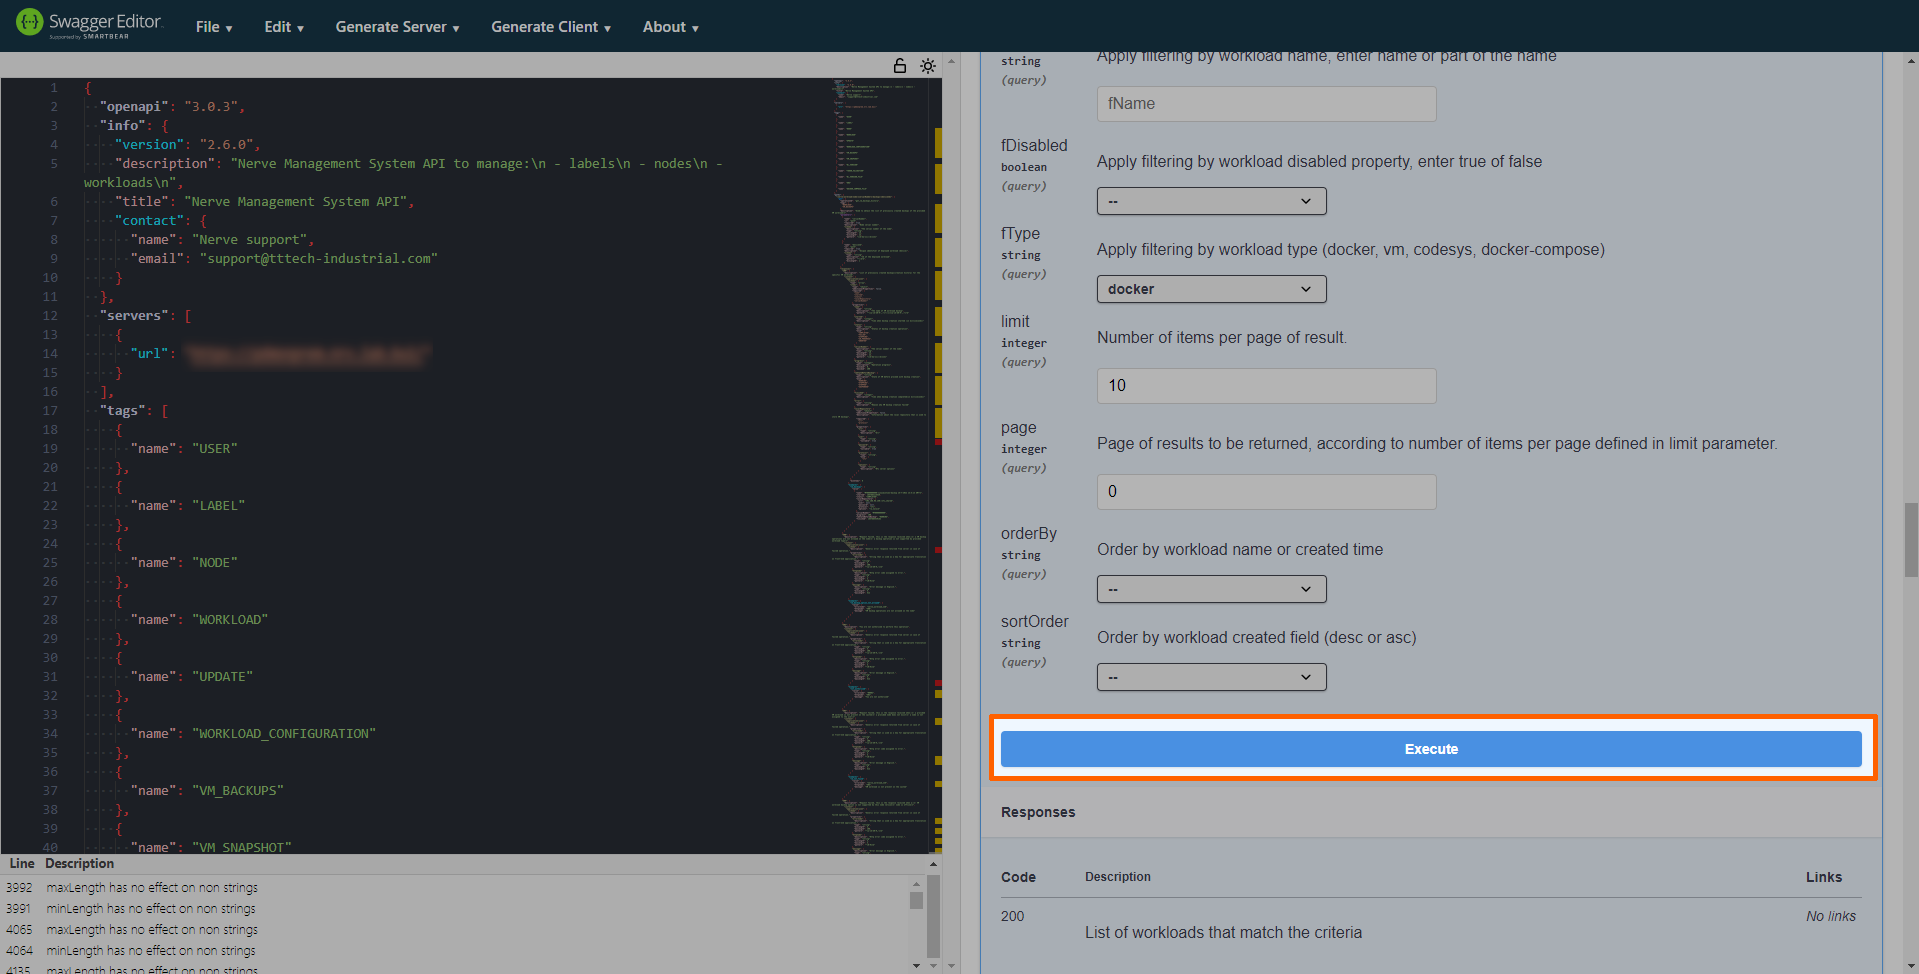
Select Execute.
Note
Use query settings to make sure the desired workloads will be part of the response. For example:
- Set the limit and page parameters to make sure all workloads are part of the response.
- Use the fName parameter to search for specific workloads by name.
- Set the fType parameter to a certain workload type to filter the list.
-
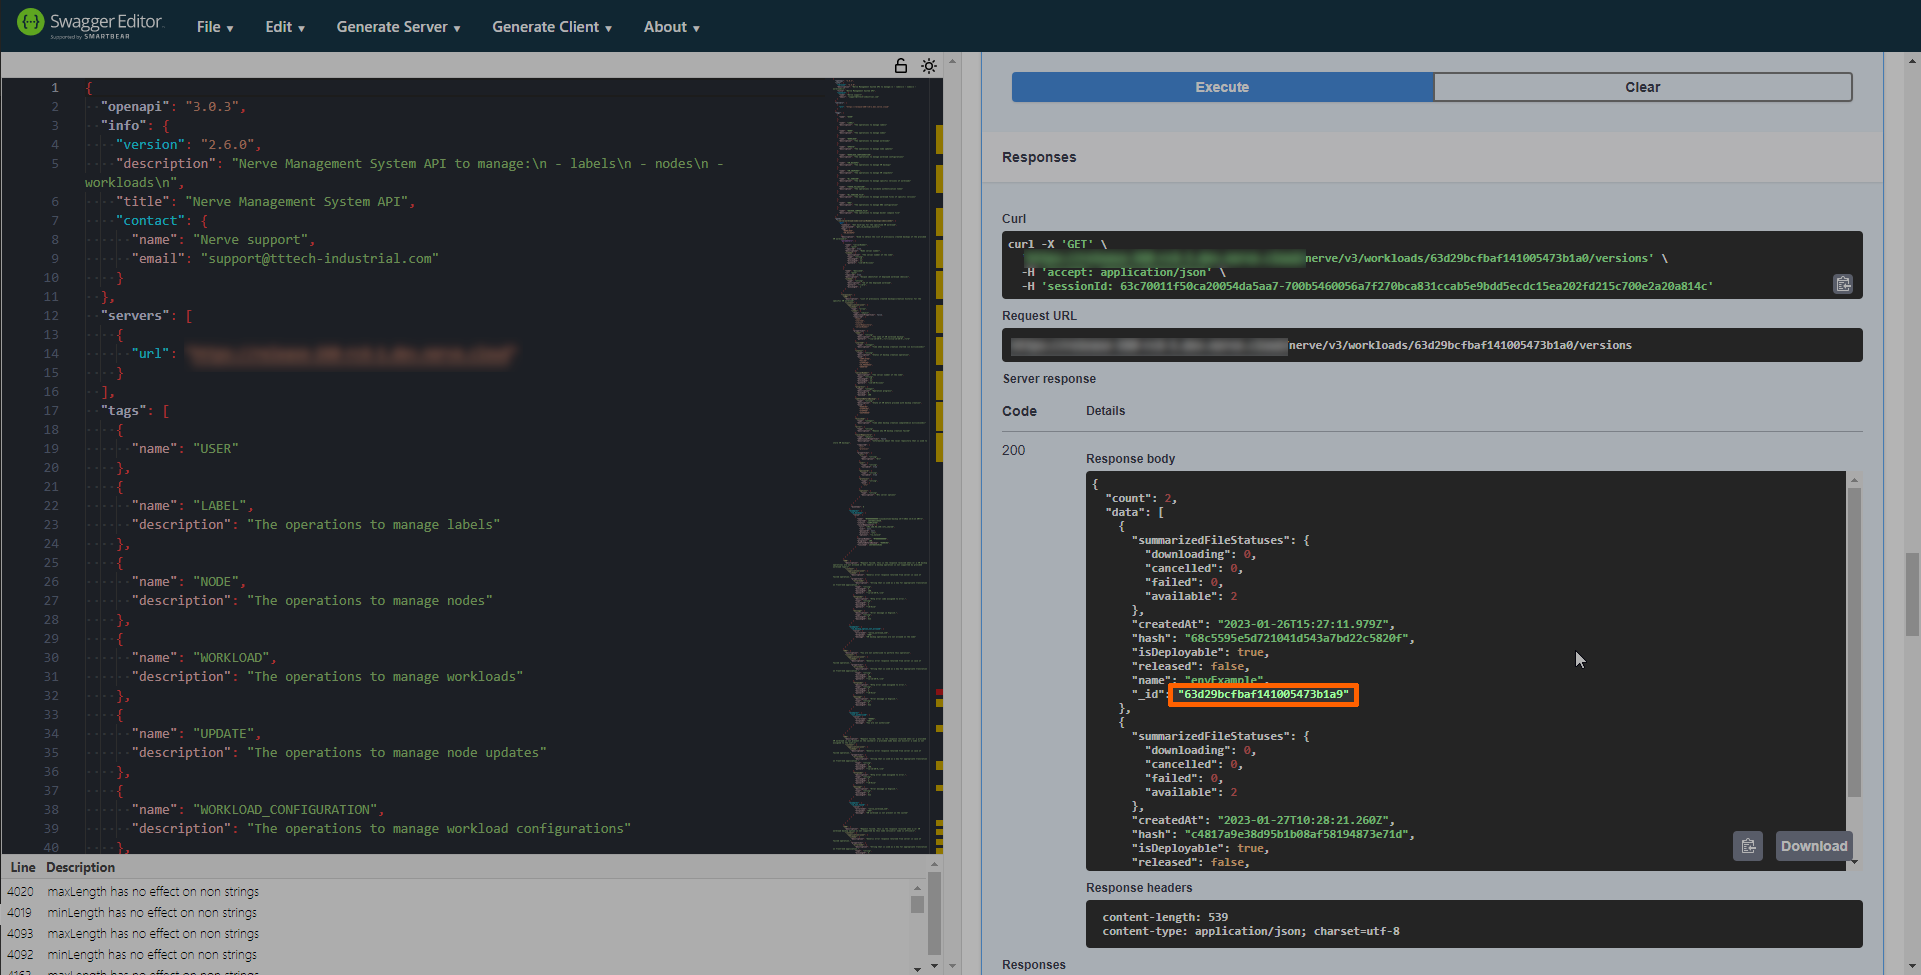
Search for the desired workloads in the response.
-
Copy the value next to "_id":.

Note
Make sure to copy the value without the quotation marks
"".
Getting the version ID
Depending on the type of workload, different calls need to be used to list workload versions and their IDs.
-
Expand the following call according to workload type.
Workload type API call Docker Compose workloads GET /nerve/v3/workloads/{workloadID}/versions Other workloads GET /nerve/v2/workloads/{workloadID} -
Select Try it out.
-
Enter the workload ID into the Workload Id field.

-
Select Execute.
-
Look for the version ID. Expand the box for a screenshot showing an example for each call.
Compose workloads
Other workloads

-
Copy the version ID of the workload.
Note
Make sure to copy the value without the quotation marks
"".
Fetching the unique info for the workload
- Expand GET /nerve/v3/workloads/{workloadId}/versions/{versionId}/unique-info under WORKLOAD.
- Select Try it out.
- Enter the workload ID that was fetched above into the Workload Id field.
-
Enter the version ID that was fetched above into the Version Id field.
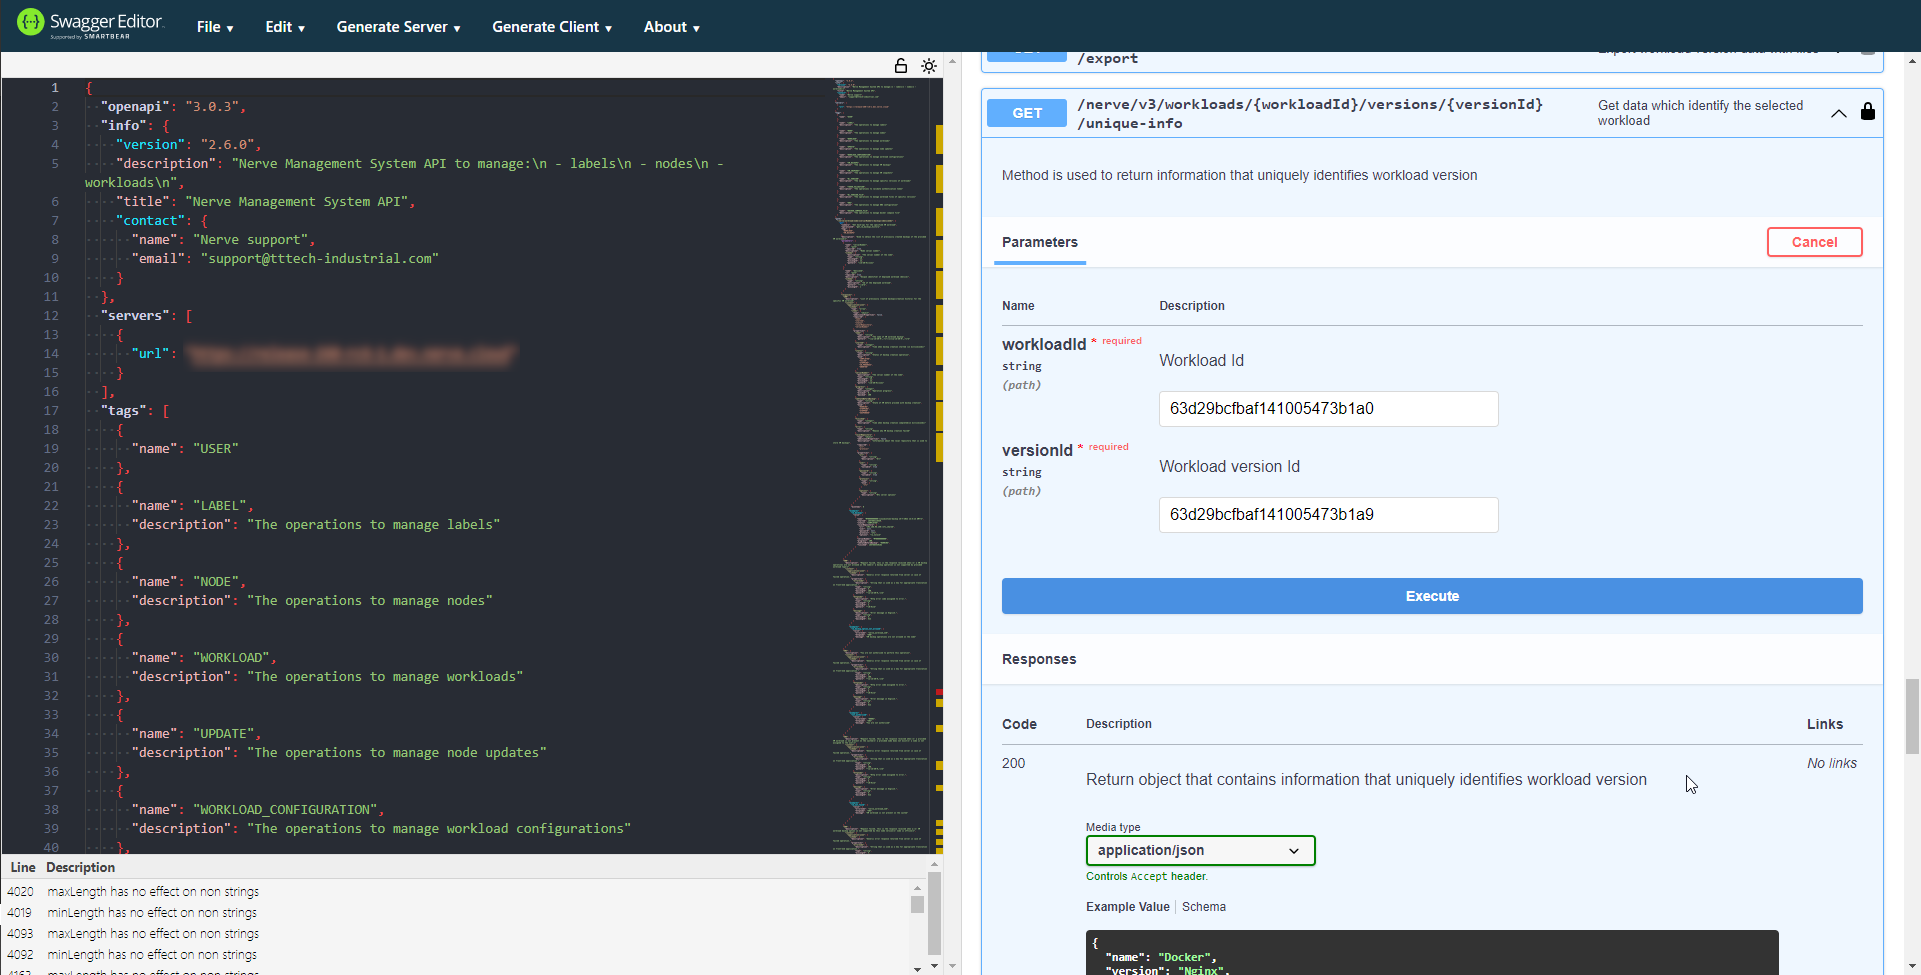
-
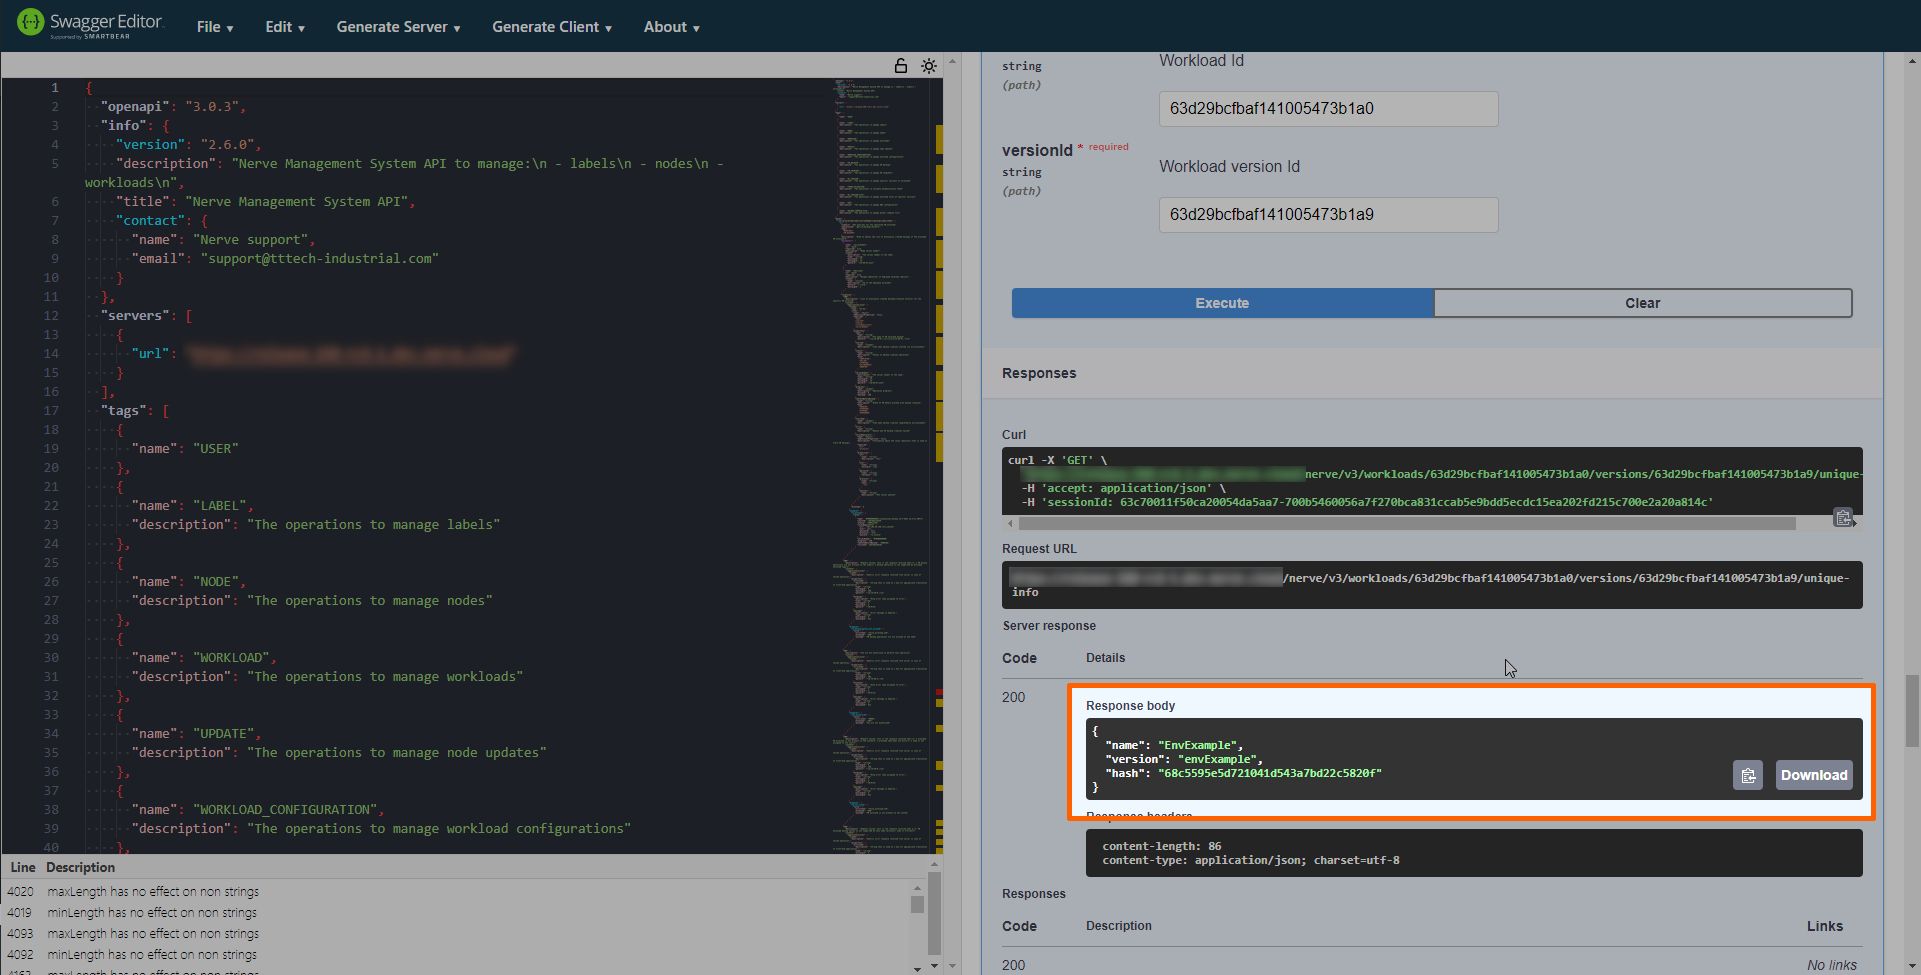
Select Execute.
The response gives the name, version and hash parameters formatted in the way they are needed for the target configuration file, making it convenient to copy them directly into the file.
Note
The workload ID and version ID of a workload can also be obtained from the URL.

Environment variables file for Docker Compose workloads
ENV files can only be added to Docker Compose workloads through the Nerve DNA process, as there is no way to add ENV files through the GUI in this version. However, there are a few recommendations to consider when it comes to environment variables for Docker Compose workloads.
- Environment variables should be defined in the Docker Compose file.
- It is recommended to define default values for environment variables in the Docker Compose file.
- Specific syntax should be used to make sure that environment variables from ENV files are considered.
Take a look at the following excerpt of a compose file as an illustration:
    restart: unless-stopped
    environment:
      - NGINX_PORT=${NGINX_PORT:-81}
    ports:
      - "8888:80"
      - "8889:81"
An environment variable NGINX_PORT is defined as NGINX_PORT=${NGINX_PORT:-81}, following this syntax rule:
${VARIABLE:-default}evaluates to default ifVARIABLEis unset or empty in the environment.
So in the file above this means that the value for NGINX_PORT will be 81, unless NGINX_PORT is defined in an ENV file that has been added through the Nerve DNA process.
While there are corner cases and combinations of defining environment variables that work with Nerve as well, the way described above is the recommended best practice to avoid error cases and complications.
Usage example for workload DNA
The following section presents a common workflow when using Nerve DNA. Make sure to have the Management System API documentation on hand for necessary calls and functions. It is recommended to use Swagger UI but the API can be used with any tool of choice. Note that a Management System and a user account in this Management System are required.
To start, a target configuration needs to be prepared. Doing so requires multiple preparation steps:
- Plan the purpose of the node.
- Make sure that all required workloads are provisioned in the Management System.
- Create a YAML file.
-
Copy the workload details of all workloads from the Management System by selecting Copy Details in the workload version view.
-
Copy the workload details into the YAML file.
- Format the YAML file according to the Configuration file syntax above.
This will result in a target configuration file that could look like this:
schema_version: 1
workloads:
  - name: nginx
    version: v1
    hash: 64080e8d700adeeea7d8cb2c2e61d9fc
  - name: mint
    version: mint
    hash: a2f69cee42320750b845bedfa734febf
A Docker workload and a Virtual Machine workload will be downloaded according to this configuration. Note that the name and version properties are required. While the hash property is not required, it is strongly recommended to ensure precise identification of the workload in some use cases.
Login and authorization
Next, the user needs to log in through the Management System API. To do that, a Management System and a user account in this Management System are required.
- Follow Trying out the Management System API to log in through Swagger UI.
Now the user is ready to work with Nerve DNA. The recommended first step is to check the status of the node in order to see how to proceed.
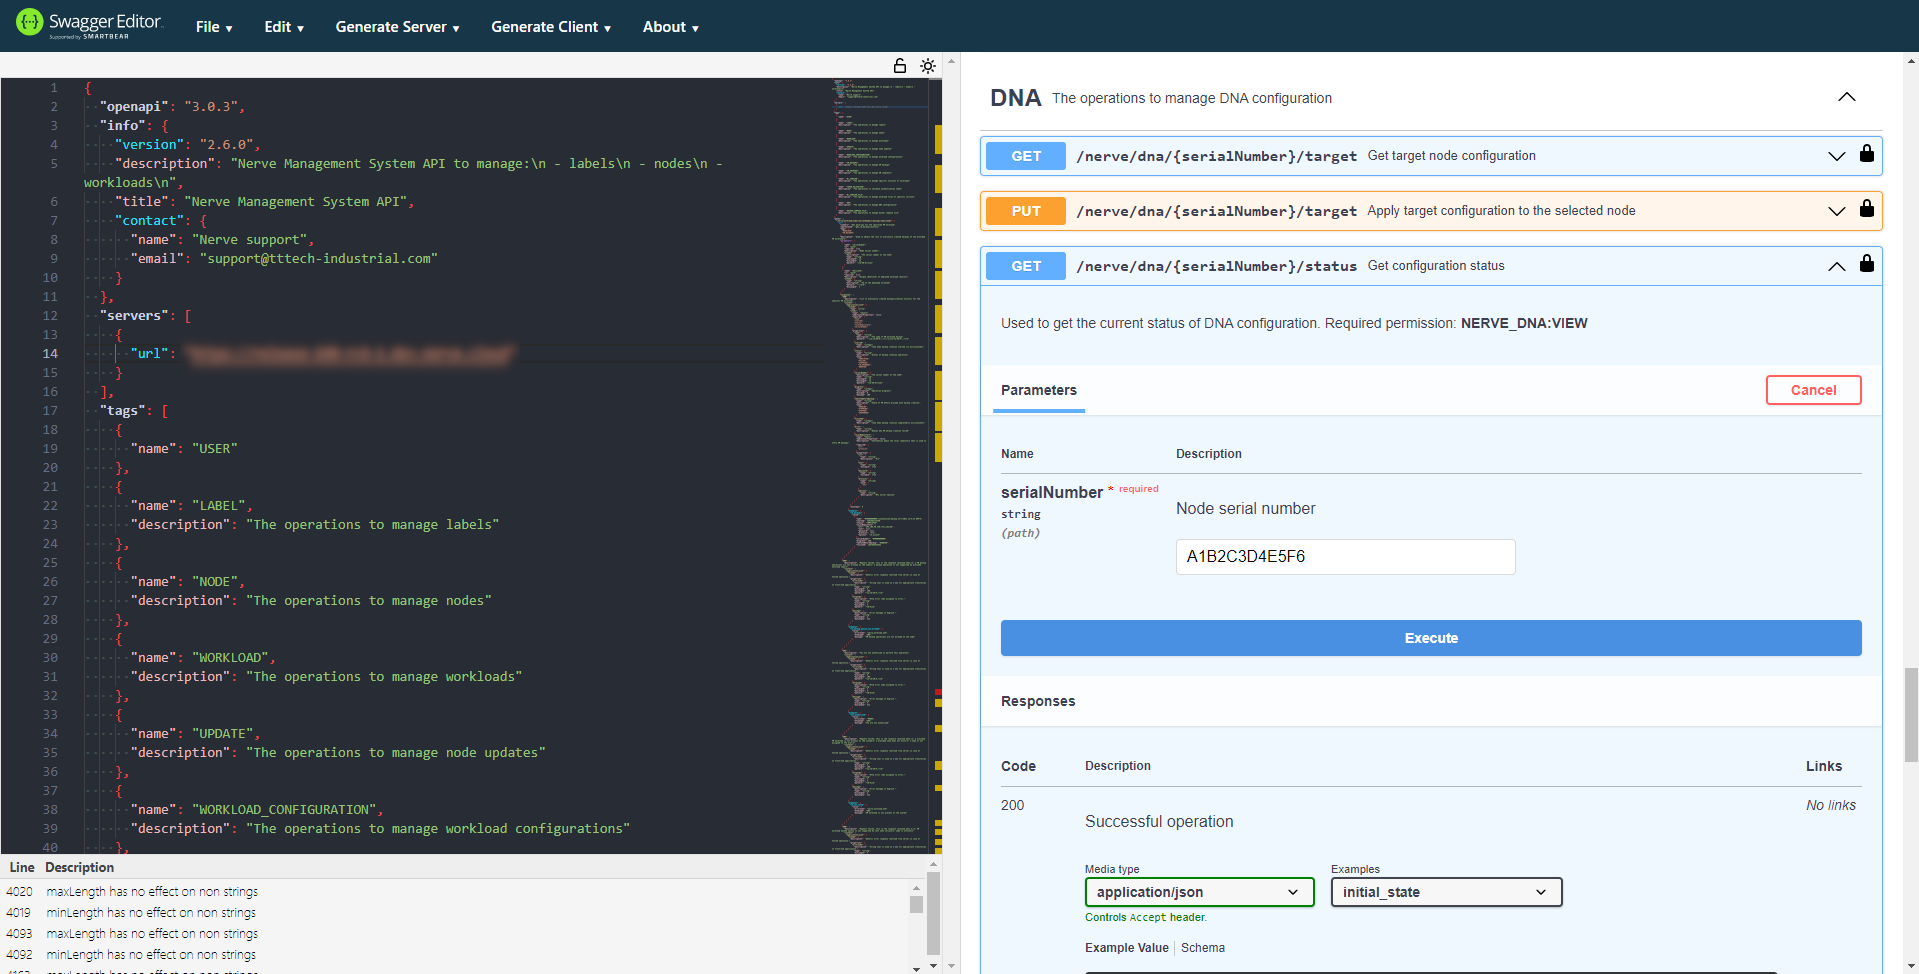
Checking the status of the node
Before applying a target configuration, it is recommended to check the status of the node and see whether the node is ready.
- Expand GET /nerve/dna/{serialNumber}/target under DNA on the right side of the Swagger Editor.
-
Select Try it out.
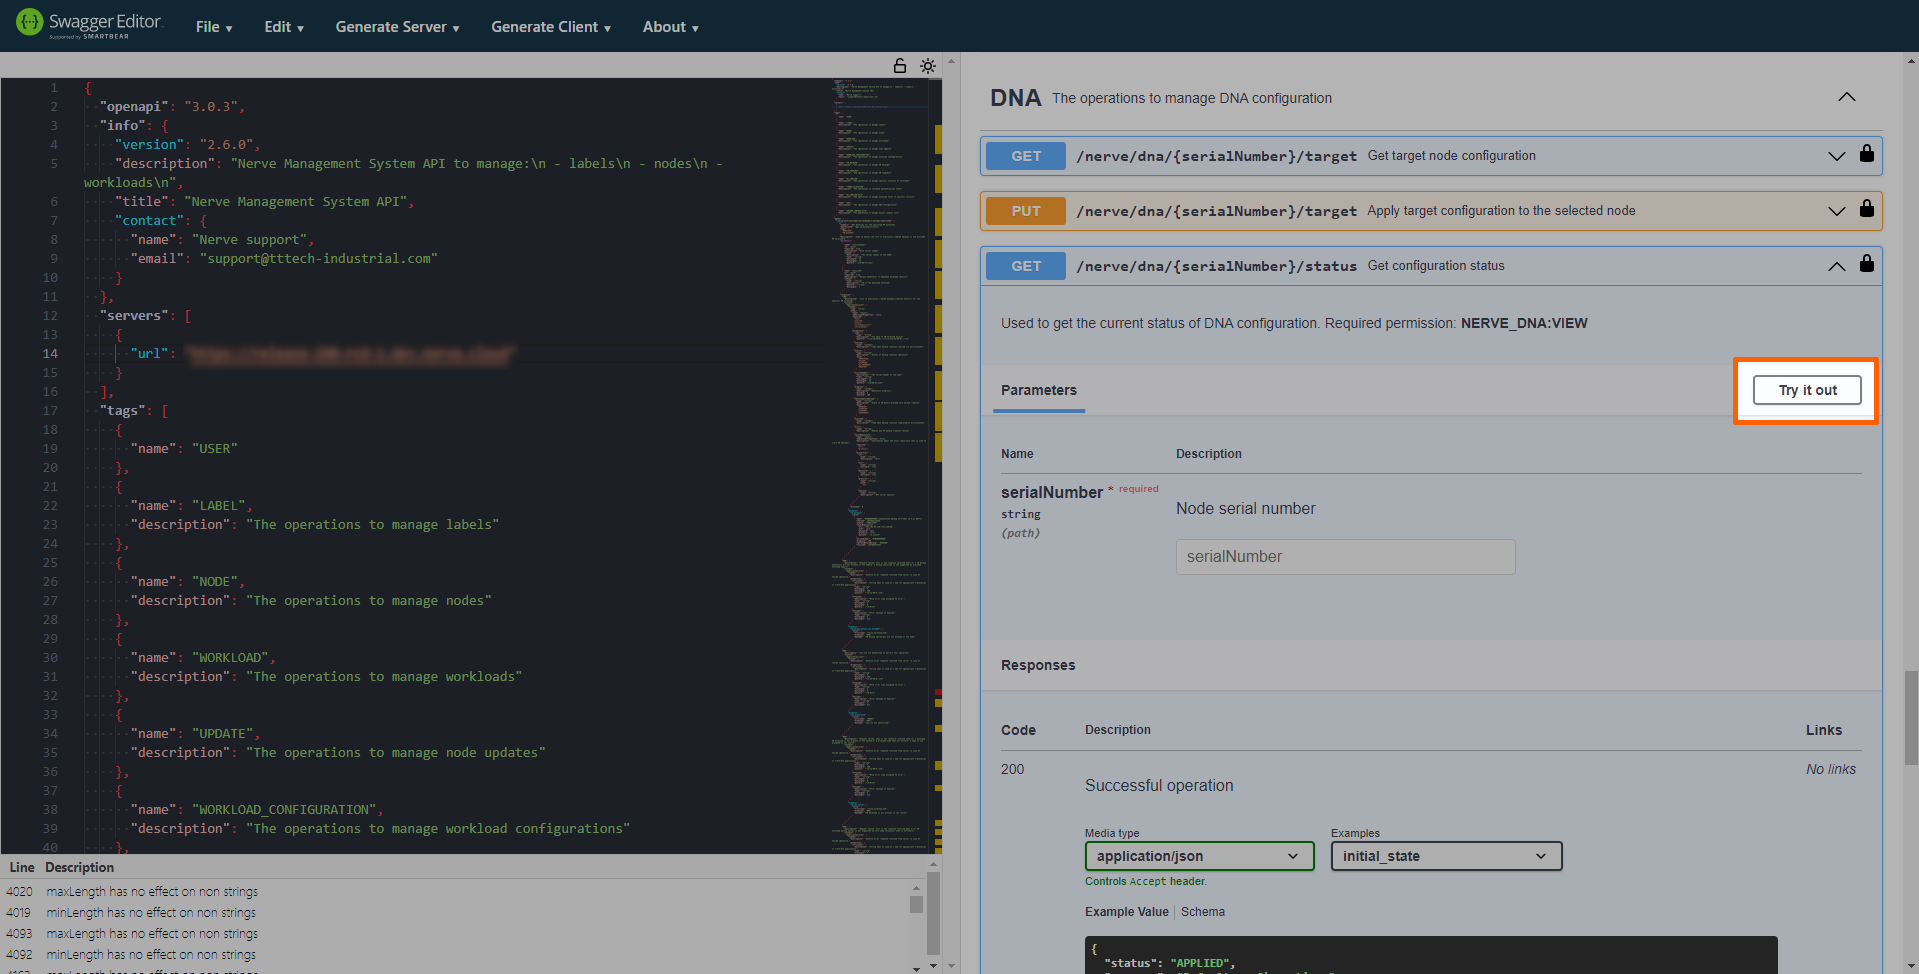
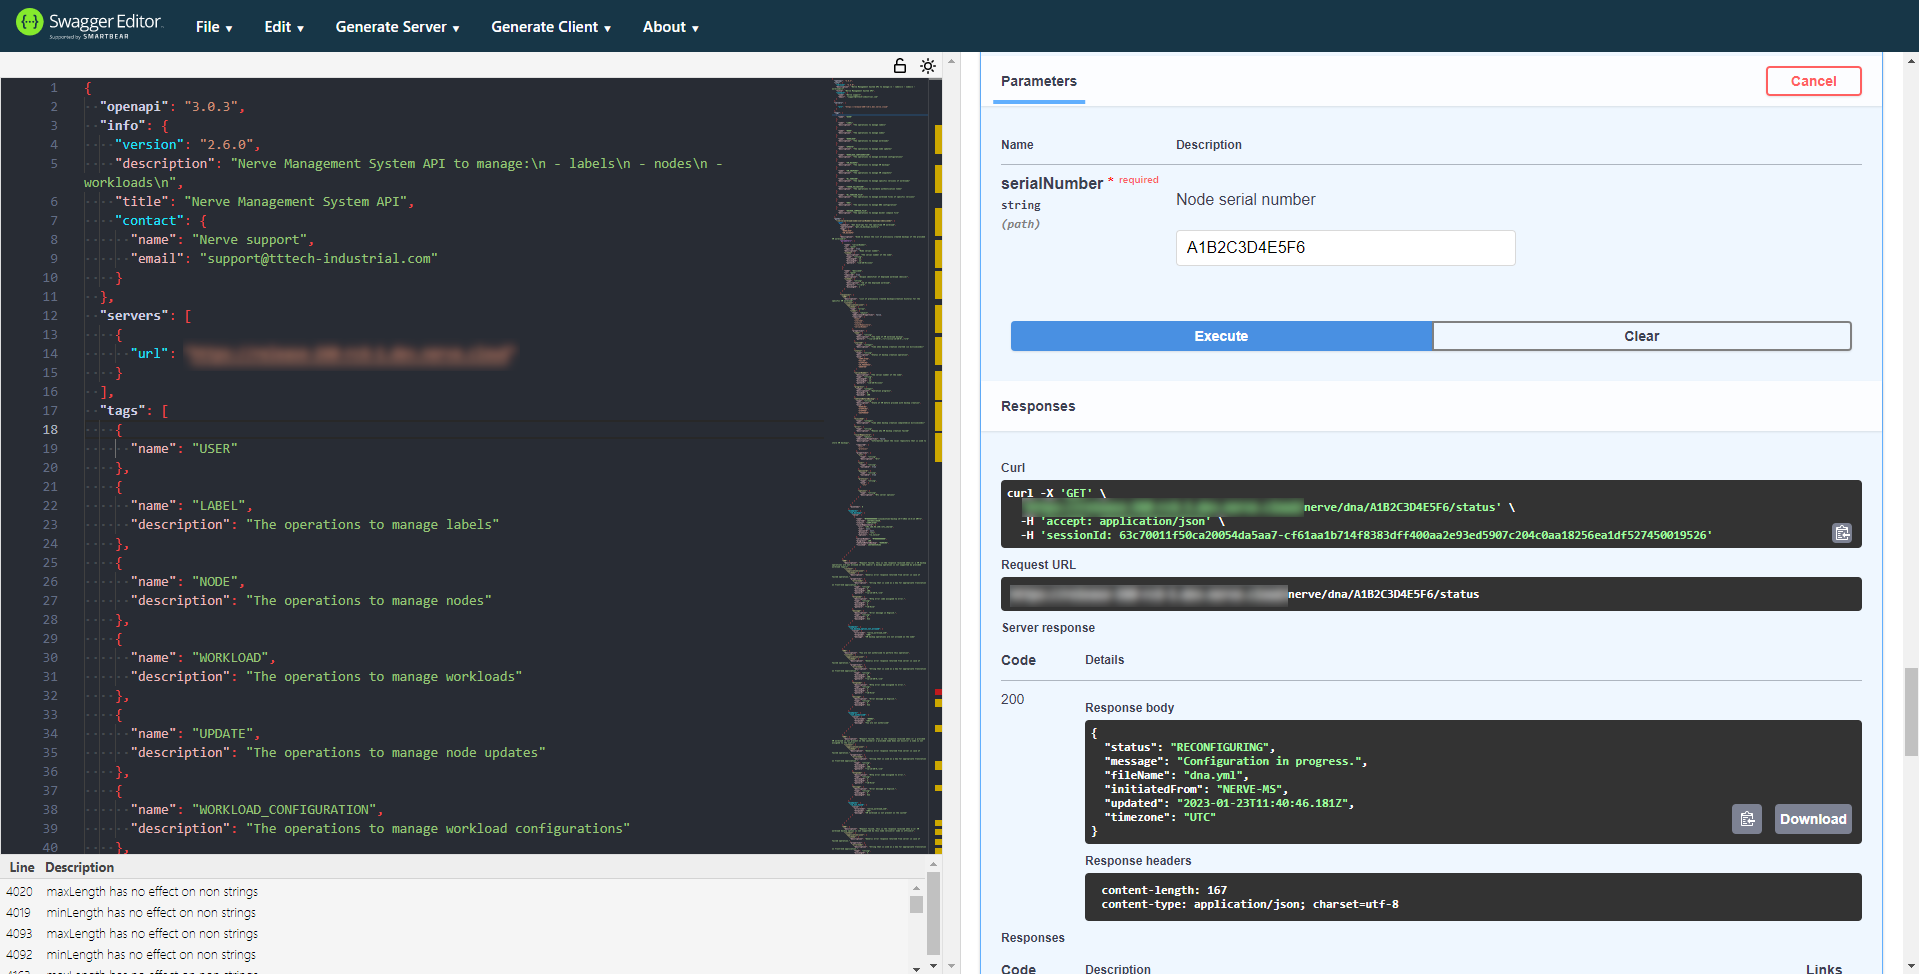
-
Enter the serial number of the node into the serialNumber text field.
Note
The serial number of the node needs to be in all capital letters.
-
Select Execute. A response from the server will pop up below the Execute button.
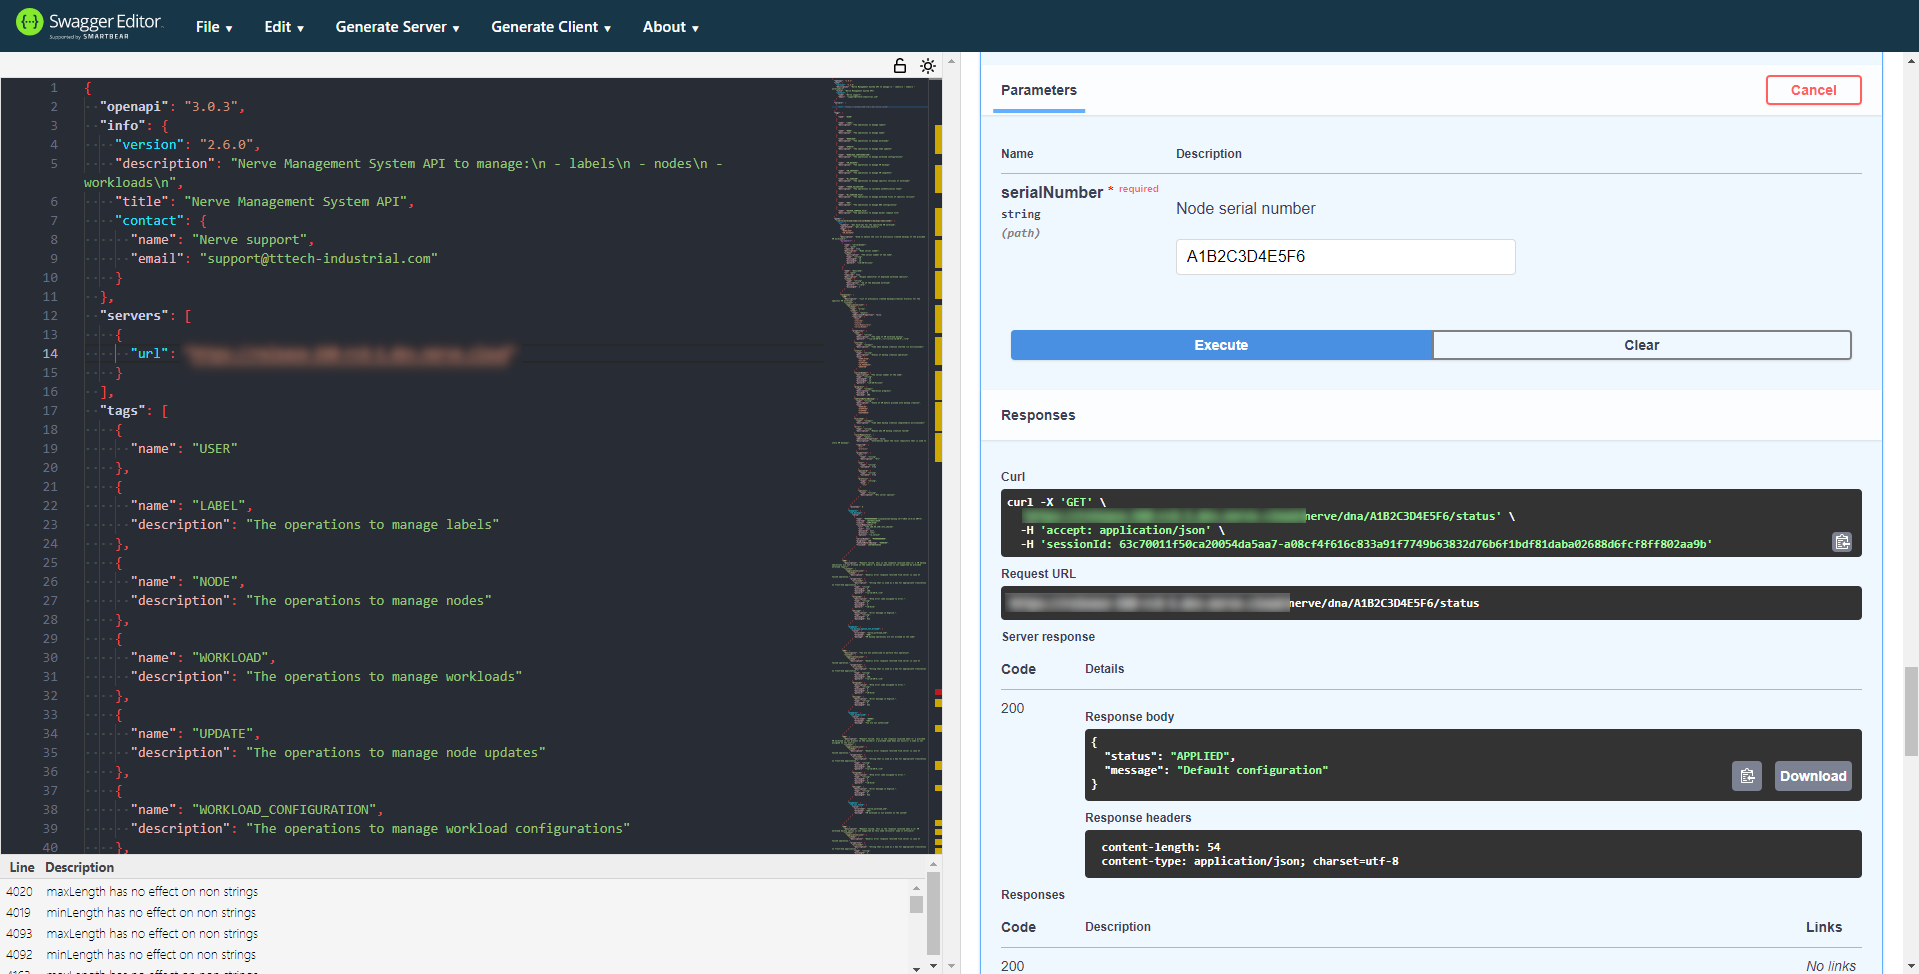
If the node is in a stable state, i.e. if the status is APPLIED, MODIFIED or UNDEFINED, a target configuration can be applied. If the node is in the RECONFIGURING state, wait until current operations have finished.
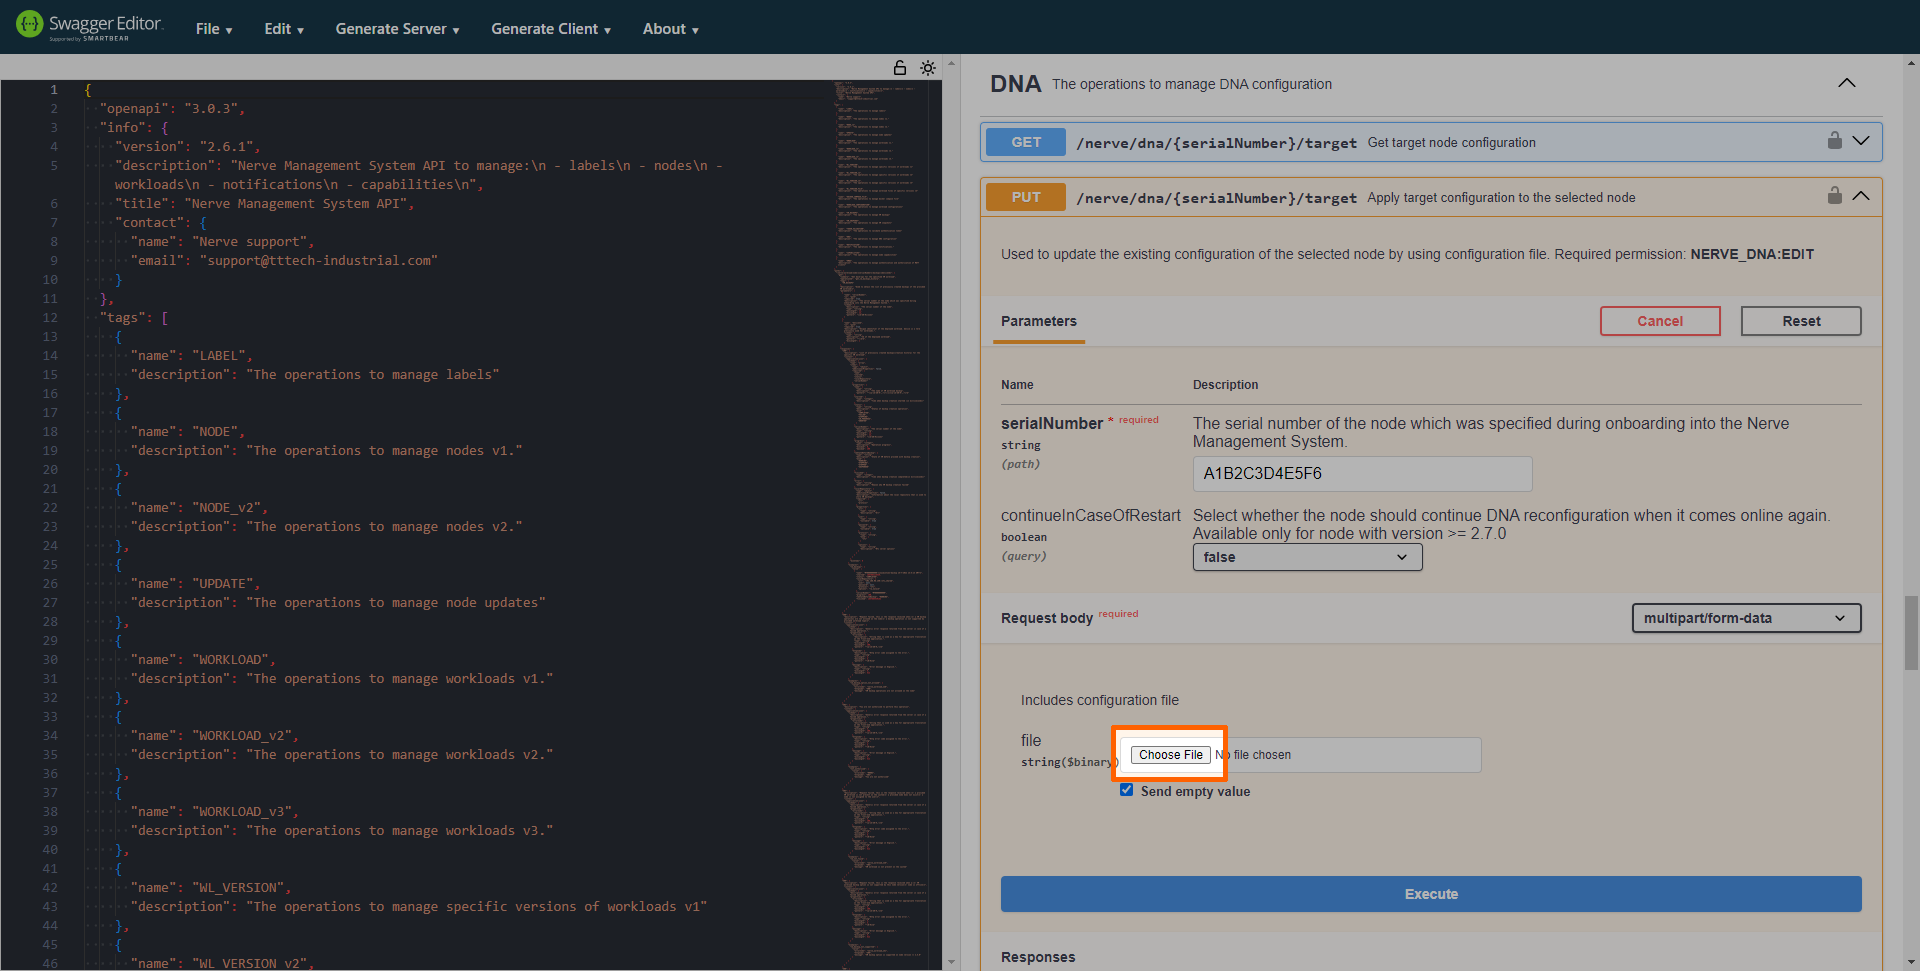
Applying a target configuration
A target configuration can only be applied in a stable state, i.e. in the APPLIED, MODIFIED or UNDEFINED states.
- Expand PUT /nerve/dna/{serialNumber}/target under DNA.
- Select Try it out.
-
Enter the serial number of the node into the serialNumber text field.
Optional:
Select true for the continueInCaseOfRestart parameter to have the node continue the DNA configuration if interrupted by an unexpected event like power loss.
Select true for the removeDockerImages parameter to remove images when Docker and Docker Compose workloads are undeployed. By default, this parameter is set to true, meaning the images will be removed during reconfiguration. If you set removeDockerImages to false, the images will be preserved on the node during undeployment. This allows you to keep images for future deployments if needed. When you apply the new target configuration to the Nerve node, you can control how workload images are handled.Note
The serial number of the node needs to be in all capital letters.
-
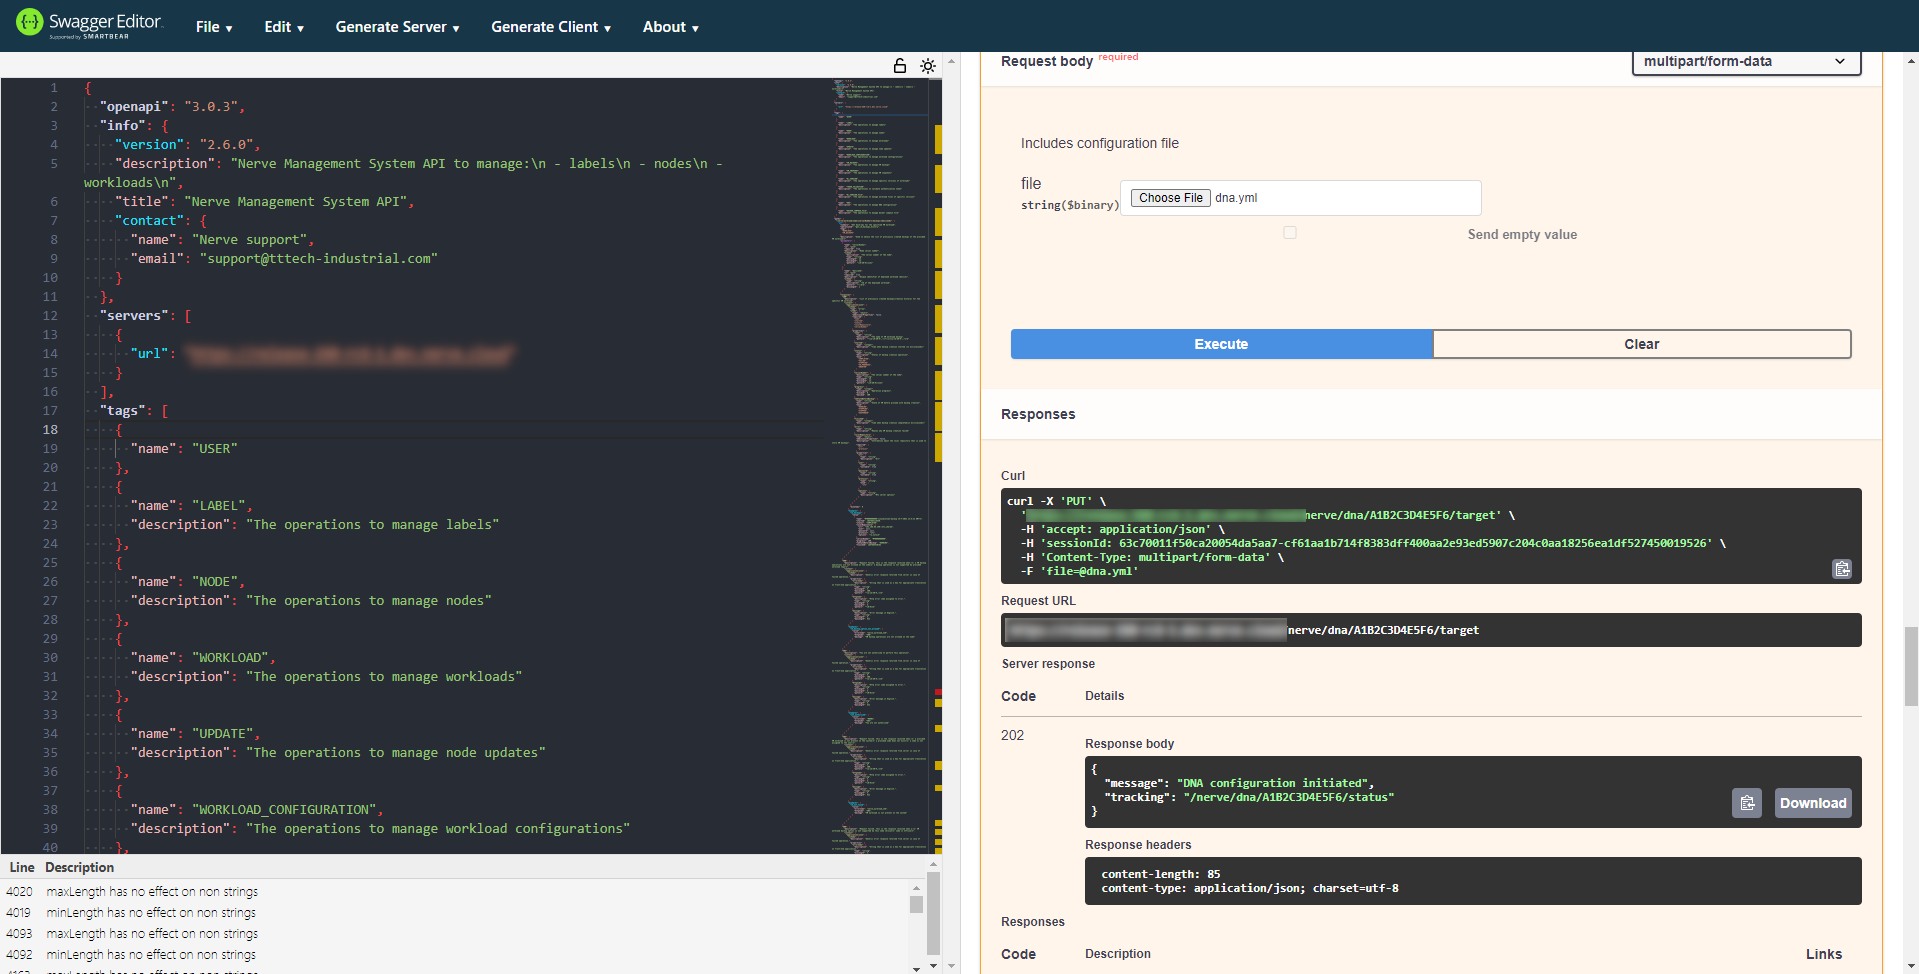
Select Choose file under Includes configuration file.
-
Add the target configuration YAML file that was written before.
-
Select Execute.
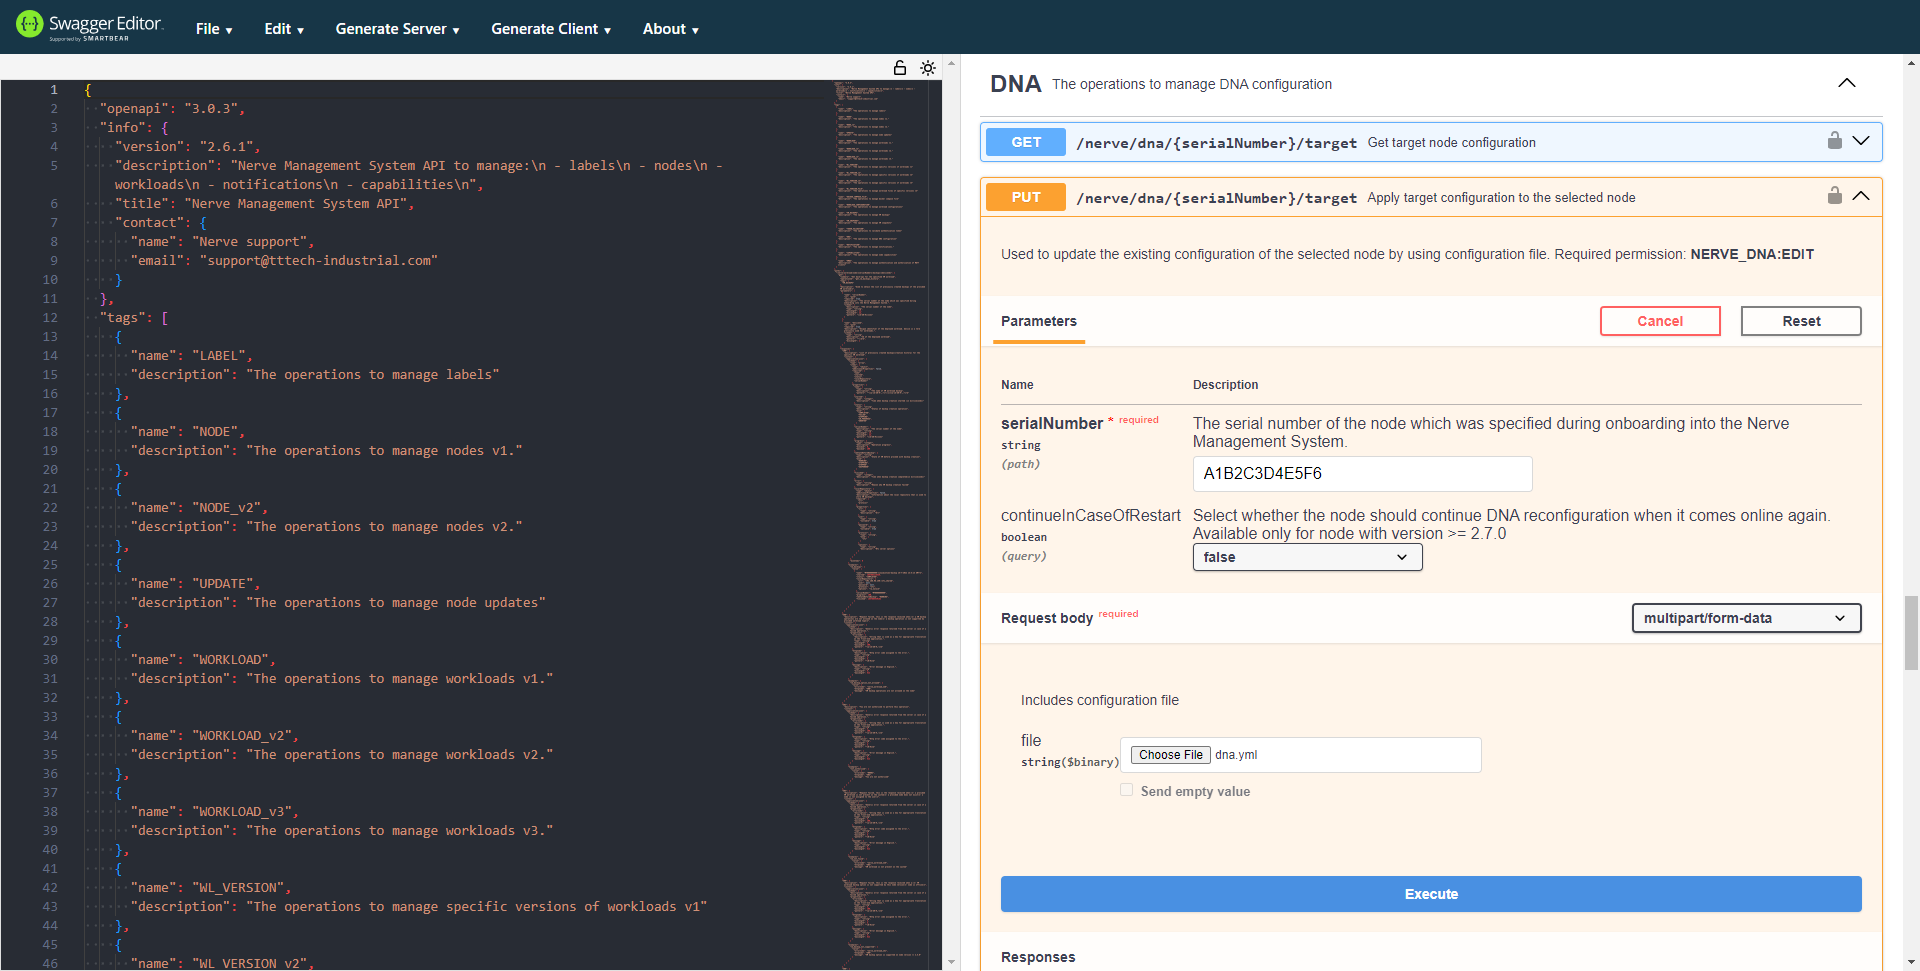
If everything went well, the server should give DNA configuration initiated as a response.
Now it is recommended to check the status right after applying to see if the configuration is proceeding as intended. Repeat the steps from Checking the status of the node to check the status of the node. The node should be in the RECONFIGURING state.
If an error occurs, for example if a workload cannot be deployed, the node will be in the UNEDFINED state. Once the deployment of the workloads has finished, the node will be in the APPLIED state.
Fetching configuration files
Next, the current configuration file can be fetched and checked as further step of investigation and confirmation. If everything completed successfully, the node will have returned to the APPLIED state and the current configuration can be compared to the configuration file that was deployed earlier.
If the node ended up in an UNDEFINED state, the current configuration can be fetched to help in finding the cause of error.
Note
The current configuration file is always fetched inside of a ZIP file. It will also contain ENV files if they have been added for Docker Compose workloads through the DNA process before.
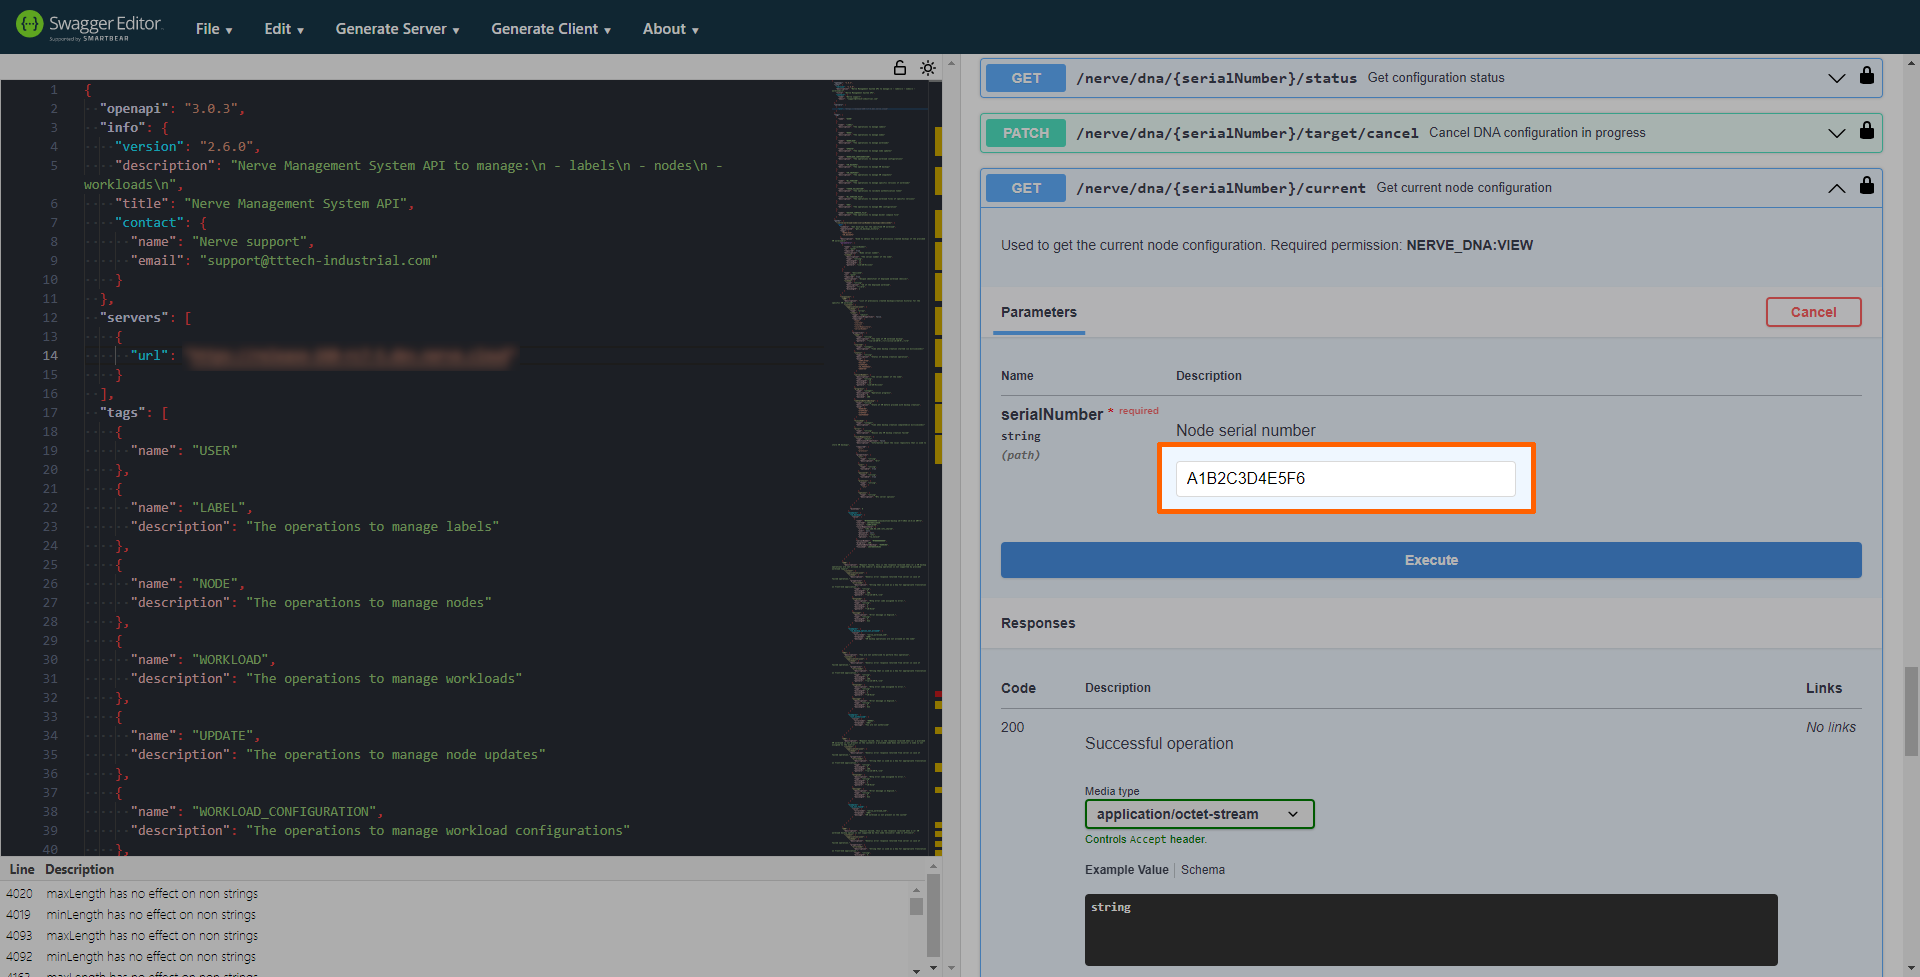
- Expand GET /nerve/dna/{serialNumber}/current under DNA.
- Select Try it out.
-
Enter the serial number of the node into the serialNumber text field.
Note
The serial number of the node needs to be in all capital letters.
-
Select Execute.
-
Select Download file in the server response.
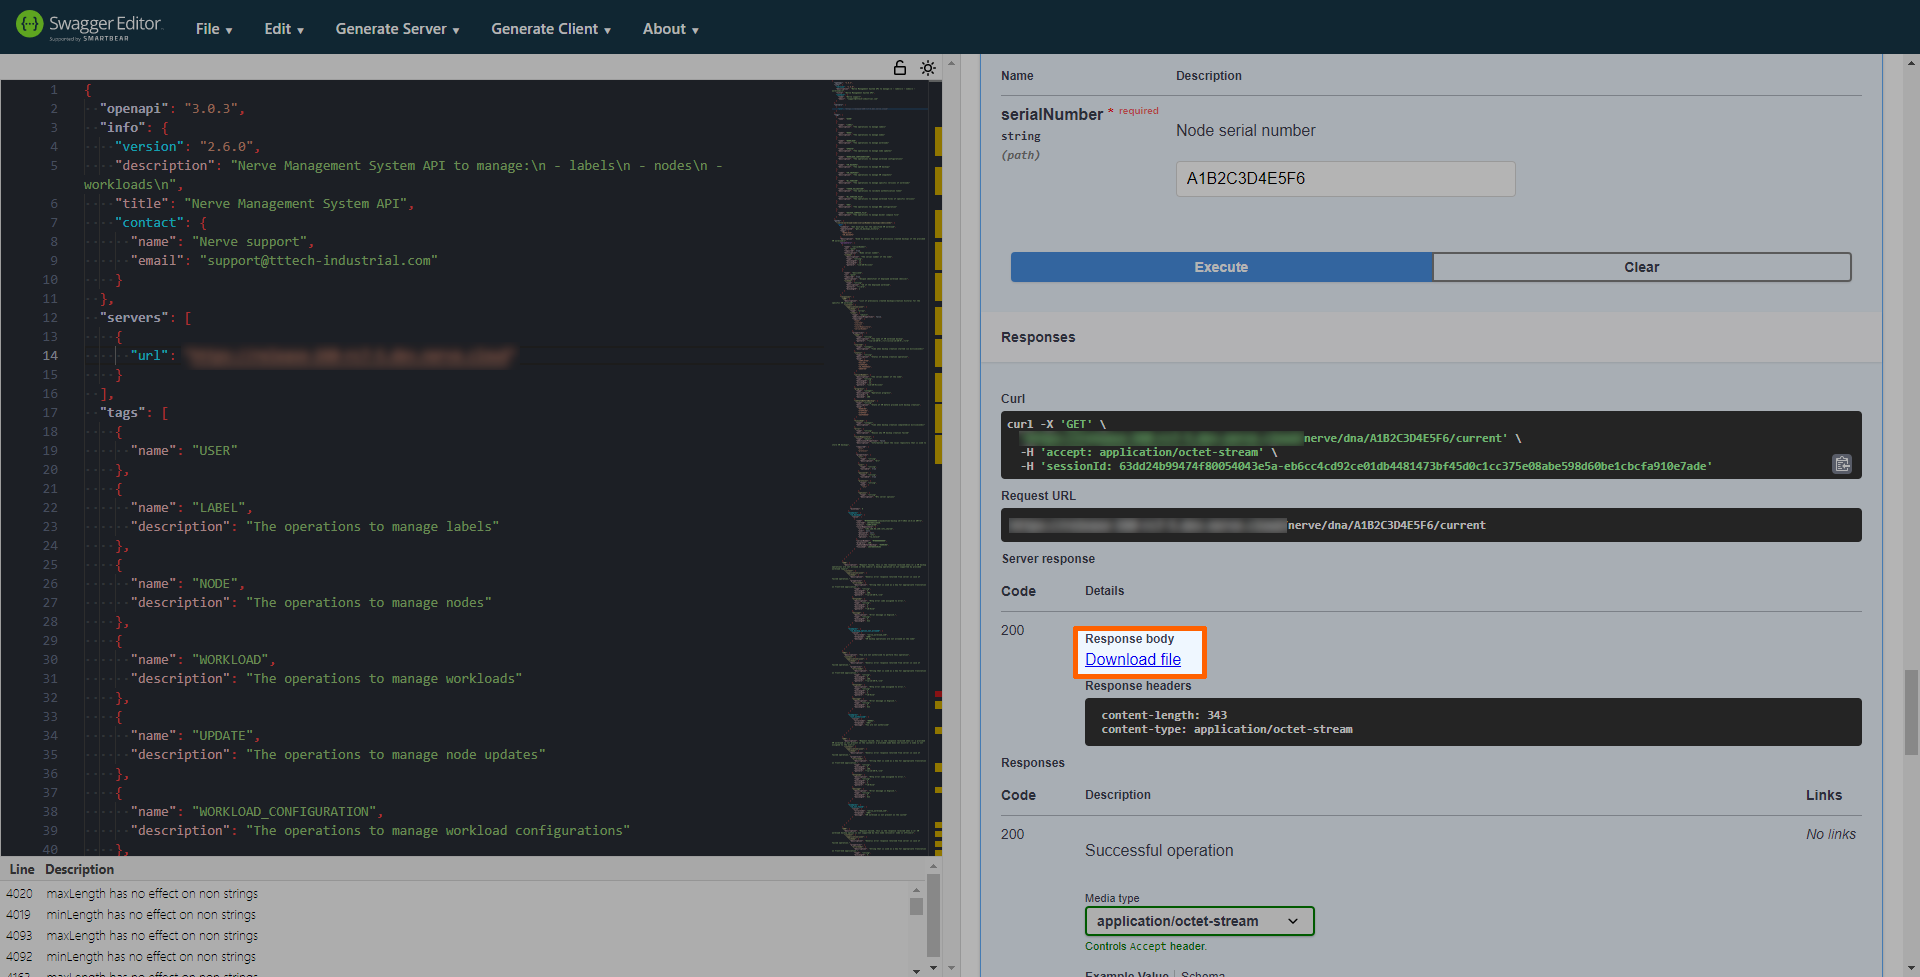
A binary file without a file extension will be downloaded.
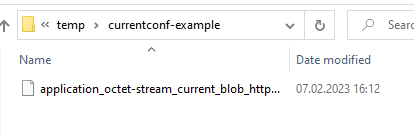
Note
While the file is technically a ZIP file, it does not have the ZIP extension due to restrictions with the OpenAPI standard.
-
Rename the downloaded file to
current.zip.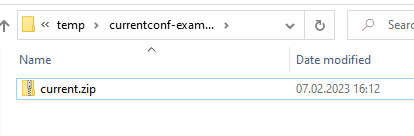
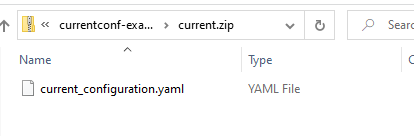
-
Extract the file to get the current_configuration.yaml file.
Nerve workload DNA UI in the Management System
DNA can be operated through the UI in the Management System. Select the DNA tab in the node details view in the node tree.
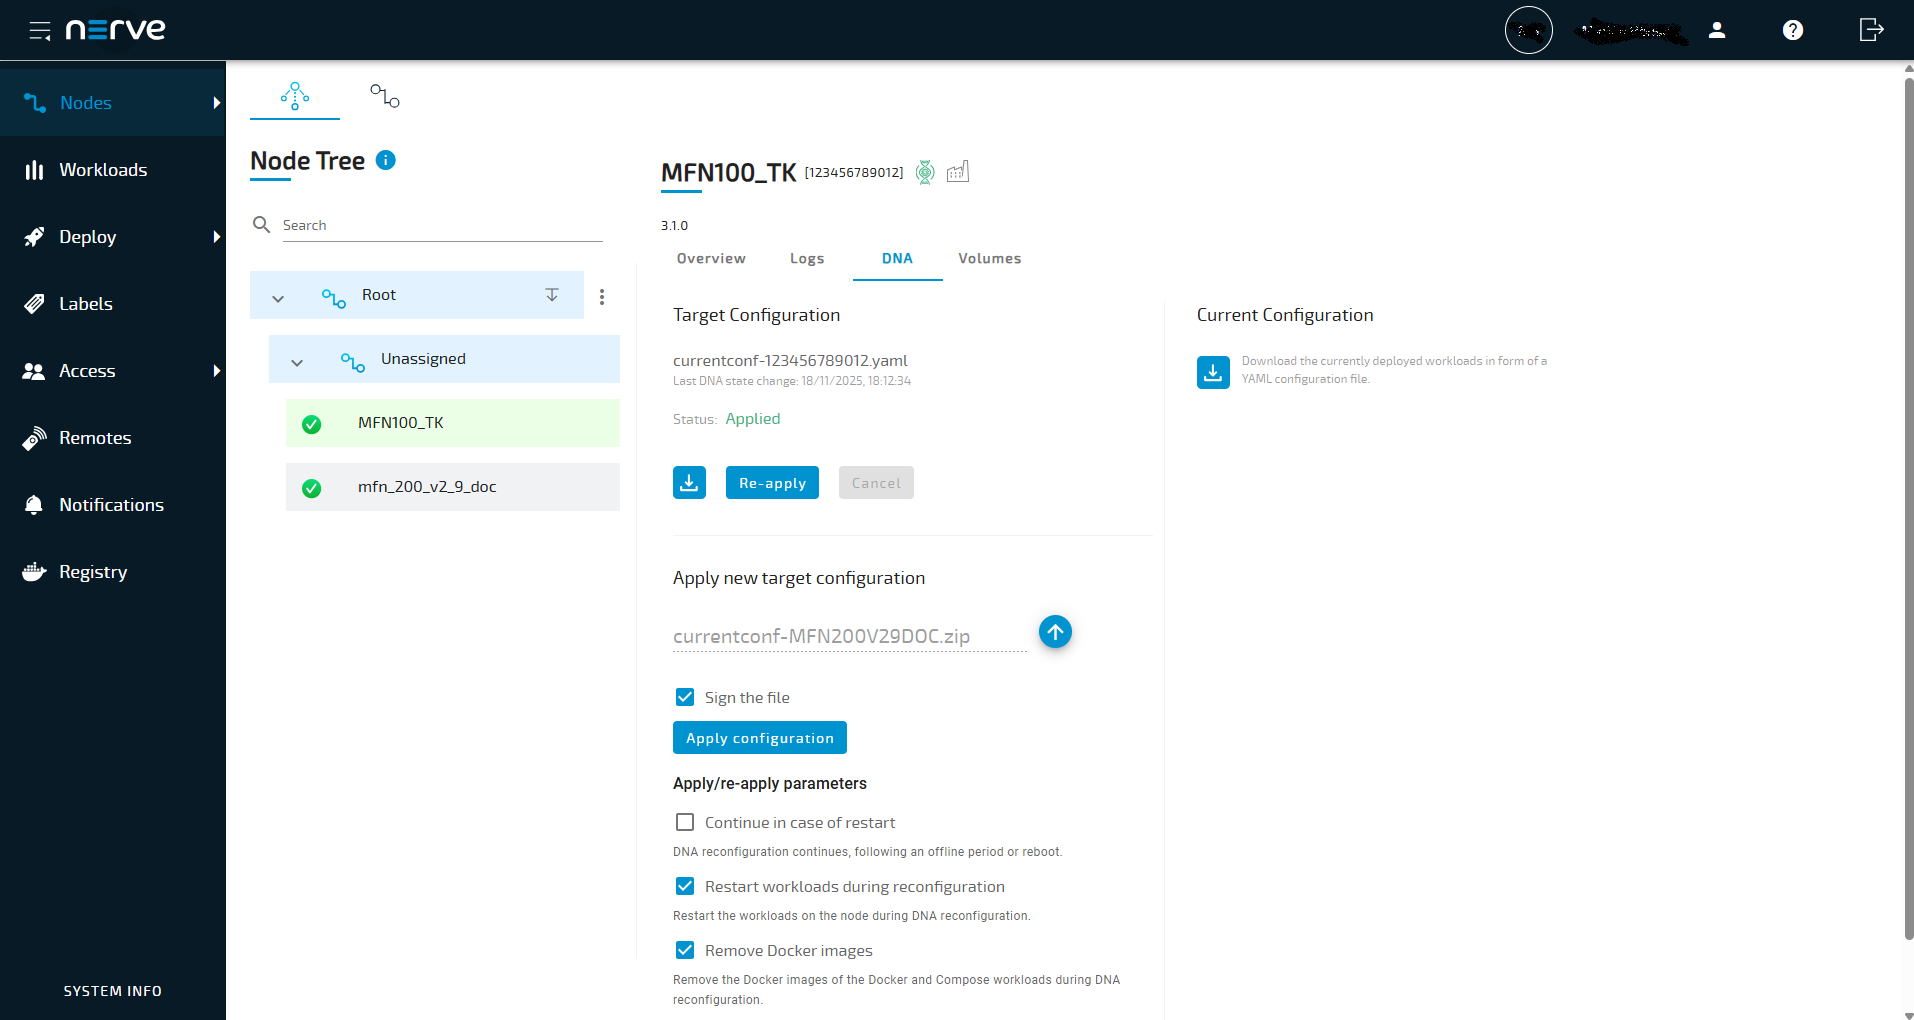
The DNA UI is split into the following categories:
| Category | Functions and descriptions |
|---|---|
| Target configuration | Target configuration file filename This is the file name of the target configuration file that was last uploaded by a user. In the screenshot above, this is dna-documentation.yaml. For a newly registered node, the name of the default empty configuration file is shown here: target_conf.yml.Last DNA state change This is the time stamp for the last time the node transitioned from one DNA state to its current state in the format DD/MM/YYYY, hh:mm::ss.Status This displays the current DNA state of the node. Possible states are
Download button Select this button to download a ZIP file with the file name targetconf-<nodeserialnumber>.zip, containing the last target configuration file that was uploaded by a user. For newly registered nodes, the DNA configuration file reflects the initial state of the node and only contains the schema version.Re-apply button Select this button to re-apply the last uploaded target configuration file. Note that this will undo any changes made in the UI if the node is in the Modified state. Cancel button Selecting this button cancels a reconfiguration in progress. Also, this button is only active when a reconfiguration is in progress. |
| Current configuration | Select the download button here to download a ZIP file with the file name currentconf-<nodeserialnumber>.zip, containing the YAML file representing the current state of the node. Any changes made to the node through the UI will be reflected in this YAML file. |
| Apply new target configuration | Upload a new target configuration here. Select the upward arrow to open a file browser and add a YAML file. However, if other files, i.e. an ENV file, are uploaded as well, then the files need to be compressed into a ZIP file. Select the Sign the file checkbox if you want the configuration to be signed by the Management System and the Node shall check the authenticity at deployment. Select Apply configuration to start the reconfiguration process. |
| Apply/re-apply parameters | Select Continue in case of restart if you want the reconfiguration to continue after a failure due to an unexpected incident, such as a power loss. When the node recovers and communication with the Management System is re-established, the DNA configuration will resume from where it stopped. Select Restart workloads during reconfiguration if you want to restart the workload that have been present on the node before configuration and were not removed during reconfiguration. Per default Docker and Docker Compose images stay on the node after applying or re-applying new target configurations. Select Remove Docker images if you want to remove docker images from the node after the corresponding Docker or Docker Compose workloads were undeployed. This way you can ensure the images are pulled from the Management System again. |
Nerve node DNA
The majority of Node DNA's functions correspond to those of Workload DNA. Detailed instructions on how to use Node DNA are provided in the following section.
To operate the node DNA interface there is no UI in in the Management System available. You have to use the Nerve API (refer to Nerve API documentation).
Configuration file syntax for node DNA
Download the schema file here in order to validate the YAML file with a schema validator of choice.
Note
If you need to modify the configuration file for node DNA, please note that the entire YAML file must always be uploaded—even if you're only changing a single parameter.
The following YAML code block illustrates how the configuration file is structured:
    schema_version: 2
    Sessions:
        sessionTimeout: 1h
        maxSessionsPerUser: 2
        maxSSHConnections: 3
    Notification:
        notificationText: ''
    BruteForce:
        maxFailedLoginAttemptsBeforeLockout: 10
        loginAttemptWindowMinutes: 10
        lockoutDurationMinutes: 5
    CredentialPolicy:
        expirationDays: 3650
    Timezone: Europe/Berlin
    Network:
    - Name: wan
        IP-Assignment: dhcp
        IP-Address: 10.248.100.120
        Mask: 255.255.255.0
        Disabled-Traffic: true
        DNS-1: 10.225.97.61
        DNS-2: 10.225.97.62
    - Name: extern1
        IP-Assignment: static
        IP-Address: 1.1.1.1
        Mask: 255.0.0.0
    - Name: extern2
        IP-Assignment: unconfigured
        IP-Address: 0.0.0.0
        Mask: 0.0.0.0
    - Name: extern3
        IP-Assignment: static
        IP-Address: 2.2.2.2
        Mask: 255.255.0.0
    Proxy:
        HTTP-Proxy: ''
        HTTPS-Proxy: ''
        Username: ''
        Exceptions: ''
        Enable: false
The following table provides an overview of the sections and their meanings:
| Section of the YAML file | Parameter and description |
|---|---|
schema_version: |
The version of the schema. |
Sessions: |
|
Notification: |
notificationText: This parameter lets you define a legal notice (as a string, e.g., 'Hello World!') that users see before logging in. |
BruteForce: |
|
CredentialPolicy: |
expirationDays: This parameter defines how many days the node can remain offline while retaining buffered credentials.After the specified number of days (e.g., 3650 days, which equals 10 years), the credentials expire and revert to the default admin account. Each time a user logs in to the node via the Local UI when the node is online, the countdown resets and starts again from the configured number of days. Note that the value must be entered in days. The default value is 3650 and can be set between 1 and 7300. |
Timezone: |
This parameter is configurable via the Local UI. For more information, refer to the user guide of the Local UI chapter Node configuration. |
Network: |
This parameter is configurable via the Local UI. The number of networks that can be configured depends on the number of ports available on the device. For more information, refer to the user guide of the Local UI chapter Local network configuration. |
Proxy: |
This parameter is configurable via the Local UI. For more information, refer to the user guide of the Local UI chapter Proxy settings. |