Workloads
In order to work with CODESYS applications, virtual machines or Docker containers on nodes, workloads need to be provisioned in the Management System. Here, provisioning is the creation of a workload and its storage in the workload repository of the Management System so that it can be deployed to nodes. This requires configuration of the workload and files that need to be uploaded to the Management System. After that, the workload can be deployed to nodes.
The following types of workloads can be provisioned:
The process of provisioning each workload is described in their respective chapters.
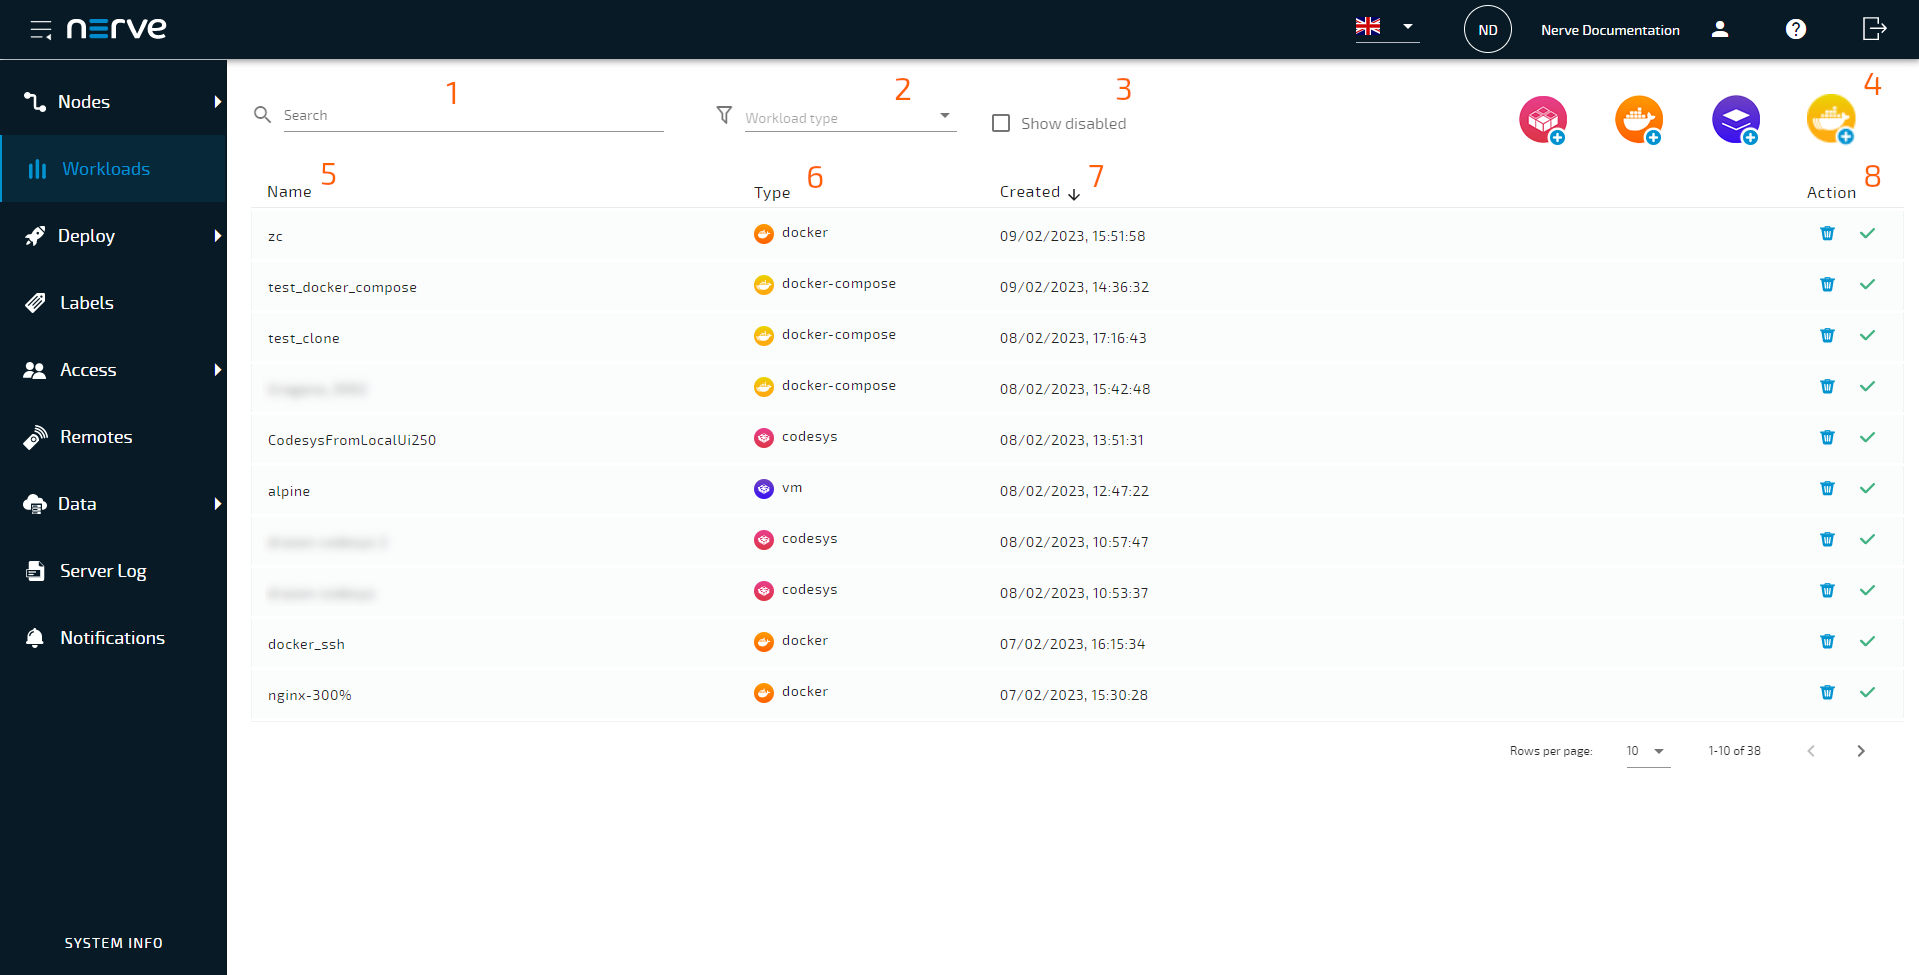
Select Workloads in the navigation on the left to find a list of all workloads that have been provisioned.
| Item | Description |
|---|---|
| Search bar (1) | Use the search bar to filter workloads in the list by name. Select the cross symbol next to the search bar to reset the search field. |
| Workload type (2) | This is a drop-down menu that allows filtering the list below by workload type. The available options are CODESYS, Docker, VM, Compose and All. |
| Show disabled (3) | Disabled workloads are not shown in the list of workloads. Ticking this checkbox shows them again. However, note that this does not enable the workloads again. |
| Workload icons (4) | Select the corresponding workload icon to provision a new workload of that type. |
| Name (5) | This is the name of the workload that has been defined in the provisioning process. The list can be sorted in alphabetical and reverse alphabetical order by selecting Name. |
| Type (6) | The type of workload is displayed here: codesys, vm, docker or docker-compose. |
| Created (7) | This is the date when the workload was provisioned in the format DD/MM/YYYY, hh:mm:ss. The list can be sorted by creation date when selecting Created. |
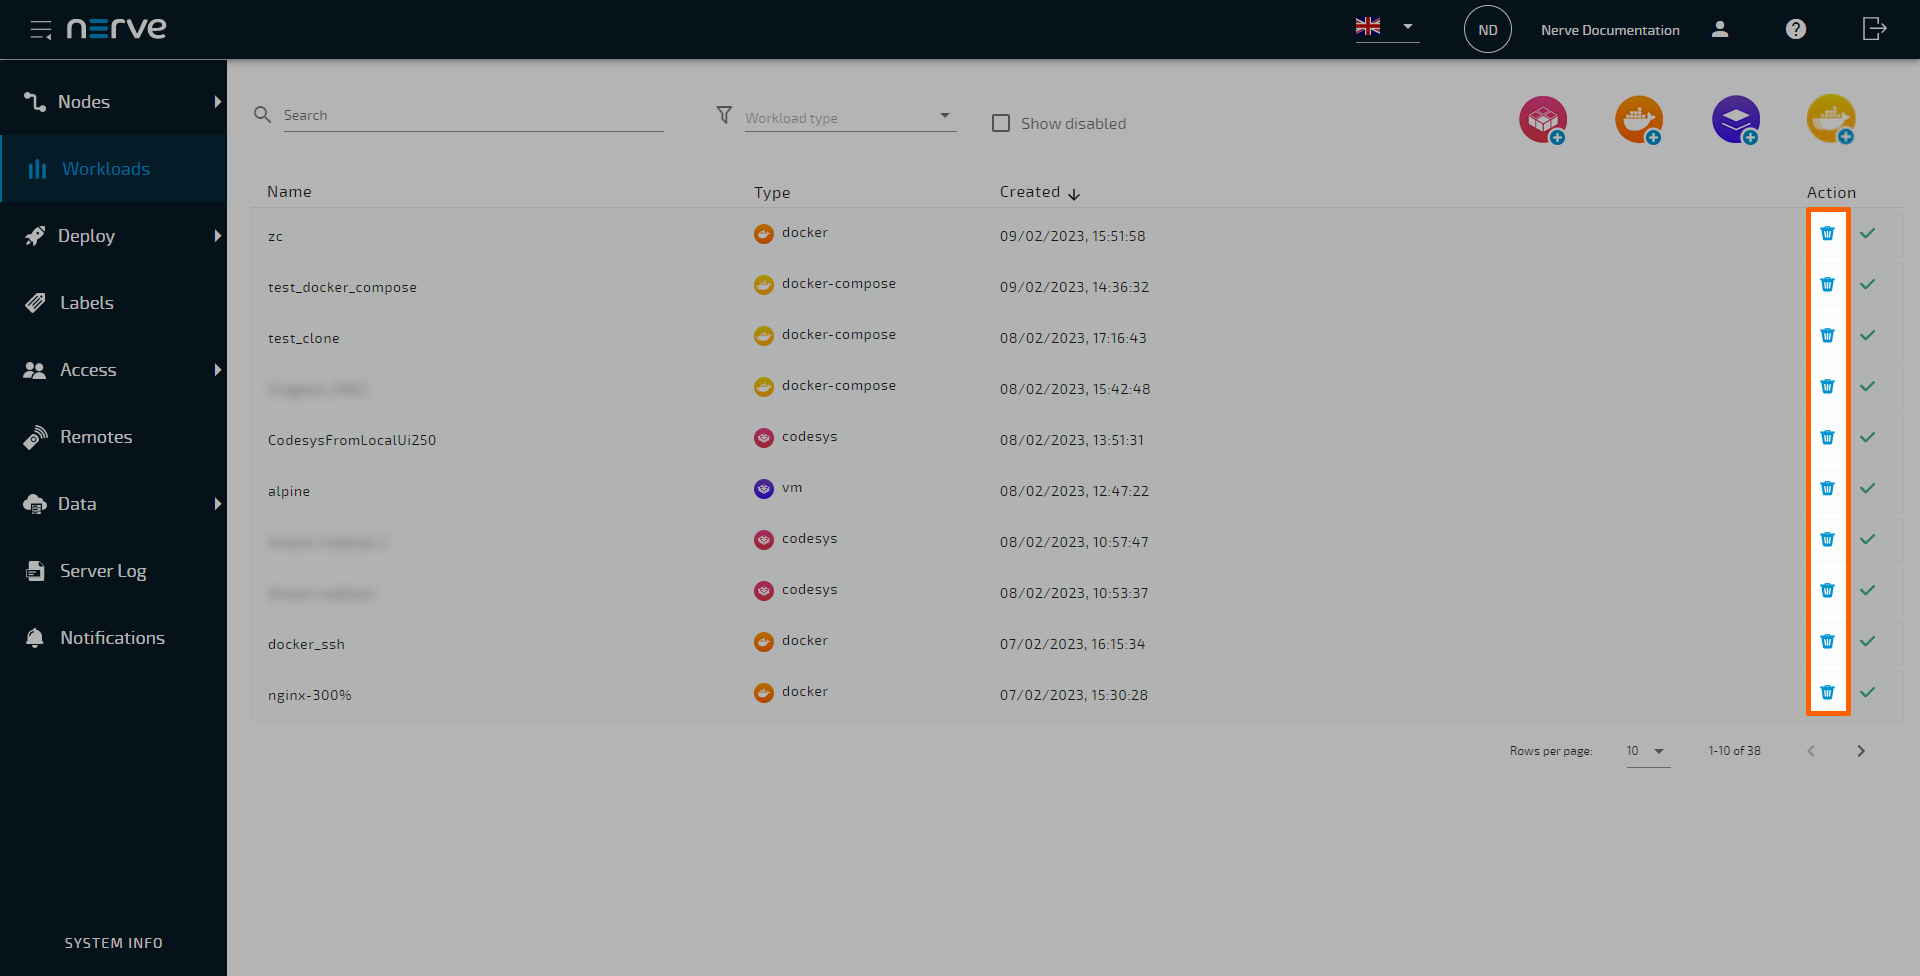
| Action (8) | This column contains icons representing actions:
|
Provisioning a workload
Provisioning a workload is the creation of a workload in the workload repository of the Management System. Workloads that have been provisioned are ready to be deployed to nodes.
Select the plus symbol in the upper-right corner of the workloads list to start provisioning a workload. The provisioning process of each workload type is covered separately in the following chapters.
- Provisioning a CODESYS workload
- Provisioning a Virtual Machine workload
- Provisioning a Docker workload
- Provisioning a Docker Compose workload
After provisioning a workload, it will appear in the list of workloads.

Adding a new workload version
Add new versions to a provisioned workload to accommodate different use cases.
- Select Workloads from the menu on the left side.
-
Select the workload to which a new version will be added.
-
Select the plus symbol in the upper-right.

Note
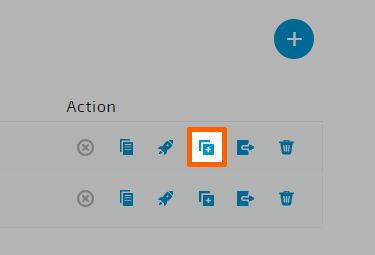
To add a new version that is a slight modification of an existing one, select the Clone icon from the Action column.
-
Configure the new workload version. Refer to the provisioning chapters of each workload type linked above for more information on configuration settings.
Note
The fields of the new version will already have information filled in. The system enters the settings of the latest version automatically. If Clone was used, the information filled in will be from that version instead.
-
Select Update to save the new version of the workload.
Editing a workload
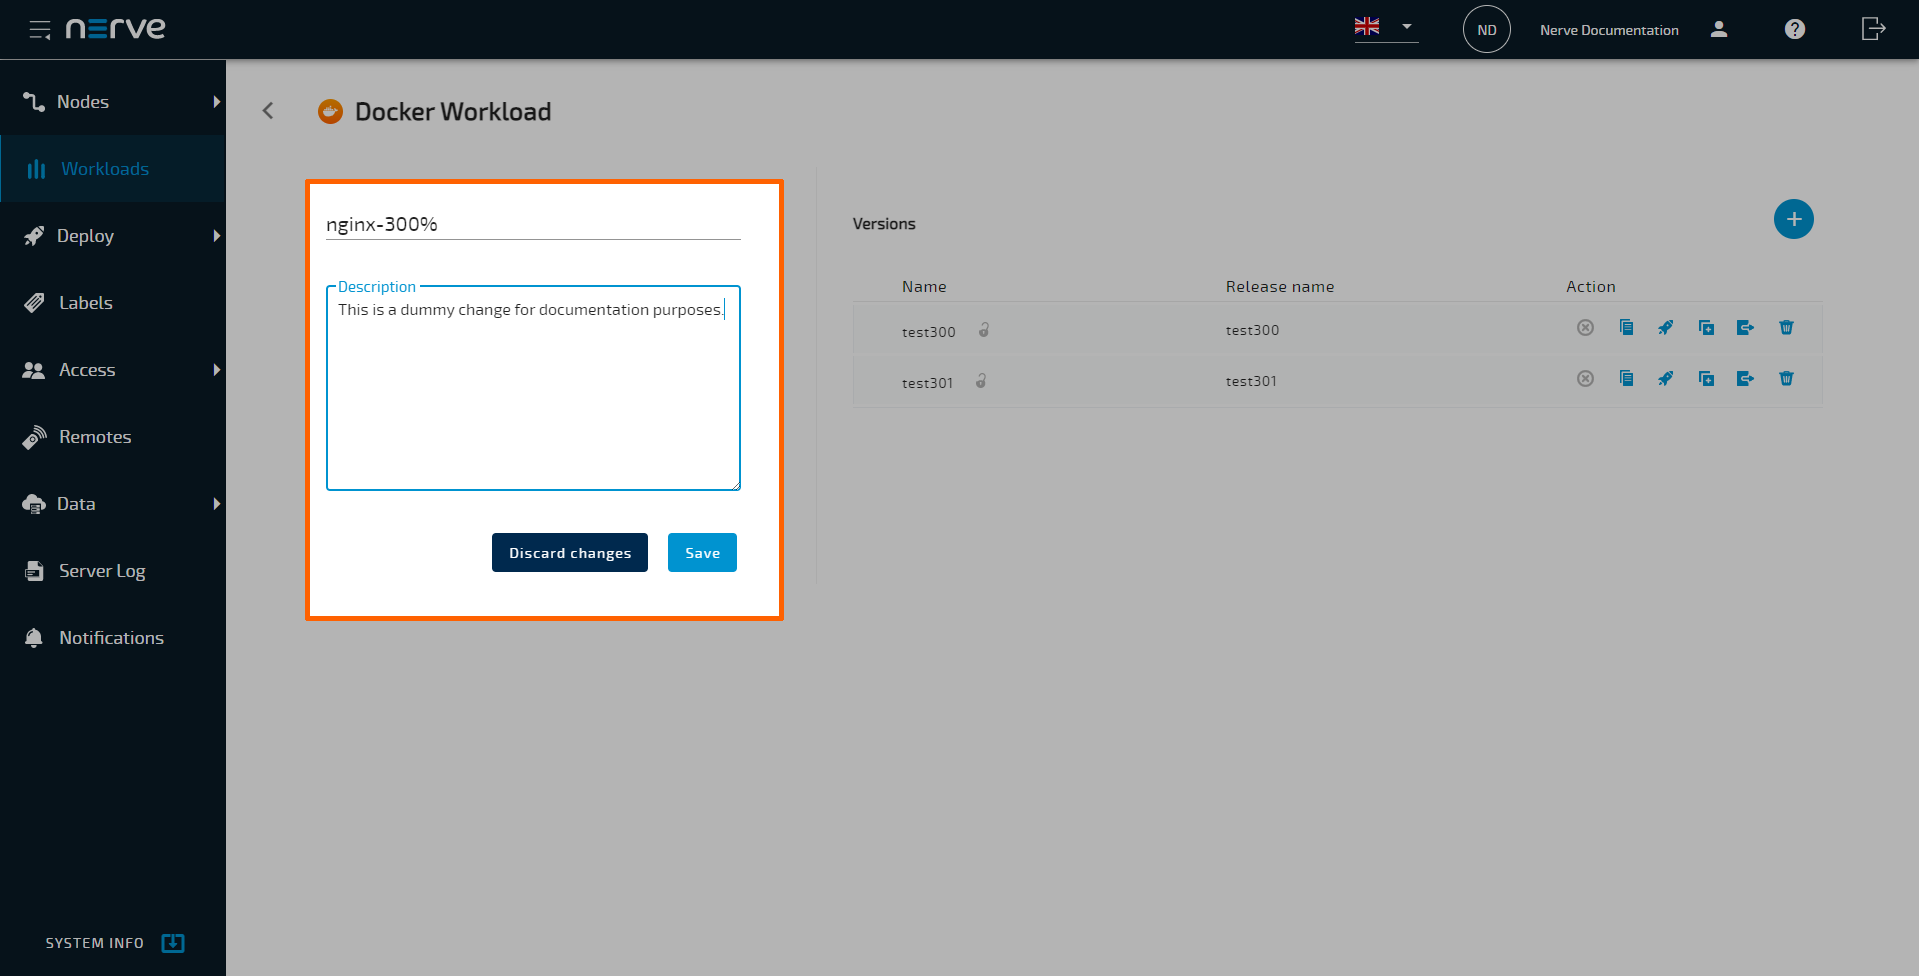
General information of a workload and configuration settings of each version can be edited starting from the workload list. General information of a workload is valid for all workload versions.
- Select Workloads from the menu on the left side.
-
Select the workload to edit.
-
Select the workload version to edit from the list on the right.

Note
Editing the Name and Description of the workload can be done on the left side before selecting a version. Perform the desired changes and select Save.
-
Perform changes to the workload version. The settings of a workload depend on the workload type. See the version settings for each workload in the provisioning chapters:
-
Select Save to save the changes.
Note that changes to a workload do not apply to workloads deployed on nodes. The workload needs to be updated or deployed again. However, this does not apply to remote connections. Once a remote connection is configured, it is available immediately for the workload on all nodes that it was deployed to.
Disabling a workload
A workload can be disabled to make it hidden and not selectable. This will hide the workload in the workload list and deployment process but it will not be deleted from the Management System. This also means that the workload cannot be deployed. Workloads that have been deployed to nodes before are not affected.
- Select Workloads from the menu on the left side.
-
Choose the workload to disable.
-
Select the green check mark icon from the Action column.

-
Select Yes in the pop-up.
The workload is now disabled and hidden in the list. To show disabled workloads again, tick the checkbox next to Show disabled at the top. All disabled workloads are faintly grayed out.

Follow the steps above to enable the workload again.
Deleting a workload
The instructions below cover the deletion of a workload from the repository in the Management System. Note that deleting a workload from the Management System will not automatically remove the workload from nodes. To remove a workload from a node, undeploy the workload in the node tree.
- Select Workloads from the menu on the left side.
-
Choose the workload to delete.
-
Select the garbage can icon from the Action column.
-
Select Yes in the pop-up to confirm the deletion.
Note
Deleting a workload will automatically delete all versions of the workload as well. To delete a workload version, refer to Deleting a workload version below.
Deleting a workload version
Workload versions can be deleted separately in the workload details. Note that deleting a workload version is not possible if only one version of the workload exists. Delete the entire workload instead.
- Select Workloads from the menu on the left side.
-
Select the workload of which a version will be deleted.
-
Choose the workload version to delete.
-
Select the garbage can icon from the Action column.
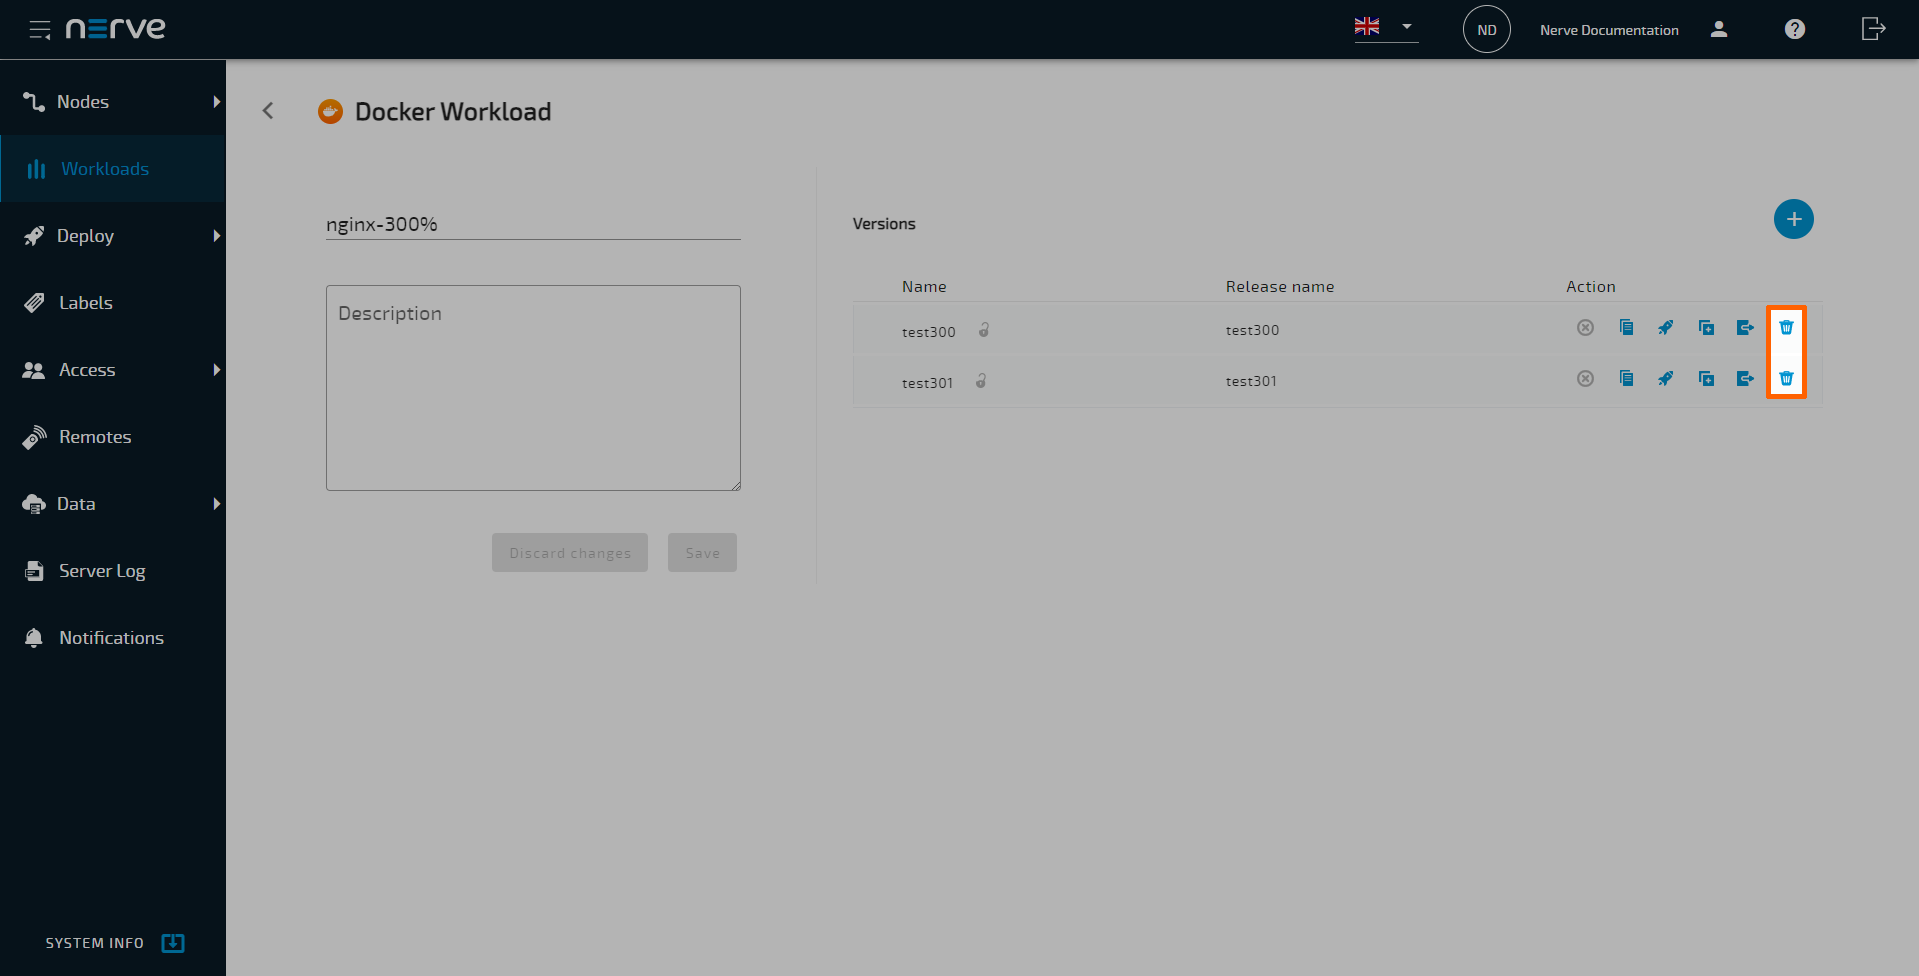
-
Select Yes in the pop-up to confirm the deletion.
Exporting a workload
Workloads can be manually deployed to nodes. To do that, a workload version must be exported. Refer to Local Workload Deployment for more information on local workload deployment.
Note
Migrating workloads from one Management System to another should only be done in a supervised environment, as it deviates from standard operation.
- Select Workloads from the menu on the left side.
-
Select the workload of which a version will be exported.
-
Choose the workload version to export.
-
Select the Export icon
 from the Action column.
Depending on the Storage preference you chose during Provisioning a Docker workload or Docker Compose workload during the export is performed differently.
Export a workload from the Management System Registry
Depending on the export status, the Export icon changes its color. The following table shows the meaning of each color during export.
| Icon | Description |
|---|---|
| The export is in progress. | |
| The export is completed. Click on the green icon to initiate the download of the exported workload. Hover over the green icon, to displays a tooltip. Which contains the date and time of the latest successful export and the option to Re-pack for latest data. Click on "Re-pack for latest data" to delete the previously exported archive and start a new export process. |
|
| During the export process, an error appeared. Hover over the red icon to get the error message. You can attempt to re-initiate the export or investigate the cause of the error. |
Export a workload from the Legacy storage
The download of the exported workload version is started automatically. The workload version is compressed into a TAR file.
Note
- Be careful if a workload export produces a TAR.GZ file. Using a TAR.GZ file for local workload deployment will break the deployment process. Transform the TAR.GZ file into a TAR file before locally importing a workload.
- If the workload export fails with a 403 error code, delete the cookies from the web browser and try again.
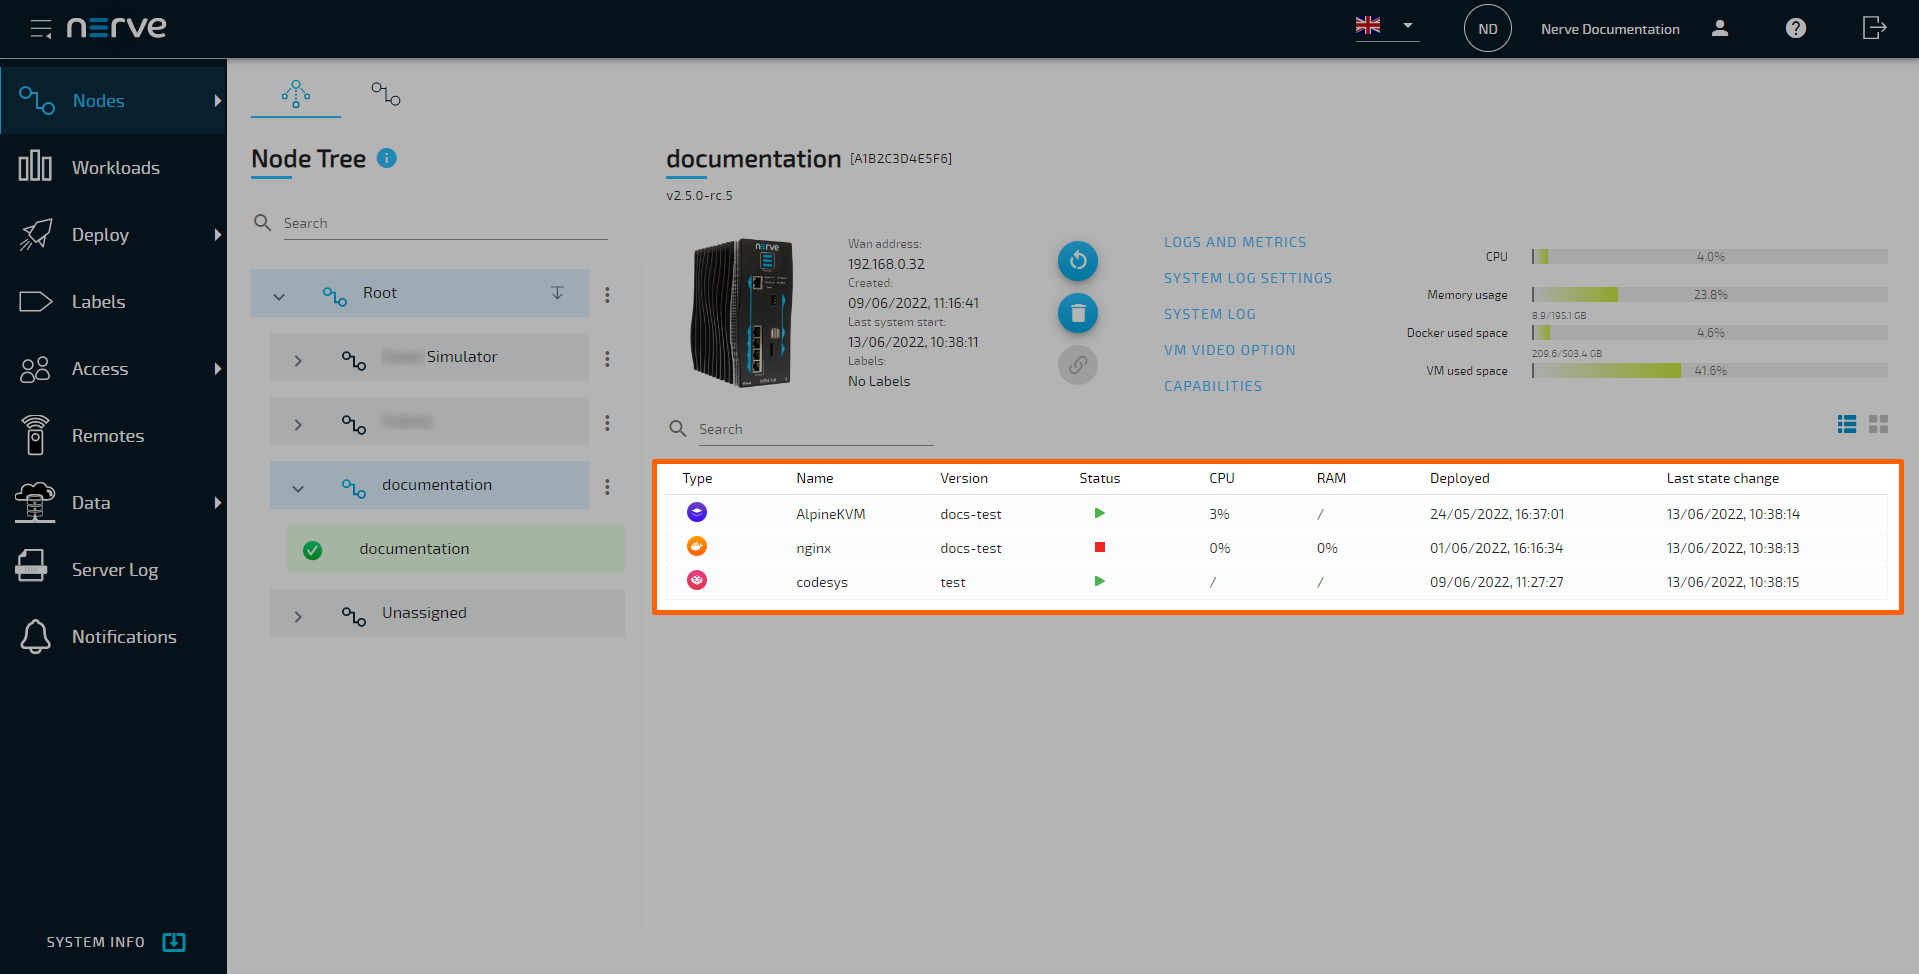
Controlling a workload
Workloads can be controlled from the node details view in the node tree. Refer to the workload control chapter for more information.
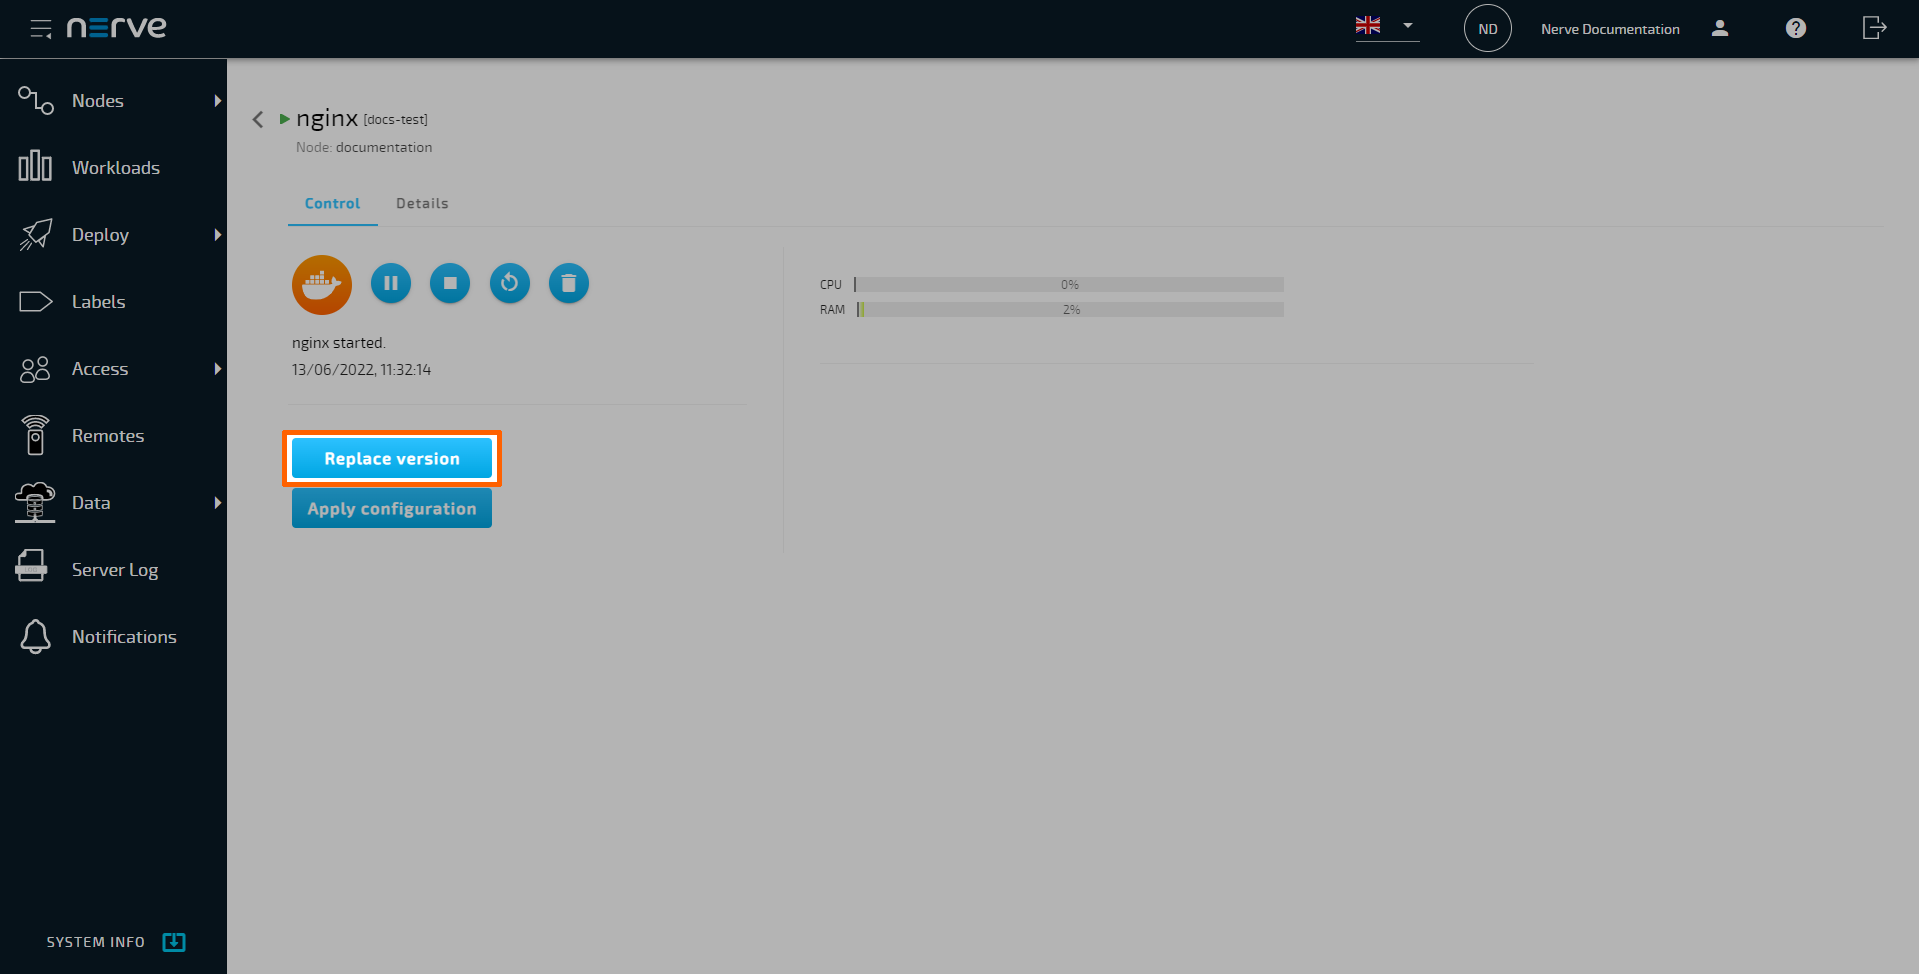
Replacing the version of a deployed workload
Versions of deployed CODESYS, Docker and Docker Compose workloads can be replaced by other versions through the workload control screen. Replacing the workload version is a quick way to deploy a new version of the same workload. Also, note that a Docker volume used for configuration storage will be removed if the new workload version does not have a volume defined and the version is replaced.
Note
Note that this functionality is also available in the Local UI. However, note that the workload version needs to be exported first. Refer to Replacing the version of a deployed workload in the Local UI for more information.
- Select Nodes in the navigation on the left.
- Select a node in the node tree that has multiple versions.
-
Select the workload in the node details view.
-
Select Replace version.
-
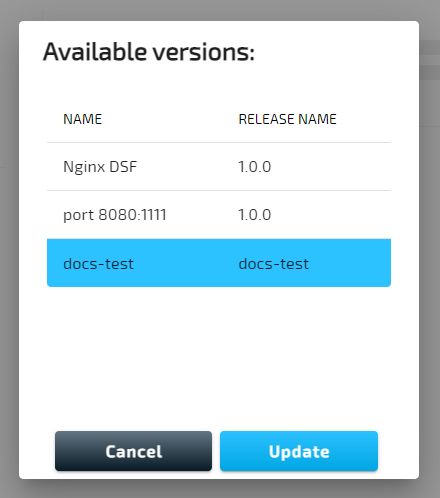
Select a version from the list of available versions.
Note
If you are replacing Docker Compose workloads, note the following:
The Docker Compose version is replaced on the node without removing the workload's images from the node. This allows the new version to reuse images if they already exist on the node, making it easy to update configuration parameters without removing or downloading the images again.
If you want, you can run docker-compose down before starting the new version. You can do this by ticking the checkbox next to Re-deploy workload version by executing docker-compose down to ensure clean start in a dialog.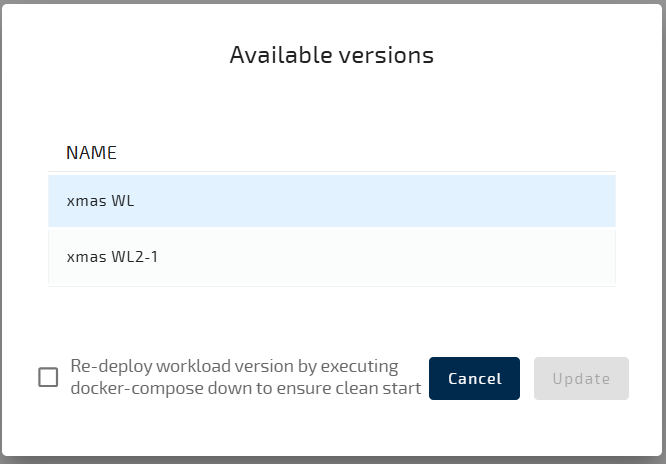
-
Select Update.
This starts the replacement of the workload version. The Management System will continue to the log next. The deployment of new version is at the top of the list. A timestamp is the name that identifies the deployment in the log.
